Quantcast
Channel: Cloudinary Blog
Viewing all 601 articles
Browse latest View live

Cloudinary’s most popular image processing add-ons

$
0
0

Error reports

Perhaps some of you readers that have been around for a while remember our add-ons launch 2 years back, when we introduced a number of third party image processing products, fully integrated into the Cloudinary image management pipeline. Since then our add-ons marketplace grew, also in our offerings, and also in usage. We now have 11 add-ons offering various capabilities and improvements.

I decided to take a peek and see which of our add-ons are most frequently used and popular amongst our customers.

Advanced Facial Attribute Detection

Firstly, we have our Advanced Facial Attribute Detection add-on. The ‘Face API' of Microsoft's Cognitive Services allows you to accurately and automatically detect eyes, nose and other facial attributes in your photos. An in depth blog post describing this powerful add-on is coming up in the next couple of weeks, so stay tuned :)

For example:

Ruby:
cl_image_tag("cloudinary_team.jpg", :transformation=>[
  {:overlay=>"santa_hat", :effect=>"trim"},
  {:gravity=>"north_east", :width=>1.0, :height=>2.3, :crop=>"lpad"},
  {:gravity=>"adv_eyes", :flags=>["region_relative", "layer_apply"], :width=>2.6},
  {:width=>500}
  ])
PHP:
cl_image_tag("cloudinary_team.jpg", array("transformation"=>array(
  array("overlay"=>"santa_hat", "effect"=>"trim"),
  array("gravity"=>"north_east", "width"=>1.0, "height"=>2.3, "crop"=>"lpad"),
  array("gravity"=>"adv_eyes", "flags"=>array("region_relative", "layer_apply"), "width"=>2.6),
  array("width"=>500)
  )))
Python:
CloudinaryImage("cloudinary_team.jpg").image(transformation=[
  {"overlay": "santa_hat", "effect": "trim"},
  {"gravity": "north_east", "width": 1.0, "height": 2.3, "crop": "lpad"},
  {"gravity": "adv_eyes", "flags": ["region_relative", "layer_apply"], "width": 2.6},
  {"width": 500}
  ])
Node.js:
cloudinary.image("cloudinary_team.jpg", {transformation: [
  {overlay: "santa_hat", effect: "trim"},
  {gravity: "north_east", width: 1.0, height: 2.3, crop: "lpad"},
  {gravity: "adv_eyes", flags: ["region_relative", "layer_apply"], width: 2.6},
  {width: 500}
  ]})
Java:
cloudinary.url().transformation(new Transformation()
  .overlay("santa_hat").effect("trim").chain()
  .gravity("north_east").width(1.0).height(2.3).crop("lpad").chain()
  .gravity("adv_eyes").flags("region_relative", "layer_apply").width(2.6).chain()
  .width(500)).imageTag("cloudinary_team.jpg")
jQuery:
$.cloudinary.image("cloudinary_team.jpg", {transformation: [
  {overlay: "santa_hat", effect: "trim"},
  {gravity: "north_east", width: 1.0, height: 2.3, crop: "lpad"},
  {gravity: "adv_eyes", flags: ["region_relative", "layer_apply"], width: 2.6},
  {width: 500}
  ]})
.Net:
cloudinary.Api.UrlImgUp.Transform(new Transformation()
  .Overlay("santa_hat").Effect("trim").Chain()
  .Gravity("north_east").Width(1.0).Height(2.3).Crop("lpad").Chain()
  .Gravity("adv_eyes").Flags("region_relative", "layer_apply").Width(2.6).Chain()
  .Width(500)).BuildImageTag("cloudinary_team.jpg")
Image with hat overlay automatically placed above all faces detected

JPEGmini

Our second most popular add-on, the JPEGmini image optimization add-on, is an add-on that helps reduce the file size of your photos by up to 5x, while keeping their original quality and JPEG format. Any Cloudinary image manipulation can be chained as well of course. When using the JPEGmini add-on, your images will be automatically optimized using advanced visual algorithms achieving maximum file size reduction while maintaining a very high visual quality. This seems like a no-brainer to me - who wouldn’t want their images automatically optimized in such a manner?? You can also read more about this add-on in this blog post.

For example:

Ruby:
cl_image_tag("tomatoes_cooking.jpg", :quality=>"jpegmini:2", :width=>500, :crop=>"scale")
PHP:
cl_image_tag("tomatoes_cooking.jpg", array("quality"=>"jpegmini:2", "width"=>500, "crop"=>"scale"))
Python:
CloudinaryImage("tomatoes_cooking.jpg").image(quality="jpegmini:2", width=500, crop="scale")
Node.js:
cloudinary.image("tomatoes_cooking.jpg", {quality: "jpegmini:2", width: 500, crop: "scale"})
Java:
cloudinary.url().transformation(new Transformation().quality("jpegmini:2").width(500).crop("scale")).imageTag("tomatoes_cooking.jpg")
jQuery:
$.cloudinary.image("tomatoes_cooking.jpg", {quality: "jpegmini:2", width: 500, crop: "scale"})
.Net:
cloudinary.Api.UrlImgUp.Transform(new Transformation().Quality("jpegmini:2").Width(500).Crop("scale")).BuildImageTag("tomatoes_cooking.jpg")
Image automatically optimized with JPEGmini add-on

Imagga crop & scale

Imagga's crop & scale smart cropping technology automatically chooses the most visually appealing parts of your images and crops them accordingly, extending Cloudinary's powerful cropping capabilities with automatic cropping that is not only based on detected faces. When using the Imagga add-on, your images will be scaled and cropped based on automatically calculated areas of interest within each specific photo. This add-on was also described in this blog post.

For example:

  • Original image: Original image
  • Imagga scaled:
    Ruby:
    cl_image_tag("/dog_field.jpg", :height=>200, :width=>400, :crop=>"imagga_scale")
    PHP:
    cl_image_tag("/dog_field.jpg", array("height"=>200, "width"=>400, "crop"=>"imagga_scale"))
    Python:
    CloudinaryImage("/dog_field.jpg").image(height=200, width=400, crop="imagga_scale")
    Node.js:
    cloudinary.image("/dog_field.jpg", {height: 200, width: 400, crop: "imagga_scale"})
    Java:
    cloudinary.url().transformation(new Transformation().height(200).width(400).crop("imagga_scale")).imageTag("/dog_field.jpg")
    jQuery:
    $.cloudinary.image("/dog_field.jpg", {height: 200, width: 400, crop: "imagga_scale"})
    .Net:
    cloudinary.Api.UrlImgUp.Transform(new Transformation().Height(200).Width(400).Crop("imagga_scale")).BuildImageTag("/dog_field.jpg")
    Image automatically scaled with Imagga add-on

Imagga auto tagging

The Imagga auto tagging add-on automatically categorizes and tags images, according to the categories detected in each image. The Imagga add-on can automatically tell you what's in a photo by returning a list of detected categories and the confidence score for each of them. User uploaded images can now be fully categorized automatically! You can read more about it in this great blog post.

Other cool add-ons

Although the add-ons described above are statistically of the highest usage amongst our customers, there are a few more that are so useful and cool, I had to highlight them as well:

VIESUS image enhancement

The VIESUS image enhancement add-on does just that, enhancing the visual quality of your photos, automatically adjusting brightness and color, restoring sharpness, removing noise and correcting for overexposure or underexposure. We speak in length about it here.

For example:

  • Original image: Original image
  • VIESUS enhanced:
    Ruby:
    cl_image_tag("beach_day.jpg", :effect=>"viesus_correct", :width=>400, :crop=>"scale")
    PHP:
    cl_image_tag("beach_day.jpg", array("effect"=>"viesus_correct", "width"=>400, "crop"=>"scale"))
    Python:
    CloudinaryImage("beach_day.jpg").image(effect="viesus_correct", width=400, crop="scale")
    Node.js:
    cloudinary.image("beach_day.jpg", {effect: "viesus_correct", width: 400, crop: "scale"})
    Java:
    cloudinary.url().transformation(new Transformation().effect("viesus_correct").width(400).crop("scale")).imageTag("beach_day.jpg")
    jQuery:
    $.cloudinary.image("beach_day.jpg", {effect: "viesus_correct", width: 400, crop: "scale"})
    .Net:
    cloudinary.Api.UrlImgUp.Transform(new Transformation().Effect("viesus_correct").Width(400).Crop("scale")).BuildImageTag("beach_day.jpg")
    Image automatically enhanced with VIESUS add-on

WebPurify

WebPurify image moderation comes in handy in various user generated content sites, by automatically moderating all photos uploaded to your application, thus preventing adult-oriented and inappropriate images from creeping into your websites or mobile applications. Custom moderation profiles can also be defined with our assistance, making sure that whatever images you don’t want appearing on your website - will be automatically screened out. You can read more about this add-on here.

Remove The Background

Remove The Background editing add-on automatically removes any background from your photos, resulting in a transparent-background image focusing only on the main object within your photo. This is especially common in e-commerce, media, and news sites in order to place the main element of the image on either white or color backgrounds. The final result better integrates an image into a site or specific page’s graphic design. This blog post describes this add-on in detail.

Which add-ons are your favorite? Are there any additional add-ons you wish we had? We would love to get your feedback and thoughts!


Facial attribute detection with Microsoft's Face API

$
0
0

Microsoft Face API face detection

Many of the photos displayed on the internet these days are of people. If your website or mobile application displays photos that include people, you will want to make sure that their faces are included in the delivered images when cropping and manipulating them to fit your graphic design and responsive layout. You may even want to further manipulate an image according to the faces present, for example, adding a harlequin mask overlay on all of their eyes, where each mask is adjusted to the correct size and orientation (although not a typical use case, it's a cool example of using advanced facial attribute detection):

Ruby:
cl_image_tag("cloudinary_team.jpg", :transformation=>[
  {:width=>700, :radius=>"max"},
  {:flags=>"region_relative", :gravity=>"adv_eyes", :overlay=>"harlequinmask", :width=>1.7}
  ])
PHP:
cl_image_tag("cloudinary_team.jpg", array("transformation"=>array(
  array("width"=>700, "radius"=>"max"),
  array("flags"=>"region_relative", "gravity"=>"adv_eyes", "overlay"=>"harlequinmask", "width"=>1.7)
  )))
Python:
CloudinaryImage("cloudinary_team.jpg").image(transformation=[
  {"width": 700, "radius": "max"},
  {"flags": "region_relative", "gravity": "adv_eyes", "overlay": "harlequinmask", "width": 1.7}
  ])
Node.js:
cloudinary.image("cloudinary_team.jpg", {transformation: [
  {width: 700, radius: "max"},
  {flags: "region_relative", gravity: "adv_eyes", overlay: "harlequinmask", width: 1.7}
  ]})
Java:
cloudinary.url().transformation(new Transformation()
  .width(700).radius("max").chain()
  .flags("region_relative").gravity("adv_eyes").overlay("harlequinmask").width(1.7)).imageTag("cloudinary_team.jpg")
jQuery:
$.cloudinary.image("cloudinary_team.jpg", {transformation: [
  {width: 700, radius: "max"},
  {flags: "region_relative", gravity: "adv_eyes", overlay: "harlequinmask", width: 1.7}
  ]})
.Net:
cloudinary.Api.UrlImgUp.Transform(new Transformation()
  .Width(700).Radius("max").Chain()
  .Flags("region_relative").Gravity("adv_eyes").Overlay("harlequinmask").Width(1.7)).BuildImageTag("cloudinary_team.jpg")
Cloudinary team with masks

Face Detection is a great feature that enables the automatic modification of images according to the detected faces within an image, making it simple to intelligently crop, position, resize and transform your images appropriately.

At Cloudinary we strive to create an enriched environment that can solve our customers media asset related needs. By taking a holistic approach to image management, we create partnerships with leading companies developing image processing and media related technologies that can extend our internal features and capabilities and cater customers with more “complex” needs. Our add-ons feature services pre-integrated into Cloudinary that are tailored for developing, extending, and operating web and mobile apps.

We have recently partnered with Microsoft's Cognitive Services which provides a Face API for high precision face detection with state-of-the-art cloud-based algorithms. The Face API technology is fully integrated within our Advanced Facial Attributes Detection add-on that can do more than just detect the human faces in an image. The Advanced Facial Attribute Detection add-on can also extract meaningful advanced data about the face(s) in an image, including the exact location of facial features. This allows you even greater control over your image categorization, and to automatically use these details to smartly crop, position, rotate and overlay images based on the detected facial features.

Microsoft Cognitive Services logo

How to automatically detect facial attributes

Cloudinary supports uploading images using a cloud-based API. You can request further information while uploading the image by setting the detection parameter to adv_face when calling Cloudinary's upload API and Advanced Facial Attribute Detection is utilized to automatically extract detailed face attributes from the uploaded image. The detected faces are returned in the JSON response with rectangles (left, top, width and height) indicating the location of faces in the image in pixels, the exact position details of the eyes, mouth, eyebrows, nose and lips, as well as a series of face related attributes from each face such as pose, gender and age. See the Advanced Facial Attribute Detection documentation for more information. The code sample below uploads the lady image while requesting that the facial attributes are also returned in the JSON response:

Ruby:
Cloudinary::Uploader.upload("lady.jpg", 
              :detection: "adv_face")
PHP:
\Cloudinary\Uploader::upload("lady.jpg", 
              array(
               "detection": "adv_face"));
Python:
cloudinary.uploader.upload("lady.jpg", 
              detection = "adv_face")
Node.js:
cloudinary.uploader.upload("lady.jpg", 
              function(result) {console.log(result); }, { detection: "adv_face" });
Java:
cloudinary.uploader().upload("lady.jpg", 
              Cloudinary.asMap("detection", "adv_face"));

Ruby:
cl_image_tag("lady.jpg")
PHP:
cl_image_tag("lady.jpg")
Python:
CloudinaryImage("lady.jpg").image()
Node.js:
cloudinary.image("lady.jpg")
Java:
cloudinary.url().imageTag("lady.jpg")
jQuery:
$.cloudinary.image("lady.jpg")
.Net:
cloudinary.Api.UrlImgUp.BuildImageTag("lady.jpg")
Original uploaded image

The example JSON snippet below contains the results of the upload response when applying advanced facial attribute detection on the uploaded image. The response includes very detailed information regarding the face that was automatically detected in the image above:

{
...
 "info": 
  {"detection": 
    {"adv_face": 
      {"status": "complete",
       "data": 
        [{"bounding_box": 
           {"top": 234.0, "left": 216.0, "width": 244.0, "height": 244.0},
          "attributes": 
           {"smile": 0.649,
            "head_pose": {"pitch": 0.0, "roll": -6.7, "yaw": 0.6},
            "gender": "female",
            "age": 30.3,
            "facial_hair": {"moustache": 0.0, "beard": 0.0, 
                            "sideburns": 0.0}},
          "facial_landmarks": 
           {"mouth": 
             {"left": {"x": 277.1, "y": 410.6},
              "right": {"x": 410.2, "y": 395.1},
              "under_lip": 
               {"bottom": {"x": 352.8, "y": 445.0},
                "top": {"x": 349.1, "y": 431.8}},
              "upper_lip": 
               {"bottom": {"x": 346.3, "y": 415.1},
                "top": {"x": 345.4, "y": 407.5}}},
            "eyebrow": 
             {"left_outer": {"x": 224.1, "y": 298.0},
              "left_inner": {"x": 306.6, "y": 283.4},
              "right_inner": {"x": 361.4, "y": 279.8},
              "right_outer": {"x": 428.8, "y": 272.2}},
            "eye": 
             {"left_outer": {"x": 258.5, "y": 314.1},
              "left_top": {"x": 277.0, "y": 306.2},
              "left_bottom": {"x": 277.1, "y": 315.6},
              "left_inner": {"x": 296.4, "y": 312.9},
              "right_inner": {"x": 373.4, "y": 305.2},
              "right_top": {"x": 388.0, "y": 294.5},
              "right_bottom": {"x": 389.0, "y": 306.0},
              "right_outer": {"x": 406.5, "y": 300.2},
              "left_pupil": {"x": 278.3, "y": 309.4},
              "right_pupil": {"x": 386.0, "y": 298.7}},
            "nose": 
             {"tip": {"x": 341.6, "y": 381.6},
              "root_left": {"x": 321.9, "y": 314.6},
              "root_right": {"x": 343.6, "y": 311.8},
              "left_alar_top": {"x": 312.7, "y": 359.7},
              "right_alar_top": {"x": 359.2, "y": 351.2},
              "left_alar_out_tip": {"x": 305.4, "y": 380.4},
              "right_alar_out_tip": {"x": 374.3, "y": 367.5}}}}]}}},
}

Dynamic image manipulation with facial attribute detection

Cloudinary supports on-the-fly image manipulation using simple parameters in HTTP delivery URLs. Based on the position of facial attributes detected by the Advanced Facial Attribute Detection add-on, Cloudinary can crop your images to focus on the detected facial features, while providing a large set of image transformation and cropping options when using a Cloudinary delivery URL. To focus an automatic crop on the detected faces, simply set the crop parameter to thumb, fill or crop and the gravity parameter to adv_faces (set gravity to adv_face for focusing on the single largest detected face in the image). The resulting images are dynamically generated on-the-fly and the result is delivered via a fast CDN.

For example, to deliver a 300x300 thumbnail of the lady image shown above:

Ruby:
cl_image_tag("lady.jpg", :gravity=>"adv_face", :height=>300, :width=>300, :crop=>"thumb")
PHP:
cl_image_tag("lady.jpg", array("gravity"=>"adv_face", "height"=>300, "width"=>300, "crop"=>"thumb"))
Python:
CloudinaryImage("lady.jpg").image(gravity="adv_face", height=300, width=300, crop="thumb")
Node.js:
cloudinary.image("lady.jpg", {gravity: "adv_face", height: 300, width: 300, crop: "thumb"})
Java:
cloudinary.url().transformation(new Transformation().gravity("adv_face").height(300).width(300).crop("thumb")).imageTag("lady.jpg")
jQuery:
$.cloudinary.image("lady.jpg", {gravity: "adv_face", height: 300, width: 300, crop: "thumb"})
.Net:
cloudinary.Api.UrlImgUp.Transform(new Transformation().Gravity("adv_face").Height(300).Width(300).Crop("thumb")).BuildImageTag("lady.jpg")
150x150 thumbnail of lady.jpg

Cloudinary can also dynamically crop your images based on the position of detected eyes. Simply set the gravity parameter to adv_eyes (g_adv_eyes for URLs) to center the image on the detected eyes. The example below delivers a 200x60 thumbnail centered on the eyes:

Ruby:
cl_image_tag("lady.jpg", :gravity=>"adv_eyes", :width=>200, :height=>60, :crop=>"thumb")
PHP:
cl_image_tag("lady.jpg", array("gravity"=>"adv_eyes", "width"=>200, "height"=>60, "crop"=>"thumb"))
Python:
CloudinaryImage("lady.jpg").image(gravity="adv_eyes", width=200, height=60, crop="thumb")
Node.js:
cloudinary.image("lady.jpg", {gravity: "adv_eyes", width: 200, height: 60, crop: "thumb"})
Java:
cloudinary.url().transformation(new Transformation().gravity("adv_eyes").width(200).height(60).crop("thumb")).imageTag("lady.jpg")
jQuery:
$.cloudinary.image("lady.jpg", {gravity: "adv_eyes", width: 200, height: 60, crop: "thumb"})
.Net:
cloudinary.Api.UrlImgUp.Transform(new Transformation().Gravity("adv_eyes").Width(200).Height(60).Crop("thumb")).BuildImageTag("lady.jpg")
200x60 thumbnail centered on eyes

Thanks to the detailed information on the position of facial attributes detected by the Advanced Facial Attribute Detection add-on, Cloudinary can add overlays while taking into account the pose of the face, and automatically scale and rotate the overlay accordingly.

Ruby:
cl_image_tag("HarlequinMask.jpg", :width=>150)
PHP:
cl_image_tag("HarlequinMask.jpg", array("width"=>150))
Python:
CloudinaryImage("HarlequinMask.jpg").image(width=150)
Node.js:
cloudinary.image("HarlequinMask.jpg", {width: 150})
Java:
cloudinary.url().transformation(new Transformation().width(150)).imageTag("HarlequinMask.jpg")
jQuery:
$.cloudinary.image("HarlequinMask.jpg", {width: 150})
.Net:
cloudinary.Api.UrlImgUp.Transform(new Transformation().Width(150)).BuildImageTag("HarlequinMask.jpg")
Harlequin mask

For example, in order to automatically overlay the above image of a harlequin mask scaled to 170% relative to the detected eyes in the main image:

Ruby:
cl_image_tag("lady.jpg", :flags=>"region_relative", :gravity=>"adv_eyes", :overlay=>"HarlequinMask", :width=>1.7, :crop=>"scale")
PHP:
cl_image_tag("lady.jpg", array("flags"=>"region_relative", "gravity"=>"adv_eyes", "overlay"=>"HarlequinMask", "width"=>1.7, "crop"=>"scale"))
Python:
CloudinaryImage("lady.jpg").image(flags="region_relative", gravity="adv_eyes", overlay="HarlequinMask", width=1.7, crop="scale")
Node.js:
cloudinary.image("lady.jpg", {flags: "region_relative", gravity: "adv_eyes", overlay: "HarlequinMask", width: 1.7, crop: "scale"})
Java:
cloudinary.url().transformation(new Transformation().flags("region_relative").gravity("adv_eyes").overlay("HarlequinMask").width(1.7).crop("scale")).imageTag("lady.jpg")
jQuery:
$.cloudinary.image("lady.jpg", {flags: "region_relative", gravity: "adv_eyes", overlay: "HarlequinMask", width: 1.7, crop: "scale"})
.Net:
cloudinary.Api.UrlImgUp.Transform(new Transformation().Flags("region_relative").Gravity("adv_eyes").Overlay("HarlequinMask").Width(1.7).Crop("scale")).BuildImageTag("lady.jpg")
Harlequin masked face

See the Advanced Facial Attribute Detection documentation for more information on the features available with the add-on and how to use them.

Summary

The Advanced Facial Attribute Detection add-on powered by Cloudinary and the Face API of Microsoft's Cognitive Services provides a high precision mechanism that can analyze images and create the best crop for most sites as well as automatically add the nice artistic effects of exact overlay placing. The integration within Cloudinary's pipeline is seamless and dynamic using simple manipulation URLs.

We are excited to enter into this partnership with Microsoft's Cognitive Services so give the add-on a try. The Advanced Facial Attribute Detection add-on is available to all our free and paid plans.

Cloudinary takes starring role enabling Moviepilot to shine spotlight on core business

$
0
0
 
Moviepilot Inc. is a media company that hosts a website and social publishing platform designed to bring together movie and TV fans, and help studios trigger, fuel and amplify positive conversations about entertainment topics. The site invites fans to create content, such as writing articles and producing videos, which are then curated on the site and distributed to more than 30 million fans worldwide. The site boasts more than 20 million unique visitors per month, with 87 percent of visitors accessing the site on mobile devices. The company is headquartered in Venice Beach, Calif., and has an office Berlin, Germany, where it was originally founded.

The Challenge: Infrastructure demands take focus away from core business

When launched in 2012, Moviepilot was building a completely homegrown product, with hardware running the platform in Berlin. But with a site that is tailored to a U.S.-based audience, the company knew it needed to rely on content delivery networks (CDNs) to reduce latency and deliver an optimal user experience.
 
We were focusing too much on managing infrastructure, rather than our core business of curating the best content and aiding top influencers to become better writers", said Ben Kubota, co-founder and chief product officer at Moviepilot. “With the explosion of GIFs on the Internet and the quantity of content being added to our site, it was time consuming to keep up with the latest image and video technology, while ensuring that uploads were being converted properly, aspect ratios weren’t broken and that it could work with a CDN near our customers.”
 
Instead of building an image serving service itself, Moviepilot evaluated a number of companies and ultimately selected Cloudinary for its experience, performance and ease of integration.

The Cloudinary Solution: Easy to use API and infrastructure reduction

Moviepilot website

“The biggest selling points for me were Cloudinary’s comprehensive documentation, and its easy-to-use, URL-based API,” Kubota said.
 
He noted that there was minimal manual work required to integrate Cloudinary into the Moviepilot platform, and was impressed by the straightforward technical documentation and superior support that Cloudinary provided to convert and migrate all content over to its solution.
 
Moviepilot users now can upload their images – mostly JPEG, but some GIF, too – directly to Cloudinary, which optimizes the images and publishes them on the Moviepilot platform.  

The Results: Bandwidth optimization and reduced costs 

By using Cloudinary to support image management, instead of doing it in-house over their own infrastructure, Moviepilot is saving costs on both bandwidth and human resources.
 
Moviepilot has transformed more than 1 million images using Cloudinary so far. The vast majority – more than 95 percent, according to Kubota – are JPEG images. However, the biggest impact has been the small percent of GIFs that have been transformed into MP4/WEBM files. All totaled, Kubota estimates that using Cloudinary has enabled Moviepilot to reduce bandwidth usage by 40 percent, which has saved the company nearly $48,000 annually.
 
Before implementing Cloudinary in 2015, Kubota said about half of one developer’s time was dedicated to ensuring that images worked properly on the Moviepilot platform. With Cloudinary in place, the developer now can focus completely on new innovations to the platform, and saves nearly $25,000 a year in costs related solely to managing images.
 
And the monthly fee for the Cloudinary solution is significantly less than the company would have incurred owning and maintaining its own infrastructure. Kubota estimates that Moviepilot saves about $12,000 annually because it doesn’t have to purchase additional servers to support image management.
 
Because Cloudinary enables Moviepilot to optimize images for various screen sizes and resolutions, images require less bandwidth and load faster, which is particularly important considering that a majority of Moviepilot users are working from mobile devices.
 
“With Cloudinary, I can sleep easier because it eliminates the technical headaches we were facing,” said Kubota. “It’s a fantastic tool that enables us to manage images more
efficiently and allows us to focus on the written content that is most relevant to our site.”


How to use conditions to dynamically manipulate images

$
0
0

Conditional image transformations illustration

It's great to have the capability to manipulate images on the fly by using dynamic URLs to customize the images to fit the graphic design of your site or mobile application. However, what if you want to manipulate an image depending on a specific image characteristic (like its width or aspect ratio) or its contents (does it contain a face?). What you need is a way to apply a transformation to an image only if a specific condition is met. Take for example a situation where you have allocated space on your page for a user uploaded image with a width and height of 200 pixels. Furthermore, if the image contains a face you would like to zoom in and focus on the face itself, otherwise you would like to fit the entire image into the available space:

Ruby:
cl_image_tag("smiling_man.jpg", :transformation=>[
  {:if=>"fc_gte_1"},
  {:width=>200, :height=>200, :gravity=>"face", :crop=>"thumb"},
  {:if=>"else", :width=>200, :height=>200, :crop=>"fit"},
  {:if=>"end"},
  {:radius=>40, :border=>"4px_solid_black"}
  ])
PHP:
cl_image_tag("smiling_man.jpg", array("transformation"=>array(
  array("if"=>"fc_gte_1"),
  array("width"=>200, "height"=>200, "gravity"=>"face", "crop"=>"thumb"),
  array("if"=>"else", "width"=>200, "height"=>200, "crop"=>"fit"),
  array("if"=>"end"),
  array("radius"=>40, "border"=>"4px_solid_black")
  )))
Python:
CloudinaryImage("smiling_man.jpg").image(transformation=[
  {"if": "fc_gte_1"},
  {"width": 200, "height": 200, "gravity": "face", "crop": "thumb"},
  {"if": "else", "width": 200, "height": 200, "crop": "fit"},
  {"if": "end"},
  {"radius": 40, "border": "4px_solid_black"}
  ])
Node.js:
cloudinary.image("smiling_man.jpg", {transformation: [
  {if: "fc_gte_1"},
  {width: 200, height: 200, gravity: "face", crop: "thumb"},
  {if: "else", width: 200, height: 200, crop: "fit"},
  {if: "end"},
  {radius: 40, border: "4px_solid_black"}
  ]})
Java:
cloudinary.url().transformation(new Transformation()
  .if("fc_gte_1").chain()
  .width(200).height(200).gravity("face").crop("thumb").chain()
  .if("else").width(200).height(200).crop("fit").chain()
  .if("end").chain()
  .radius(40).border("4px_solid_black")).imageTag("smiling_man.jpg")
jQuery:
$.cloudinary.image("smiling_man.jpg", {transformation: [
  {if: "fc_gte_1"},
  {width: 200, height: 200, gravity: "face", crop: "thumb"},
  {if: "else", width: 200, height: 200, crop: "fit"},
  {if: "end"},
  {radius: 40, border: "4px_solid_black"}
  ]})
.Net:
cloudinary.Api.UrlImgUp.Transform(new Transformation()
  .If("fc_gte_1").Chain()
  .Width(200).Height(200).Gravity("face").Crop("thumb").Chain()
  .If("else").Width(200).Height(200).Crop("fit").Chain()
  .If("end").Chain()
  .Radius(40).Border("4px_solid_black")).BuildImageTag("smiling_man.jpg")
Original image (scaled down)right arrowAn image containing a face is delivered as a zoomed in thumbnail

Ruby:
cl_image_tag("golden_gate.jpg", :transformation=>[
  {:if=>"fc_gte_1"},
  {:width=>200, :height=>200, :gravity=>"face", :crop=>"thumb"},
  {:if=>"else", :width=>200, :height=>200, :crop=>"fit"},
  {:if=>"end"},
  {:radius=>40, :border=>"4px_solid_black"}
  ])
PHP:
cl_image_tag("golden_gate.jpg", array("transformation"=>array(
  array("if"=>"fc_gte_1"),
  array("width"=>200, "height"=>200, "gravity"=>"face", "crop"=>"thumb"),
  array("if"=>"else", "width"=>200, "height"=>200, "crop"=>"fit"),
  array("if"=>"end"),
  array("radius"=>40, "border"=>"4px_solid_black")
  )))
Python:
CloudinaryImage("golden_gate.jpg").image(transformation=[
  {"if": "fc_gte_1"},
  {"width": 200, "height": 200, "gravity": "face", "crop": "thumb"},
  {"if": "else", "width": 200, "height": 200, "crop": "fit"},
  {"if": "end"},
  {"radius": 40, "border": "4px_solid_black"}
  ])
Node.js:
cloudinary.image("golden_gate.jpg", {transformation: [
  {if: "fc_gte_1"},
  {width: 200, height: 200, gravity: "face", crop: "thumb"},
  {if: "else", width: 200, height: 200, crop: "fit"},
  {if: "end"},
  {radius: 40, border: "4px_solid_black"}
  ]})
Java:
cloudinary.url().transformation(new Transformation()
  .if("fc_gte_1").chain()
  .width(200).height(200).gravity("face").crop("thumb").chain()
  .if("else").width(200).height(200).crop("fit").chain()
  .if("end").chain()
  .radius(40).border("4px_solid_black")).imageTag("golden_gate.jpg")
jQuery:
$.cloudinary.image("golden_gate.jpg", {transformation: [
  {if: "fc_gte_1"},
  {width: 200, height: 200, gravity: "face", crop: "thumb"},
  {if: "else", width: 200, height: 200, crop: "fit"},
  {if: "end"},
  {radius: 40, border: "4px_solid_black"}
  ]})
.Net:
cloudinary.Api.UrlImgUp.Transform(new Transformation()
  .If("fc_gte_1").Chain()
  .Width(200).Height(200).Gravity("face").Crop("thumb").Chain()
  .If("else").Width(200).Height(200).Crop("fit").Chain()
  .If("end").Chain()
  .Radius(40).Border("4px_solid_black")).BuildImageTag("golden_gate.jpg")
Original image (scaled down)right arrow An image without a face detected is delivered as large as possible

As can be seen in the example images above, a different transformation is applied to the image depending on whether the original image contains a face.

Making sure your site looks good can be challenging if you don't know in advance what kind of images your users (or editors) upload. The images will likely vary in aspect ratios, dimensions, and other characteristics, and the graphic design of your site probably requires different image dimensions and effects for different kinds of image. For example:

  • If you need to place an image in a space that has more width available than height, some portrait images will probably look too small if you just resize all images to fit within the space available. You would want to apply different resizing and cropping depending on the image's aspect ratio.
  • If the original images are very small, you would want to handle them in a different way to the way you would handle images that are larger than the available display space.
  • If faces appear in the image, you may want to manipulate the image in a different way to images without faces present (e.g. use a different artistic effect, different cropping dimensions, add overlays, etc).

The solution: conditional transformations

With Cloudinary, images are manipulated on-the-fly using dynamic delivery URLs for any uploaded image. A condition and its associated transformations are added to the URLs using the if parameter which accepts a string value detailing the condition to evaluate. You can apply a transformation based on the image's width, height, aspect ratio, the number of faces in the image (if any) or the number of frames (for animated images) or pages (for PDFs) present. For example, to evaluate whether the image's width is greater than 500 pixels: if_w_gt_500. Multiple conditions can be evaluated by concatenating the conditions with an and or or operator, and a different transformation can be applied in the case that the condition is evaluated as negative by using the if_else parameter.

The following examples highlight some use cases for conditional transformations. For more comprehensive information and details on the available options, see the documentation on Conditional transformations.

Example 1: Conditional text overlay

You have allocated space on your page for a user uploaded image with a width and height of 300 pixels. If the original image needs to be cropped in order to fill in the required space (i.e. either the width or height is greater than 300 pixels) you also want to add a text overlay with the disclaimer "This image has been cropped to fit":

Ruby:
cl_image_tag("dog.jpg", :transformation=>[
  {:if=>"w_gt_300_or_h_gt_300"},
  {:overlay=>"text:Verdana_90_bold:This%20image%20has%20been%20cropped%20to%20fit", :gravity=>"south", :y=>40},
  {:if=>"end"},
  {:border=>"5px_solid_green", :radius=>30, :width=>300, :height=>300, :crop=>"fill"}
  ])
PHP:
cl_image_tag("dog.jpg", array("transformation"=>array(
  array("if"=>"w_gt_300_or_h_gt_300"),
  array("overlay"=>"text:Verdana_90_bold:This%20image%20has%20been%20cropped%20to%20fit", "gravity"=>"south", "y"=>40),
  array("if"=>"end"),
  array("border"=>"5px_solid_green", "radius"=>30, "width"=>300, "height"=>300, "crop"=>"fill")
  )))
Python:
CloudinaryImage("dog.jpg").image(transformation=[
  {"if": "w_gt_300_or_h_gt_300"},
  {"overlay": "text:Verdana_90_bold:This%20image%20has%20been%20cropped%20to%20fit", "gravity": "south", "y": 40},
  {"if": "end"},
  {"border": "5px_solid_green", "radius": 30, "width": 300, "height": 300, "crop": "fill"}
  ])
Node.js:
cloudinary.image("dog.jpg", {transformation: [
  {if: "w_gt_300_or_h_gt_300"},
  {overlay: "text:Verdana_90_bold:This%20image%20has%20been%20cropped%20to%20fit", gravity: "south", y: 40},
  {if: "end"},
  {border: "5px_solid_green", radius: 30, width: 300, height: 300, crop: "fill"}
  ]})
Java:
cloudinary.url().transformation(new Transformation()
  .if("w_gt_300_or_h_gt_300").chain()
  .overlay("text:Verdana_90_bold:This%20image%20has%20been%20cropped%20to%20fit").gravity("south").y(40).chain()
  .if("end").chain()
  .border("5px_solid_green").radius(30).width(300).height(300).crop("fill")).imageTag("dog.jpg")
jQuery:
$.cloudinary.image("dog.jpg", {transformation: [
  {if: "w_gt_300_or_h_gt_300"},
  {overlay: "text:Verdana_90_bold:This%20image%20has%20been%20cropped%20to%20fit", gravity: "south", y: 40},
  {if: "end"},
  {border: "5px_solid_green", radius: 30, width: 300, height: 300, crop: "fill"}
  ]})
.Net:
cloudinary.Api.UrlImgUp.Transform(new Transformation()
  .If("w_gt_300_or_h_gt_300").Chain()
  .Overlay("text:Verdana_90_bold:This%20image%20has%20been%20cropped%20to%20fit").Gravity("south").Y(40).Chain()
  .If("end").Chain()
  .Border("5px_solid_green").Radius(30).Width(300).Height(300).Crop("fill")).BuildImageTag("dog.jpg")
If original image is bigger than 300x300 then text overlay added

Example 2: Conditional blurred background

If you allocate space on your page for an image with a width of 500px, you can conditionally add a blurred background for images that have a width less than 500px:

Ruby:
cl_image_tag("small_koala.jpg", :transformation=>[
  {:if=>"w_lt_500"},
  {:overlay=>"text:Arial_20_bold:Image%20shown%20in%20full%20scale", :y=>5, :x=>5, :color=>"white", :gravity=>"south_east"},
  {:effect=>"blur:400", :underlay=>"small_koala", :width=>500, :crop=>"scale"},
  {:if=>"end"},
  {:border=>"5px_solid_black", :radius=>30}
  ])
PHP:
cl_image_tag("small_koala.jpg", array("transformation"=>array(
  array("if"=>"w_lt_500"),
  array("overlay"=>"text:Arial_20_bold:Image%20shown%20in%20full%20scale", "y"=>5, "x"=>5, "color"=>"white", "gravity"=>"south_east"),
  array("effect"=>"blur:400", "underlay"=>"small_koala", "width"=>500, "crop"=>"scale"),
  array("if"=>"end"),
  array("border"=>"5px_solid_black", "radius"=>30)
  )))
Python:
CloudinaryImage("small_koala.jpg").image(transformation=[
  {"if": "w_lt_500"},
  {"overlay": "text:Arial_20_bold:Image%20shown%20in%20full%20scale", "y": 5, "x": 5, "color": "white", "gravity": "south_east"},
  {"effect": "blur:400", "underlay": "small_koala", "width": 500, "crop": "scale"},
  {"if": "end"},
  {"border": "5px_solid_black", "radius": 30}
  ])
Node.js:
cloudinary.image("small_koala.jpg", {transformation: [
  {if: "w_lt_500"},
  {overlay: "text:Arial_20_bold:Image%20shown%20in%20full%20scale", y: 5, x: 5, color: "white", gravity: "south_east"},
  {effect: "blur:400", underlay: "small_koala", width: 500, crop: "scale"},
  {if: "end"},
  {border: "5px_solid_black", radius: 30}
  ]})
Java:
cloudinary.url().transformation(new Transformation()
  .if("w_lt_500").chain()
  .overlay("text:Arial_20_bold:Image%20shown%20in%20full%20scale").y(5).x(5).color("white").gravity("south_east").chain()
  .effect("blur:400").underlay("small_koala").width(500).crop("scale").chain()
  .if("end").chain()
  .border("5px_solid_black").radius(30)).imageTag("small_koala.jpg")
jQuery:
$.cloudinary.image("small_koala.jpg", {transformation: [
  {if: "w_lt_500"},
  {overlay: "text:Arial_20_bold:Image%20shown%20in%20full%20scale", y: 5, x: 5, color: "white", gravity: "south_east"},
  {effect: "blur:400", underlay: "small_koala", width: 500, crop: "scale"},
  {if: "end"},
  {border: "5px_solid_black", radius: 30}
  ]})
.Net:
cloudinary.Api.UrlImgUp.Transform(new Transformation()
  .If("w_lt_500").Chain()
  .Overlay("text:Arial_20_bold:Image%20shown%20in%20full%20scale").Y(5).X(5).Color("white").Gravity("south_east").Chain()
  .Effect("blur:400").Underlay("small_koala").Width(500).Crop("scale").Chain()
  .If("end").Chain()
  .Border("5px_solid_black").Radius(30)).BuildImageTag("small_koala.jpg")
if original is smaller than 500px then blurred underlay added

Example 3: Conditional overlay placement based on detected faces

If you want to add an overlay of the golden_star image over all the detected faces in the image. If no faces are detected then you want to place the overlay in the bottom right corner:

  • Faces detected - the overlay is placed over the detected faces:

Ruby:
cl_image_tag("bicycle.jpg", :transformation=>[
  {:width=>400},
  {:if=>"faces_gte_1"},
  {:overlay=>"golden_star", :width=>1.1, :flags=>"region_relative", :gravity=>"faces"},
  {:if=>"else"},
  {:overlay=>"golden_star", :width=>100, :gravity=>"south_east"},
  {:if=>"end"},
  {:border=>"7px_solid_grey", :radius=>30}
  ])
PHP:
cl_image_tag("bicycle.jpg", array("transformation"=>array(
  array("width"=>400),
  array("if"=>"faces_gte_1"),
  array("overlay"=>"golden_star", "width"=>1.1, "flags"=>"region_relative", "gravity"=>"faces"),
  array("if"=>"else"),
  array("overlay"=>"golden_star", "width"=>100, "gravity"=>"south_east"),
  array("if"=>"end"),
  array("border"=>"7px_solid_grey", "radius"=>30)
  )))
Python:
CloudinaryImage("bicycle.jpg").image(transformation=[
  {"width": 400},
  {"if": "faces_gte_1"},
  {"overlay": "golden_star", "width": 1.1, "flags": "region_relative", "gravity": "faces"},
  {"if": "else"},
  {"overlay": "golden_star", "width": 100, "gravity": "south_east"},
  {"if": "end"},
  {"border": "7px_solid_grey", "radius": 30}
  ])
Node.js:
cloudinary.image("bicycle.jpg", {transformation: [
  {width: 400},
  {if: "faces_gte_1"},
  {overlay: "golden_star", width: 1.1, flags: "region_relative", gravity: "faces"},
  {if: "else"},
  {overlay: "golden_star", width: 100, gravity: "south_east"},
  {if: "end"},
  {border: "7px_solid_grey", radius: 30}
  ]})
Java:
cloudinary.url().transformation(new Transformation()
  .width(400).chain()
  .if("faces_gte_1").chain()
  .overlay("golden_star").width(1.1).flags("region_relative").gravity("faces").chain()
  .if("else").chain()
  .overlay("golden_star").width(100).gravity("south_east").chain()
  .if("end").chain()
  .border("7px_solid_grey").radius(30)).imageTag("bicycle.jpg")
jQuery:
$.cloudinary.image("bicycle.jpg", {transformation: [
  {width: 400},
  {if: "faces_gte_1"},
  {overlay: "golden_star", width: 1.1, flags: "region_relative", gravity: "faces"},
  {if: "else"},
  {overlay: "golden_star", width: 100, gravity: "south_east"},
  {if: "end"},
  {border: "7px_solid_grey", radius: 30}
  ]})
.Net:
cloudinary.Api.UrlImgUp.Transform(new Transformation()
  .Width(400).Chain()
  .If("faces_gte_1").Chain()
  .Overlay("golden_star").Width(1.1).Flags("region_relative").Gravity("faces").Chain()
  .If("else").Chain()
  .Overlay("golden_star").Width(100).Gravity("south_east").Chain()
  .If("end").Chain()
  .Border("7px_solid_grey").Radius(30)).BuildImageTag("bicycle.jpg")
overlay placed over detected faces
  • No faces detected - the overlay is placed in the bottom right corner:

Ruby:
cl_image_tag("leather_bag.jpg", :transformation=>[
  {:width=>400},
  {:if=>"faces_gte_1"},
  {:overlay=>"golden_star", :width=>1.1, :flags=>"region_relative", :gravity=>"faces"},
  {:if=>"else"},
  {:overlay=>"golden_star", :width=>100, :gravity=>"south_east"},
  {:if=>"end"},
  {:border=>"7px_solid_grey", :radius=>30}
  ])
PHP:
cl_image_tag("leather_bag.jpg", array("transformation"=>array(
  array("width"=>400),
  array("if"=>"faces_gte_1"),
  array("overlay"=>"golden_star", "width"=>1.1, "flags"=>"region_relative", "gravity"=>"faces"),
  array("if"=>"else"),
  array("overlay"=>"golden_star", "width"=>100, "gravity"=>"south_east"),
  array("if"=>"end"),
  array("border"=>"7px_solid_grey", "radius"=>30)
  )))
Python:
CloudinaryImage("leather_bag.jpg").image(transformation=[
  {"width": 400},
  {"if": "faces_gte_1"},
  {"overlay": "golden_star", "width": 1.1, "flags": "region_relative", "gravity": "faces"},
  {"if": "else"},
  {"overlay": "golden_star", "width": 100, "gravity": "south_east"},
  {"if": "end"},
  {"border": "7px_solid_grey", "radius": 30}
  ])
Node.js:
cloudinary.image("leather_bag.jpg", {transformation: [
  {width: 400},
  {if: "faces_gte_1"},
  {overlay: "golden_star", width: 1.1, flags: "region_relative", gravity: "faces"},
  {if: "else"},
  {overlay: "golden_star", width: 100, gravity: "south_east"},
  {if: "end"},
  {border: "7px_solid_grey", radius: 30}
  ]})
Java:
cloudinary.url().transformation(new Transformation()
  .width(400).chain()
  .if("faces_gte_1").chain()
  .overlay("golden_star").width(1.1).flags("region_relative").gravity("faces").chain()
  .if("else").chain()
  .overlay("golden_star").width(100).gravity("south_east").chain()
  .if("end").chain()
  .border("7px_solid_grey").radius(30)).imageTag("leather_bag.jpg")
jQuery:
$.cloudinary.image("leather_bag.jpg", {transformation: [
  {width: 400},
  {if: "faces_gte_1"},
  {overlay: "golden_star", width: 1.1, flags: "region_relative", gravity: "faces"},
  {if: "else"},
  {overlay: "golden_star", width: 100, gravity: "south_east"},
  {if: "end"},
  {border: "7px_solid_grey", radius: 30}
  ]})
.Net:
cloudinary.Api.UrlImgUp.Transform(new Transformation()
  .Width(400).Chain()
  .If("faces_gte_1").Chain()
  .Overlay("golden_star").Width(1.1).Flags("region_relative").Gravity("faces").Chain()
  .If("else").Chain()
  .Overlay("golden_star").Width(100).Gravity("south_east").Chain()
  .If("end").Chain()
  .Border("7px_solid_grey").Radius(30)).BuildImageTag("leather_bag.jpg")
overlay placed in bottom right corner

Example 4: Conditional cropping based on aspect ratio

If you want to include as much of an image as possible, how you crop and deliver the image can depend on whether the original image is in landscape or portrait format.

  • Original (scaled down) images of bike and happy_dog:
bike.jpg happy_dog.jpg
  • Both images cropped to a width of 300 pixels and a height of 200 pixels results in a bad crop for the portrait image:
[300x200 bike.jpg [300x200 happy_dog.jpg
  • Both images cropped to a width of 200 pixels and a height of 300 pixels results in a bad crop for the landscape image:
200x300 bike.jpg 200x300 happy_dog.jpg

By first checking the aspect ratio of the image and then applying a transformation accordingly, it becomes easier to fit the image into the graphic design of your site and make sure you include the relevant parts of an image. In this case, if the aspect ratio is greater than 1:1 (landscape) we want to deliver the image with a width of 300 pixels and a height of 200 pixels. On the other hand if the aspect ratio is less than 1:1 (portrait) we want to deliver the image with a width of 200 pixels and a height of 300 pixels:

  • Images cropped according to their aspect ratio: landscape images are cropped to a width of 300 pixels and a height of 200 pixels, and portrait images are cropped to a width of 200 pixels and a height of 300 pixels:
    Ruby:
    cl_image_tag("bike.jpg", :transformation=>[
      {:if=>"ar_gt_1:1"},
      {:width=>300, :height=>200, :crop=>"fill"},
      {:if=>"else", :width=>200, :height=>300, :crop=>"fill"},
      {:if=>"end"},
      {:border=>"7px_solid_grey", :radius=>30}
      ])
    PHP:
    cl_image_tag("bike.jpg", array("transformation"=>array(
      array("if"=>"ar_gt_1:1"),
      array("width"=>300, "height"=>200, "crop"=>"fill"),
      array("if"=>"else", "width"=>200, "height"=>300, "crop"=>"fill"),
      array("if"=>"end"),
      array("border"=>"7px_solid_grey", "radius"=>30)
      )))
    Python:
    CloudinaryImage("bike.jpg").image(transformation=[
      {"if": "ar_gt_1:1"},
      {"width": 300, "height": 200, "crop": "fill"},
      {"if": "else", "width": 200, "height": 300, "crop": "fill"},
      {"if": "end"},
      {"border": "7px_solid_grey", "radius": 30}
      ])
    Node.js:
    cloudinary.image("bike.jpg", {transformation: [
      {if: "ar_gt_1:1"},
      {width: 300, height: 200, crop: "fill"},
      {if: "else", width: 200, height: 300, crop: "fill"},
      {if: "end"},
      {border: "7px_solid_grey", radius: 30}
      ]})
    Java:
    cloudinary.url().transformation(new Transformation()
      .if("ar_gt_1:1").chain()
      .width(300).height(200).crop("fill").chain()
      .if("else").width(200).height(300).crop("fill").chain()
      .if("end").chain()
      .border("7px_solid_grey").radius(30)).imageTag("bike.jpg")
    jQuery:
    $.cloudinary.image("bike.jpg", {transformation: [
      {if: "ar_gt_1:1"},
      {width: 300, height: 200, crop: "fill"},
      {if: "else", width: 200, height: 300, crop: "fill"},
      {if: "end"},
      {border: "7px_solid_grey", radius: 30}
      ]})
    .Net:
    cloudinary.Api.UrlImgUp.Transform(new Transformation()
      .If("ar_gt_1:1").Chain()
      .Width(300).Height(200).Crop("fill").Chain()
      .If("else").Width(200).Height(300).Crop("fill").Chain()
      .If("end").Chain()
      .Border("7px_solid_grey").Radius(30)).BuildImageTag("bike.jpg")
    landscape image cropped to fit in space with 400x300 pixels
    Ruby:
    cl_image_tag("happy_dog.jpg", :transformation=>[
      {:if=>"ar_gt_1:1"},
      {:width=>300, :height=>200, :crop=>"fill"},
      {:if=>"else", :width=>200, :height=>300, :crop=>"fill"},
      {:if=>"end"},
      {:border=>"7px_solid_grey", :radius=>30}
      ])
    PHP:
    cl_image_tag("happy_dog.jpg", array("transformation"=>array(
      array("if"=>"ar_gt_1:1"),
      array("width"=>300, "height"=>200, "crop"=>"fill"),
      array("if"=>"else", "width"=>200, "height"=>300, "crop"=>"fill"),
      array("if"=>"end"),
      array("border"=>"7px_solid_grey", "radius"=>30)
      )))
    Python:
    CloudinaryImage("happy_dog.jpg").image(transformation=[
      {"if": "ar_gt_1:1"},
      {"width": 300, "height": 200, "crop": "fill"},
      {"if": "else", "width": 200, "height": 300, "crop": "fill"},
      {"if": "end"},
      {"border": "7px_solid_grey", "radius": 30}
      ])
    Node.js:
    cloudinary.image("happy_dog.jpg", {transformation: [
      {if: "ar_gt_1:1"},
      {width: 300, height: 200, crop: "fill"},
      {if: "else", width: 200, height: 300, crop: "fill"},
      {if: "end"},
      {border: "7px_solid_grey", radius: 30}
      ]})
    Java:
    cloudinary.url().transformation(new Transformation()
      .if("ar_gt_1:1").chain()
      .width(300).height(200).crop("fill").chain()
      .if("else").width(200).height(300).crop("fill").chain()
      .if("end").chain()
      .border("7px_solid_grey").radius(30)).imageTag("happy_dog.jpg")
    jQuery:
    $.cloudinary.image("happy_dog.jpg", {transformation: [
      {if: "ar_gt_1:1"},
      {width: 300, height: 200, crop: "fill"},
      {if: "else", width: 200, height: 300, crop: "fill"},
      {if: "end"},
      {border: "7px_solid_grey", radius: 30}
      ]})
    .Net:
    cloudinary.Api.UrlImgUp.Transform(new Transformation()
      .If("ar_gt_1:1").Chain()
      .Width(300).Height(200).Crop("fill").Chain()
      .If("else").Width(200).Height(300).Crop("fill").Chain()
      .If("end").Chain()
      .Border("7px_solid_grey").Radius(30)).BuildImageTag("happy_dog.jpg")
    portrait image cropped to fit in space with 300x400 pixels

Summary

Conditional transformations is a powerful feature that goes beyond simple dynamic image manipulation and can produce completely different results depending on the attributes of the original image as well as on the results of any applied manipulations. This capability has been requested by many of our customers and solves plenty of advanced use cases that they have encountered. For more details, see the documentation on Conditional transformations and note that the feature is available for use with all Cloudinary accounts, including the free tier.

Why JPEG is like a photocopier

$
0
0

JPEG like a copy machine

If you make a copy of a copy of a copy, the quality will deteriorate with every ‘generation’. This problem is called ‘generation loss’. It is not difficult to understand why this happens with actual copier machines. Scanning and printing are not perfect, being based on noisy sensors and physical paper and ink, and the resulting noise will tend to accumulate.

Digital images should theoretically not have this problem: a file can be copied over and over again, and it will still be bit-for-bit identical to the original.

However, lossy image formats like JPEG can behave like photocopiers. If you simply copy a JPEG file, nothing changes, but if you open a JPEG file in an image editor and then save it, you will get a different JPEG file. The same happens each time an image is uploaded to, say, Facebook or Twitter: the image is re-encoded automatically (in the case of these two social networks, with a relatively low quality setting, to save on storage and bandwidth). Some information is lost in the process, and compression artifacts will start to accumulate. If you do this often enough, eventually the image will degrade significantly.

In this article we’ll take a deeper look at the generation loss of JPEG and other lossy image formats. We’ll explain what causes it, and how it can be avoided.

What happens if you save a JPEG over and over again?

This is what happens if you re-encode a JPEG image many times:

First encoding:
First encoding of JPEG
After 100 encodings:
After 100 JPEG encodings

After 1,000 encodings
After 10,000 encodings:
After 10,000 JPEG encodings

JPEG has a ‘quality’ setting that allows you to make a trade-off between compression and visual quality. Lower quality settings will give you smaller files, at the price of discarding more image information. Higher quality settings result in larger files, but more information is retained so the resulting image is closer to the original.

So if you just save the JPEG at a high enough quality setting, there won't be a problem, right?

Sadly, no. Obviously, information that is already lost cannot be magically recovered. So if you take a JPEG image that was saved with a quality of, say, 70, then re-saving it with a quality of 90 will, of course, not make the image look any better. But here’s the problem: it will even be worse. Every additional JPEG encoding will introduce additional loss, even if it is done at a higher quality setting than the original JPEG.

Why does this happen?

To understand why JPEG works this way, we have to dig a little deeper into how JPEG actually works. The JPEG format uses several mechanisms to reduce the file size of an image, some of which don’t accumulate while others do.

First of all, JPEG uses a color space transformation. Digital images are typically represented as pixels containing three separate 8-bit RGB values (red, green, blue). That is how computer screens display their pixels: each of the three color channels can have 256 different levels of intensity, resulting in 16.7 million possible colors (256*256*256) if you consider all the different combinations of red, green and blue.

These three RGB color channels are statistically correlated in most images: for example, in a grayscale image, the three channels are completely identical. So if image compression is the goal, RGB is not the best representation. Instead, JPEG uses the YCbCr color space. The Y channel is called ‘luma’ (the intensity of the light, i.e. the grayscale image), the two other channels, Cb and Cr, are called ‘chroma’ (the color components).

Besides decorrelating the pixel information, this color transformation has another advantage: the human eye is more sensitive to luma than it is to chroma, so in lossy compression, you can get away with more loss in the chroma channels than in the luma channel.

This color space transformation itself already introduces some loss, due to rounding errors and limited precision. If you transform an image containing all 16.7 million different colors from RGB to YCbCr and back, and then count the number of different colors, you’ll end up with only about 4 million different colors. Most of the loss is in the red and blue channels.

http://res.cloudinary.com/jon/RGB_YCbCr.png

Chroma subsampling

The YCbCr color transform by itself does not result in generation loss. It’s a relatively small, one-time loss in color precision, but it does not accumulate. JPEG does something else too though: it does so-called ‘chroma subsampling’, often referred to with the somewhat cryptic notation 4:2:0 (chroma subsampling is optional, but typically done by default). This means that only the Y channel is encoded at full resolution; for the two chroma channels Cb and Cr, the image resolution is cut in half both horizontally and vertically. In that way, instead of having chroma channels that take up two thirds of the information, they are reduced to one third of the total.

Chroma subsampling does contribute to generation loss and can lead to so-called `color bleeding’ or ‘color drifting’. Effectively, the chroma channels become increasingly blurry with each iteration of subsampling/upsampling. For example, this is what happens if you take an image and save it with a JPEG quality of 100 with 4:2:0 chroma subsampling:

Original:
Original
After 1 encoding:
After 1 encoding
After 100 encodings
After 100 encodings
After 1,000 encodings:
After 1,000 JPEG encodings

This is one of the factors that can lead to generation loss. But we haven’t discussed the real loss introduced by JPEG yet...

Quantization

The details of how JPEG compression actually works – the Discrete Cosine Transform (DCT) in 8x8 blocks – are a bit tricky to understand (if you’re interested: the Wikipedia article on JPEG is a good starting point). But the thing that is relevant for generation loss can be understood without needing to dig that deep. The core of JPEG compression is quantization, which is a very simple yet effective mechanism.

How does it work? Suppose you want to compress some sequence of numbers – it doesn’t really matter whether these numbers represent pixel values, DCT coefficients or something else. The amount of space you need to encode these numbers depends on how large the numbers are: for smaller numbers, less bits are needed.

So how can you make those numbers smaller? The answer is simple: just divide them by some number (this number is called a ‘quantization constant’) in the encoder, and then multiply it again by that same number in the decoder. The larger this quantization constant, the smaller the encoded values will become, but also the more lossy the whole operation becomes, since we’re rounding everything to integers here (otherwise the numbers wouldn’t really become smaller).

For example, suppose you want to encode the following sequence of numbers:

Original:

50

100

150

200

250

300

If you use a quantization constant of 50, you can greatly reduce these numbers and still get back to the original sequence:

Encode:

1

2

3

4

5

6

times 50

Decode:

50

100

150

200

250

300


Most of the time, we will not be that lucky and we will get some loss, but the resulting values are still ‘close enough’. For example, if we use the quantization constant 100, we get even smaller numbers, at the cost of some loss:

Encode:

0

1

1

2

2

3

times 100

Decode:

0

100

100

200

200

300


As you can see, the ‘smooth’ sequence of numbers now became a not-so-smooth sequence of numbers. It’s this kind of quantization effect that leads to so-called `color banding’.

The higher the quantization constant, the lower the image quality and the smaller the JPEG file. Quality 100 corresponds to the quantization constant 1, in other words, no quantization at all. For the sake of this example, suppose a JPEG quality of 70 corresponds to the quantization constant 60, while a JPEG quality of 80 corresponds to the quantization constant 35. Clearly, the quality 80 image will be closer to the original than the quality 70 image:

Quality 80 encode:

1

3

4

6

7

9

times 35

Quality 80 decode:

35

105

140

210

245

315


Original:

50

100

150

200

250

300


Quality 80 error:

-15

5

-10

10

-5

15


Quality 70 encode:

1

2

2

3

4

5

times 60

Quality 70 decode:

60

120

120

180

240

300


Original:

50

100

150

200

250

300


Quality 70 error:

10

20

-30

-20

-10

0


In this case, the quality 80 sequence has a maximum error of 15 (and in general it cannot have a larger error than half of the quantization constant, so 17), while the quality 70 sequence has a maximum error of 30.

But what happens if you take the quality 70 image, and re-encode it at quality 80? Now the ‘original’ is no longer the original sequence, but the decoded quality 70 image is:

Quality 70 decode:

60

120

120

180

240

300


Quality 80 encode:

2

3

3

5

7

9

times 35

Quality 80 decode:

70

105

105

175

245

315


Original:

50

100

150

200

250

300


Quality 80 error:

10

-15

-15

-5

5

15


Total error w.r.t. original:

20

5

-45

-25

-5

15


If we are lucky, like on the second value in the sequence, the error of the first generation encoding (+20) is partially compensated by the error of the second generation encoding (-15) and the result is actually closer to the original again. But that’s just luck. The errors can just as well add up. In this example, the maximum error is now 45, which is larger than the maximum error from either quantization by itself.

This explains why re-saving a JPEG file at a higher quality setting than the original is always a bad idea: you’ll get a larger file, with more loss than if you would re-save it at the exact same quality setting.

What about other image formats?

The JPEG file format is about 25 years old now, so maybe that’s why it suffers from this problem of generation loss. Surely more modern image formats like WebP (released in 2010) or BPG (released in 2014) are better in this respect, right?

Sadly, no again. In fact, WebP and BPG suffer even more from generation loss than JPEG. It’s not really a practical issue at this point, since the formats are not commonly used by end-users and most WebP or BPG images you’ll find on the internet will be ‘first generation’. But this could very well become a bigger problem should those formats become more popular.

After 1,000 encodings:
After 1,000 encodings
After 5,000 encodings:
After 5,000 encodings

Compared to WebP and BPG, JPEG is relatively robust in terms of generation loss. One of the reasons for this is that JPEG does everything in 8x8 blocks of pixels (or 16x16 if you take chroma subsampling into account), and most of the error accumulation cannot cross the boundaries of these macroblocks. The more modern formats WebP and BPG use variable-sized, larger macroblocks, which is good for compression, but it also means that an error in one part of the image can more easily propagate to other parts of the image.

This does not at all mean that WebP and BPG are bad image formats. They are actually great image formats. It just means that you have to be somewhat careful in how you use them.

What about FLIF?

FLIF is a lossless image format that outperforms other lossless image formats. FLIF also has a lossy encoder which modifies the image so that the lossless compression works better on it. It is much less sensitive to generation loss because the format itself is lossless – the color space is not YCbCr but YCoCg, which does not introduce loss, and there is no chroma subsampling, nor transformation to DCT which introduces rounding errors – and also because of the way it adds loss. Instead of using quantization, it rounds small values to zero and discards a number of bits. This works because the values it encodes are differences (between predicted pixel values and actual pixel values), not absolute values (of DCT coefficients). For example, to go back to the example that illustrated how quantization loss can accumulate:

Original:

50

100

150

200

250

300


FLIF high quality

48

96

144

200

248

296

3 bits discarded, values < 20 become 0

FLIF low quality

0

96

160

192

256

288

5 bits discarded, values < 60 become 0

FLIF high quality after low quality: nothing changes

FLIF low quality after high quality: same as low quality directly


However, even lossy FLIF is not immune to generation loss if you significantly modify the image between generations, for example by doing a rotation or resizing.

How to avoid generation loss

There are only two ways to avoid generation loss: either don’t use a lossy format, or keep the number of generations as close as possible to 1. The generation count has a larger impact on the image quality than the actual quality settings you use. For example, if you save an image first with a JPEG quality of 85 and then re-save it with a quality of 90, the result will actually be more lossy than if you saved it only once with a quality of 80.

Avoiding lossy formats is a good idea if possible. When editing images, it is best to store the original and intermediate images using lossless image formats like PNG, TIFF, FLIF, or native image editor formats like PSD or XCF. Only when you’re done should the final image be saved using a lossy format like JPEG to reduce the file size. If you later change your mind and want to do some further editing, you can go back to the lossless originals and start from there.

In some cases this is not an option though. If you find an image on the internet that you want to reuse and edit (say to create a very funny meme), chances are the image is a JPEG file, and the original cannot be found. In this case, one thing you can do is track down the image using Google Image Search, and try to find the earliest generation, i.e. the oldest and highest resolution version of the image.

In particular, if you encounter images on social media websites like Facebook or Twitter, take into account that these websites automatically transcode uploaded images, so generation loss can easily accumulate if an image goes viral and it jumps frequently between those different websites. For this reason, using “Share” or “Retweet” is better than downloading the image and then re-uploading it.

Finally, if you really need to edit a JPEG file, there are some ways to avoid or minimize generation loss, depending on what kind of edits you want to make:

  • If all you need to do is cropping or rotation by 90 degrees: this can actually be done without fully re-encoding the JPEG file, so without any generation loss.
  • If you do actual editing of some (but not all) of the pixels, you should of course work with lossless files in your image editor, but to save the final image, it’s probably best to use the exact same quality settings as the original JPEG file (as we explained above, this introduces less generation loss than if you use a higher quality setting).
  • If your editing is changing all or most of the pixels – e.g. you’re scaling down, rotating by an arbitrary angle, applying some kind of global filter or effect – then the original quality setting doesn’t really matter anymore, so using a high(er) quality setting certainly makes sense.

If you’re using Cloudinary, I would recommend always uploading the highest resolution, highest quality original image you have available (lossless if possible), especially if you’re using automatic format selection (f_auto). Cloudinary always keeps your original image as is (adding zero generation loss), and each derived image is encoded directly from the original (adding one generation, which is inevitable). That way you ensure that your image assets are future-proof: when in the future, higher image qualities and/or resolutions are required or desired, or new image formats become available, it will be an effortless change.

Cloudinary delivers holistic prescription to mindbodygreen for managing image-heavy web design

$
0
0
Case study of mindbodygreen

mindbodygreen is a digital media brand dedicated to health and wellness. The company’s website bring together leaders in the wellness world, best-selling authors, fitness experts, trusted healers, pioneering doctors, top chefs, celebrities and top-tier journalists to provide readers fresh, expert content and tools to help them live healthy, happy lives. The company was founded in 2009 and is headquartered in Brooklyn, N.Y. 

The Challenge: Image-heavy web redesign 

mindbodygreen’s website has more than 12 million unique visitors each month, with about 55 percent of them accessing the site from mobile devices. In early 2015, the company began the process of rebranding, which included an art-directed, image-heavy redesign of its website
 
“If you analyzed our home page across multiple breakpoints, we had more than 20 different aspect ratios we needed to support,” said Tim Glenister, mindbodygreen’s CTO. “We had standard crops to make for each aspect ratio, then we would have to resize each image accordingly. This really put the pressure on our editorial team, and it was taking up too much of their time per article.”
 
The new design also used a lot more bandwidth than expected, as the site was serving between 25 million and 35 million pages a month. “The bandwidth dedicated to serving image content was skyrocketing because our visitors were consuming more images, especially our mobile users” Glenister added. 
 
mindbodygreen_website

The Cloudinary Solution: Fast implementation and instant impact

About a month after launching the redesign of the mindbodygreen website, Glenister and his team realized the process they were using – which included Amazon CloudFront for serving static images – was going to be unsustainable in the long run because it was so time consuming for the editorial team. 
 
They quickly started looking for solutions that would enable them to crop images on the fly, and examining how other image-heavy websites handled their image transformation. This search led them to Gawker’s website, where they dug into the source code and discovered the unique URLs produced by Cloudinary
 
After reaching out to Cloudinary, mindbodygreen set up a trial of the solution and in less than a week was running it in production. “Implementing the basic Cloudinary code took us less than a day” Glenister said, adding that they were able to set up the source URLs so that Cloudinary could pull images off their servers. “Within a couple of weeks, we were using Cloudinary to transform all our site images, and implemented the flags and filters we needed to optimize our bandwidth.”
 
With Cloudinary, mindbodygreen can update the images for its 25,000 articles on-the-fly, optimizing them for any device and any resolution used by visitors. “We are using lazy loading, DPR parameters, and HTML picture tags with polyfill, which enables us to serve retina images to retina devices and standard images to other devices” he said.
 
Glenister mentions that there are many other image transformations, such as overlays, that they find useful as well. For example, Cloudinary enables conditional transformations that allow a logo overlay to be adjusted as a percentage of the image size, depending on the pixel width of the image. “We need to create three different images, over three different break points – requiring us to swap out images, which would have been challenging,” he explained. “With Cloudinary we can do this with a single URL, and apply it to every image in our library, adding a transformation through code that could be live on our site the next day. Without Cloudinary, it would take several days to engineer this process.”
 
 mindbodygreen website
 
Glenister added that with Cloudinary, mindbodygreen also can easily conduct A/B tests, in conjunction with Optimize.ly, to see what design works best. “To visually update the site with just code, versus having to change the underlying assets has been huge for the engineering and creative team. It has allowed us test creative concepts in real-time that would not have been possible before” he noted.  

The Results: An improved user experience coupled with significant cost, time and bandwidth savings

The time and cost savings related to the move to Cloudinary were almost instantaneous. In just the first month, mindbodygreen was able to drop its image serving costs by 75 percent, while reducing page load by over 33 percent and page weight by 60 percent on average across devices.
 
“We’re in a game where we need our users to have a great experience with our content, especially on mobile devices,” Glenister said. “Before we used Cloudinary, we had a site that was serving a lot of images that were not appropriately sized, and that was slowing down the user experience and using up their bandwidth.”
 
The Cloudinary solution enables mindbodygreen’s small team of about 30 individuals to be agile and move quickly, yet still have a strong brand based on the visual design the creative team envisions. Glenister estimates that the company is saving more than 400 minutes a week – almost a full day of work for a single person – by eliminating the manual processes related to image transformations. 
 
It’s hard to get any simpler than Cloudinary. In fact, it was almost scary how easy it was – we thought we had screwed something up,” Glenister concluded. “We can now manage our assets more effectively with the Cloudinary solution, and we can play around with transformations and overlays to see how things react, since we’re only manipulating URLs. Cloudinary is indispensable to us.” 
 

Unlocking value from digital assets with content categorization

$
0
0
Imagga_Cloudinary_API
This is a guest post by Georgi Kadrev, co-founder and CEO, ImaggaImagga develops and offers technologies, services, and online tools for visual image recognition. Cloudinary provides an add-on for using Imagga's image recognition capabilities, fully integrated into Cloudinary's image management and manipulation pipeline.

Many companies with vast libraries of digital assets can quickly find themselves overwhelmed when sorting through millions of images to find just the right one for that new web design or targeted email campaign. Sure, tagging images can help narrow down the search. But if you’re doing manual tagging, there’s a lot of time required, and the results may not be as consistent across the board. Then once you select a particular image, how do you know if it’s the best one to use? 
 
My company, Imagga, offers an image recognition platform that provides APIs for automated image categorization and conceptual tagging. We use powerful beyond state of the art machine learning algorithms to provide technology that can reduce the time, effort and cost related to manually curating images. We simplify the process, supporting large-scale automation of image categorization, which enables you to quickly and easily tag photos in high-level, pre-defined categories, such as those featuring indoor or outdoor scenes; by subject matter, such as children, animals, food, parties, landscape or other topics. 
 
Last fall, Cloudinary began offering an Imagga add-on for automatic image categorization and tagging, which was explained in a previous blog post. In that post, we addressed the technical aspects of how Imagga and Cloudinary work together. The idea of this blog is to showcase the business benefits of merging the power of both of our solutions.

Imagga_Cloudinary_tagging

Digital asset management

You can automatically add text tags to your digital assets using Imagga, making it easier to search vast libraries using simple text queries. Adding valuable metadata to your photos, you can create a single, organized library of assets that can be leveraged across your entire organization.
 
This approach is particularly useful if your company needs to maintain digital assets and make them available for various teams. For example, if the marketing team needs an image of a “beach” for a new email campaign about promoting vacation packages, they can search the entire library and select the most appropriate image for their project (previously bought and used by the PR team for example). Then, with Cloudinary, they can transform and optimize the image to fit their needs.   

Analytics

Using Imagga tagging and categorization API, you can add context to your images, Cloudinary’s API can associate that information with the image file and share it with your analytics tools. By examining both the categorization and usage data, you can gain valuable insights into how different asset types impact engagement and conversion.
 
For example, you can test how different images – such as a landscape vs. an animal photo – may impact engagement for a specific campaign. Or you may be able to identify trends in image content that have a measurable impact on other key performance indicators (KPIs). By gaining insight into this unique data, you can be more strategic, leveraging optimal content when designing websites, apps or email campaigns. 

User profiling

If you are categorizing photos that are uploaded on your service or shared on social media, you can learn a lot about demographics and behavior patterns of end users. Consider someone who posts photos of children, taken in parks or playgrounds. Based on the category or/and tags returned for any particular image, you can surmise that the user is a parent or perhaps a teacher. But if photos feature parties, networking events, group sports activities, it’s likely that user is a college student or young professional. 
 
It’s easy to see that with Imagga and Cloudinary, you can go well beyond simple image recognition and tagging. We enable you to scale seamlessly and gather meaningful data from digital assets to make strategic business decisions that could improve your users’ experience and drive greater profits.  
 

Dynamically generating ZIP files with one line of code

$
0
0

Dynamic ZIP creation from code

As a developer, you want to allow your users to download multiple files in a single click. An easy way to download multiple files and share them is to generate a ZIP file. When images are involved, you may also want to normalize the original images before including them in the ZIP file, by scaling them down to the same maximum resolution or converting them to the same format.

In the following simple example, 3 images of cats have been uploaded to the cloud.

fat_cat.jpg fat_cat kitten.jpg kitten hungry_cat.jpg hungry_cat

With one line of code, you can generate a dynamic URL that, for example, automatically creates and then delivers a ZIP file containing the cat images, all scaled down to a width of 200 pixels:

https://api.cloudinary.com/v1_1/demo/image/generate_archive?api_key=373364719177799&expires_at=1557919777&mode=download&public_ids%5B%5D=fat_cat&public_ids%5B%5D=kitten&public_ids%5B%5D=hungry_cat&signature=a2f86b73d32d2a778493d6759d59059d0a30076d&timestamp=1464179836&transformations=c_scale%2Cw_200

The ability to dynamically generate and deliver ZIP files to your users by including one line of code can be useful for developers in a number of ways. For example:

  • Social and messaging apps that allow users to select multiple files to send to another recipient, who subsequently receives all the files in one ZIP file (e.g., the Gmail feature where you can download all attachments as a single ZIP file).
  • Applications that include image galleries and allow users to select multiple images and then download a ZIP file with all the selected images (e.g., as Google Photos has implemented).
  • Allowing your users to download multiple images simultaneously in a single ZIP file, where all the images have been normalized to a certain size, format or quality, (or any other image transformation you want to apply to all the images).

Generating ZIP files of images in the cloud

Cloudinary supports generating ZIP files using the generate_archive method, that can include any type of file, and offers various options for determining which files to include in the ZIP file (e.g., according to the file's name, all files in the same folder, etc). The method also allows you to apply transformations to all the images before including them in the file and set various options for generating the ZIP file (e.g., naming the file). For more information on all the options available for generating ZIP files, see the generate_archive documentation.

Cloudinary enables you to create and deliver ZIP files in one of the following two ways:

  • Precreate the ZIP file and upload it to the cloud.
  • Generate a dynamic URL for creating and downloading a ZIP file on demand.

Create a ZIP file of images

To precreate a ZIP file, use the create_archive method of the Upload API, which also automatically uploads the ZIP file to the cloud, and then give your users a link for downloading it. This option is best if multiple users will be downloading the resulting ZIP file.

For example, to create a ZIP file called small_cats.zip that contains small (50x50) thumbnails of all of the images in your account that have been tagged as "cats":

Ruby:
Cloudinary::Uploader.create_archive(:tags => 'cats', 
    :resource_type => 'image', :target_public_id => 'small_cats.zip',
    :transformations => {:width => 50, :height => 50, :crop => :fill})
PHP:
\Cloudinary\Uploader::create_archive(array(
    'tags' => 'cats', 'resource_type' => 'image', 
    'target_public_id' => 'small_cats.zip', 'transformations' => array(
        'width' => 50, 'height' => 50, 'crop' => 'fill')));
Python:
cloudinary.uploader.create_archive(
    tags = 'cats', resource_type = 'image', 
    target_public_id = 'small_cats.zip', transformations = {
        width = 50, height = 50, crop => 'fill'})
Node.js:
cloudinary.v2.uploader.create_archive(
    { tags: 'cats', resource_type: 'image', 
    target_public_id: 'small_cats.zip', transformations: {
        width: 50, height: 50, crop: 'fill'}},
    function(error,result) {console.log(result) });
Java:
cloudinary.uploader().createArchive(
    ObjectUtils.asMap('tags', 'cats', 'resource_type', 'image',
    'target_public_id', 'small_cats.zip', 'transformations', 
    Arrays.asList(
        new Transformation().width(50).height(50).crop('fill')));
cURL:
curl https://api.cloudinary.com/v1_1/demo/image/generate_archive -X POST --data 'tags=cats$resource_type=image&target_public_id=small_cats.zip&timestamp=173719931&api_key=436464676&signature=a788d68f86a6f868af&transformations=c_fill%2Cw_50%2Ch_50'

The response to the API call includes all pertinent information about the created zip file, including the URL needed to access it, in this case:

Ruby:
cl_image_tag("small_cats.zip")
PHP:
cl_image_tag("small_cats.zip")
Python:
CloudinaryImage("small_cats.zip").image()
Node.js:
cloudinary.image("small_cats.zip")
Java:
cloudinary.url().imageTag("small_cats.zip")
jQuery:
$.cloudinary.image("small_cats.zip")
.Net:
cloudinary.Api.UrlImgUp.BuildImageTag("small_cats.zip")

Generate a dynamic URL for downloading a ZIP file on demand

Instead of precreating the ZIP file, you can generate a signed URL for creating a ZIP file on the fly and on demand with the download_archive_url method of the Utils API. The ZIP file is only created and streamed to your user when the URL is accessed. The resulting ZIP file is not cached or stored in your Cloudinary account, so this option is best if only a single user downloads the resulting ZIP file and avoids waste if the URL is not accessed by the user.

For example, to generate a signed URL for creating and delivering a ZIP file that contains the 'fat_cat' and 'kitten' images:

Ruby:
Cloudinary::Utils.download_archive_url(
    :public_ids => ['fat_cat', 'kitten'], 
    :resource_type => 'image')
PHP:
\Cloudinary\Utils::download_archive_url(
    array(
        'public_ids' => array('fat_cat', 'kitten'), 
        'resource_type' => 'image'));
Python:
cloudinary.utils.download_archive_url(
    public_ids = ['fat_cat', 'kitten'], 
    resource_type = 'image')
Node.js:
cloudinary.v2.utils.download_archive_url(
    { public_ids: ['fat_cat', 'kitten'], resource_type: 'image'},
    function(error,result) {console.log(result) });
Java:
cloudinary.utils().downloadArchiveUrl(
    ObjectUtils.asMap('public_ids', Arrays.asList('fat_cat', 'kitten'), 
        'resource_type', 'image'));
cURL:
curl https://api.cloudinary.com/v1_1/demo/image/generate_archive -X POST --data 'public_ids[]=fat_cat&public_ids[]=kitten$resource_type=image&mode=download&timestamp=173719931&api_key=436464676&signature=a788d68f86a6f868af'

The API call returns the URL needed to dynamically create and deliver the ZIP file, in this case:

https://api.cloudinary.com/v1_1/demo/image/generate_archive?api_key=373364719177799&expires_at=1557919777&mode=download&public_ids%5B%5D=fat_cat&public_ids%5B%5D=kitten&signature=45411c9ad47e06a2a9468658d919b045d810ec1b&timestamp=1464180350

Dynamic ZIP files with a single line of code

Generating ZIP files with a single line of code allows you to organize, streamline, normalize and optimize multiple image delivery to your users. Either create the ZIP file and upload it to the cloud, or generate a dynamic URL that creates and delivers the ZIP file on demand. For more information on all the options available for generating ZIP files, see the generate_archive documentation. The feature is available for use with all Cloudinary accounts, including the free tier.


Effective strategies for improving web content personalization

$
0
0

Improving web content personalization

At the Intersection of IT and Marketing

Personalization of web content is becoming increasingly important for businesses to gain – and maintain – their competitive advantage. Web personalization is key to increasing conversion rates and return rates, as well as boosting retention, time-on-site, and page views, according to a December 2015 VentureBeat study, which noted that 87 percent of companies have seen a lift of at least 5 percent in their most important metrics as a result of personalization. 
 
But personalization efforts are no longer solely the bailiwick of marketing. To be successful, IT, design and marketing must work together. Research firm Gartner noted that teamwork is needed in order to evaluate solutions, source data, manage and consolidate the application portfolio, and integrate solutions.  
 
This collaborative effort is predicted to be fruitful. Gartner estimates that by 2018, CIOs who build strong relationships with CMOs will be able to drive a 25 percent improvement in return on marketing technology investment. Furthermore, those firms that that incorporate personalization into digital commerce will realize revenue increases up to 15 percent. 
 
“Personalization enables sellers to remain competitive and drive customer satisfaction, loyalty and advocacy, as well as increase profitability,” Gartner noted. “Consumers who have personalized experiences spend more. Companies that incorporate personalization into B2B digital commerce strategies will make their business customers more efficient, provide a better customer experience and increase the likelihood of greater purchase value as well as upselling and cross-selling — all leading to greater revenue.”

Creative Bottleneck Drives Companies to a Screeching Halt

While the benefits and projected ROI described by Gartner and others are enticing, web personalization programs are very resource intensive. Developers must build code for alternate experiences, then marketers must generate the appropriate content. But as they work together, it quickly becomes apparent that there’s a creative bottleneck. 
 
There are many content optimization/personalization tools – such as Maxymiser, Optimizely, Adobe Target, Ensighten – available today that offer WYSIWYG (What You See Is What You Get) editors to help speed coding and development. But the creative bottleneck stubbornly remains. It all boils down to manpower. With current tools, companies can create great personalization or A/B test ideas. But they are unable to execute on them because the creative team does not have the vast number of people, the time or the resources to develop what’s needed. Effective web personalization needs more than even infinite manpower can be expected to achieve.
 
For many companies, it’s a Catch 22. The more successful they are in their optimization program, the harder and more resource-intensive it will be to scale and maintain. This is especially true as personalization becomes increasingly granular, requiring even more content catered to the individual user. 

The Green Light for Improved Web Content Personalization 

So, how can your company scale up its web content personalization initiatives without hiring an army of creative folks?  Here are some strategies that can help you achieve optimal web personalization:
 
Improved personalization content

Start with A/B Testing

Most A/B testing tools enable you to add segments to your experiments to get insight into how different audiences are behaving in response to each experience. Tools like Maxymiser will automatically find the relevant segments and present them to you. But  with some others you have to add the segments ahead of time, which can be guesswork. A/B testing your way into personalization is a great way to back into a personalized site, while also gathering data ahead of time about which personalization strategies are most effective for future use. Of course this leaves out many possibilities as some personalization strategies can’t be backed into. But A/B testing is a great way to increase your ROI with limited resources.

Increase the Number of Experiences per Test

Many tests are only run with the default experience and a single alternate. This is fine for UX changes where only a single alternate makes sense. But if your goal is personalization, you should add more experiences since you never know what may garner responses from different segments of traffic. Instead of two experiences, try four or more. This approach will give you more chances to find something relevant to your core segments.

Know Who Your Visitors Are

The more you know about your visitors, the more opportunities you will have for personalization. This may sound obvious, but from my experience, it’s often overlooked. In addition to the typical temporal, behavioral and browser-level attributes you are looking at, see what other data is available about your visitors, including information that other internal teams may control.  For instance, your CRM probably contains a wealth of information about your visitors’ gender, purchase history, campaign engagement and more.  Several data management platforms (DMPs), such as Oracle Bluekai and Adobe Audience Manager, and even some tag management tools, like Ensighten and Tealium, can help you onboard and make use of this data in your A/B testing tool for segmentation and targeting. 

Leverage Dynamic Content Creation Tools

You need to remove the limitations associated with manually creating and managing content, and instead take a programmatic approach to those tasks. Tools, such as Cloudinary, automate the process of creating and delivering images dynamically. Simply changing the URL of the image and applying custom parameters right in the image URL will enable you to build a new, customized image on the fly, without creative team involvement. You can reuse existing creative content and transform it to fit your current requirements by re-sizing, cropping, overlaying text and other images, adding borders and more. Taking this step will enable you to scale and execute your personalization strategy by eliminating that creative bottleneck. If you cannot automate content creation, you’ll remain limited not only in the tests you can execute, but in those that you can fully scale going forward after winners are determined.  
 
 
For web personalization and content optimization to be successful, you must take a broader approach – looking across your organization to encourage closer collaboration between IT, design and marketing. By working in tandem, and leveraging a number of tools available on the market for testing, dynamic content creation and automation, your company can deliver content that is tailored to a wide variety of users, which will in turn translate into more sales, greater return on investment and a stronger, long-term relationship with your customers. 
 

What matters most to web users might surprise you

$
0
0
Image performance
 
The most common frustrations voiced by people when visiting a website are the time it takes for pages to load and the amount of bandwidth some sites eat from their monthly mobile plans. 
 
What these users might not realize is that, in many cases, the culprit is the same: website image performance. Ensuring images are optimized is particularly important to businesses who manage these sites since they account for the majority of the downloaded bytes on a web page, and can slow down load times considerably. 
 
For web developers, image performance is key. Cloudinary can help you automate image optimization, and avoid the pitfalls that can waste users’ time, money and bandwidth, and hampers your site’s performance, which negatively impacts your company’s bottom line. 
 
Check out the infographic below, where you will see the impact that page load time, as well as image format and quality, can have on the user experience.
 
 
Image performance infographic


Optimizing web performance and your bottom line

$
0
0

Optimizing web performance and speed

Time is money

Patience is not a virtue for website visitors and online shoppers. Every fraction of a second counts when it comes to keeping – or losing – a visitor to your website.  
 
Loading time is a major contributing factor to page abandonment, according to an infographic on the Kissmetrics blog using statistics from Akamai and Gomez. Because the average web visitor has no patience for a page that takes too long to load, abandonment increases as a percentage with every second of load time. Nearly 40 percent of users will abandon a page after 10 seconds, the blog noted. Mobile Internet users probably experience the most frustration with this issue –  73 percent noted that they’ve encountered a website that was too slow to load. 
 
The page load problem directly impacts the shopping behavior of website visitors. The Kissmetrics blog noted that 79 percent of shoppers who were dissatisfied with website performance are less likely to buy from the same site again. Nearly half of consumers expect page to load in 2 seconds or less, and a 1 second delay will decrease customer satisfaction by 16 percent. The consequences of these delays translate into real money. In a Fast Company article,  ecommerce giant Amazon revealed that a page load slowdown of only 1 second would cost it $1.6 billion in sales revenue. Similarly, Google noted that a slow-down of just four tenths of a second in its search results would result in a loss of 8 million searches per day, which translate into millions less in online advertising. 

Getting to the Heart of the Problem

The biggest contributing factors impacting load time are images, videos and graphics on today’s websites. Today’s websites incorporate more visuals, and less text, to draw in visitors. According to HTTP Archive, nearly 64 percent of a website’s average weight is images, while video accounts for another 8 percent.
 
Since these types of media account for nearly three quarters of the website size, it’s important for you to more effectively managing images and videos on your site to improve performance and conversion rates. Let’s look at some steps you can take to reduce the impact of images and video on your website’s performance.
Image formats

Use More Efficient, Modern Image Formats

Google has added support for its WebP image format to Chrome browsers, and Microsoft has done the same for JPEG-XR in most of its Internet Explorer and Edge browsers. But many developers have still not embraced these changes, sticking with the same JPG and PNG formats, rather than taking advantage of how the modern formats can optimize their sites. Ideally, you should convert images to the WebP and JPEG-XR when appropriate, and adjust compression quality to balance between the formats. It’s important to also detect the specific browser that accesses each image and deliver a version of the image optimized to the respective browser. Doing so will enable you to ensure users receive the best images possible, in terms of visual quality and file size optimization, without slowing down your site.

Eliminate Wasteful Browser-side Resizing 

Developers often use browser-side image resizing as a shortcut, rather than resizing images on the server-side. While the end result looks exactly the same on modern browsers, the impact on bandwidth is quite different. With browser-side resizing, website visitors waste precious time downloading an unnecessarily large image and you waste bandwidth delivering it to them. For older browsers, the problem is even more pronounced as their resizing algorithms are usually sub-par. You need to make sure your images perfectly fit their required website dimensions. It’s well worth creating different thumbnails of the same image rather than delivering a large image and relying on the browser to resize it. There some tools available that can assist with this, such as an open source image resizer like ImageMagick or a cloud-based solution like Cloudinary.

Use Correct Image File Types 

JPEG, PNG and GIF are the most common file formats used on websites today, but each one has very different roles. Use the wrong format and you’re wasting your visitors’ time and your own money. A frequent mistake is using PNGs to deliver photographs. There is a common misconception that PNGs, as lossless formats, will yield the highest possible reproduction for the photos. While this is generally true, this is also quite an unnecessary optimization. It’s important to keep in mind what image format should be used for the content shown. PNG should be used for computer generated images (charts, logos, etc.) or when you need transparency in your image (image overlays); JPEG when you are showing a captured photograph; and GIF when animation is needed (Ajax loading animation, etc.). 

Don’t Use a Single Image Size Across All Delivery Mediums 

Your website is being viewed by many different devices, particularly as smartphones, tablets and smartwatches have become preferred by consumers. Often developers offer the same images across all device resolutions, using client-side resizing for the images. The images may look great, but visitors waste time loading unnecessarily large images to their devices and you pay for redundant bandwidth usage. This is particularly unfair to 3G users and roaming users who pay a large extra to download the uselessly extra high resolution images. To avoid these issues, you should identify visitors’ mobile devices and resolution using their user agent and optionally additional client-side Javascript code. With the correct resolution in hand, retrieve the best fitting image from your servers. This requires that you make available a set of thumbnails for each of your original images. There are excellent Javascript packages available that will automate this process. 

Image formats

Leverage Responsive Design

Each device that a visitor is using to access your site has different resolution. A website's markup must adapt itself to look perfect on all the different devices and in various resolutions, pixel densities and mobile device orientations. Managing, manipulating and delivering images, is one of the main challenges of responsive design that web developers face. Due to these challenges, many websites are built with the highest resolution images that may be needed and simply scaled down client-side depending on the breakpoint. This process is inefficient and harms performance. But there are options, such as the open source tool responsivebreakpoints.com, which can help you generate all the image sizes you will need, as well as the appropriate html code.

Utilize Content Delivery Networks (CDNs)

CDNS typically have servers strategically deployed around the world to shorten content round-trip times. CDNs allow images to be served more quickly to users and reduce the likelihood of crashes, enhance SEO performance, and improve the user experience. When you are choosing a CDN, you will need to consider its level of global coverage, the caching rate, ability to run logical operations at the edge, average response times, and other metrics, such as average invalidation times. 

The Impact of Change

By employing these best practices, you can truly make a difference in the user experience, encouraging visitors to stay longer, browse more, engage and make purchases. Consider the results of these companies: 
 
Apartment List, an online resource that helps individuals search for rental housing, found itself dealing with a variety of different image formats and resolution as it picks up data feeds of images from the various apartment communities featured on its site. By transforming all of these images into optimal images for presentation on mobile devices of various sizes, as well as desktops, as well as leveraging responsive design techniques, the company saw an increase of nearly 20 percent in its conversion rates. 
 
KartRocket, a SaaS-based e-commerce platform offering a transparent and complete e-commerce ecosystem that helps SMBs to quickly and easily create online stores, needed to find a way to ensure quality of images while not impacting load time or site performance for its clients. It leveraged tools to dynamically control images, so that they were optimized for small thumbnails, large banner images and main product images. This approach enabled KartRocket to achieve a 100x increase in response time for image loading. 

Enhanced speed for website

The Bottom Line

When time is money, website owners can’t afford not to take all the necessary steps to improve their visitors’ experiences. Even a fraction of a second delay in loading a page could translate into lost revenue and confidence, on the part of the consumer. Considering that images and videos are the biggest bandwidth hogs on most websites, you need to take a serious look at your web design and image formats, then take the steps necessary to ensure that media is optimized so your site – not to mention your revenues and customer perceptions – don’t suffer as result.
 

Introducing smart cropping, intelligent quality selection and automated responsive images

$
0
0

Auto everything - Images solved

Every image is unique and every one of your website visitors is different. In a perfect world, we'd like to adapt each image individually to be "just right" for every user. With "just right" being perfectly cropped, using responsive dimensions, correct encoding settings and optimal quality with the best image format.

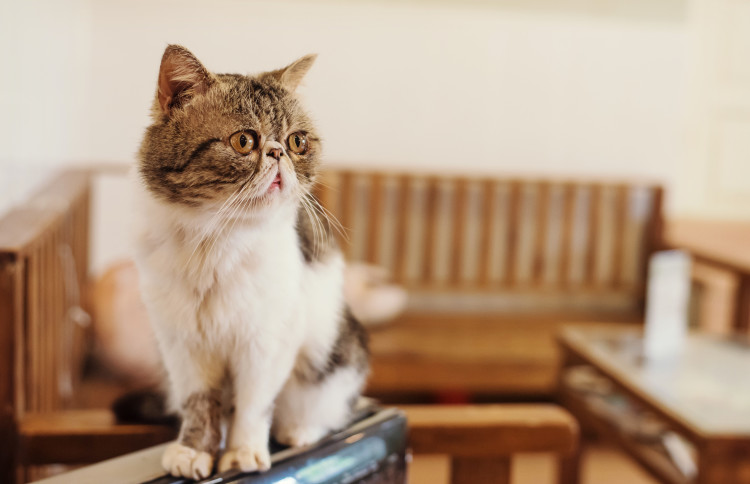
Here’s a quick example using a photo of a (...drum roll...) cat:

Original cat photo

Now, we need to adapt the image to fit the graphic design on every device and browser. The image should look great in any resolution and website layout and it should be delivered optimized to improve website performance.

Ruby:
cl_image_tag("white_cat.jpg", :client_hints=>true, :transformation=>[
  {:aspect_ratio=>"4:6", :gravity=>"auto", :crop=>"fill"},
  {:width=>"auto", :quality=>"auto", :fetch_format=>:auto}
  ])
PHP:
cl_image_tag("white_cat.jpg", array("client_hints"=>true, "transformation"=>array(
  array("aspect_ratio"=>"4:6", "gravity"=>"auto", "crop"=>"fill"),
  array("width"=>"auto", "quality"=>"auto", "fetch_format"=>"auto")
  )))
Python:
CloudinaryImage("white_cat.jpg").image(client_hints=True, transformation=[
  {"aspect_ratio": "4:6", "gravity": "auto", "crop": "fill"},
  {"width": "auto", "quality": "auto", "fetch_format": "auto"}
  ])
Node.js:
cloudinary.image("white_cat.jpg", {client_hints: true, transformation: [
  {aspect_ratio: "4:6", gravity: "auto", crop: "fill"},
  {width: "auto", quality: "auto", fetch_format: "auto"}
  ]})
Java:
cloudinary.url().transformation(new Transformation()
  .aspectRatio("4:6").gravity("auto").crop("fill").chain()
  .width("auto").quality("auto").fetchFormat("auto")).clientHints(true).imageTag("white_cat.jpg")
jQuery:
$.cloudinary.image("white_cat.jpg", {client_hints: true, transformation: [
  {aspect_ratio: "4:6", gravity: "auto", crop: "fill"},
  {width: "auto", quality: "auto", fetch_format: "auto"}
  ]})
.Net:
cloudinary.Api.UrlImgUp.Transform(new Transformation()
  .AspectRatio("4:6").Gravity("auto").Crop("fill").Chain()
  .Width("auto").Quality("auto").FetchFormat("auto")).ClientHints(true).BuildImageTag("white_cat.jpg")
Standard image crop and encoding Automatic image crop and encoding

The image on the left is a standard crop and is delivered as a standard JPEG of the original 2000px image height, resulting in a large 537KB file. However, the image on the right is perfectly cropped, scaled down to 300px wide and delivered as an optimized 17KB WebP image on Chrome (saving 97% of bandwidth).

Optimal delivery on an image-by-image and user-by-user basis is quite challenging. It requires a considerable know-how on the intricacies of file formats, vision algorithms and browser support. This challenge gets even more complicated when you want to scale up to hundreds of thousands if not hundreds of millions of images that may be uploaded to your websites and mobile apps.

So how is this achieved, and how can you automatically apply it to your own website and mobile apps?

Images solved

When we launched the Cloudinary service more than 4 years ago, we wanted to eliminate the R&D time involved in managing the images of web and mobile applications. The service that was written by developers for developers, and was designed to be a complete solution for all their image needs. Today we are excited to introduce a major milestone in making our vision a reality by reaching the state of Images solved.

Developers want to create the perfect image crop focusing on the most important region. Developers need to determine the optimal file format and encoder settings for every image, to perfectly represent the content with the minimum number of bytes, for a fast and fluid user experience. Developers need to create multiple variants of every image for responsive delivery on various devices and in different resolutions.

Every image is unique in its content, and every visitor to your website has a different device, resolution, browser and network speed. It is challenging to deliver an optimal image to every user, especially when you need to scale that up to hundreds, thousands or millions of images.

The "Images Solved" solution introduced here, takes Cloudinary's cloud-based image management solution to the next level using automatic content-aware and context-aware image adaptation.

The concept is to let users upload one high resolution copy of any image and then automatically adapt the image, in real-time, to focus on the most important region of the image, select the optimal quality and encoding settings and responsively deliver the image to any device in any resolution or pixel density. We wanted to simplify the life of a developer further, by automating the following critical image manipulation and delivery components:

  • Automatic content-aware cropping - g_auto
  • Intelligent content-aware encoding - q_auto
  • Dynamic format selection - f_auto
  • Automatic responsive images - w_auto and dpr_auto

Automatic content-aware cropping - 'g_auto'

For any website design, and specifically any responsive design, simply scaling an image up or down isn't always enough -  images often require cropping to fit diverse device layouts, resolutions and aspect ratios while maximizing the visibility of important areas within the image.

Manually cropping individual images to fit them on various resolutions is resource intensive and quite impossible if your web application includes massive user generated content and a dynamic responsive layout.

Cropping all images to focus on the center of the image, by default, can result in a loss of important content.

Cloudinary already supports face detection to perfectly crop a photo, but what if you want to focus on more than just the face or if the image subject is a product, a food item or a pet?

The Cloudinary content-aware cropping algorithm uses a combination of heuristics to automatically detect the region of interest in every image and then crop them on the fly (using dynamic URLs) to fit the graphic design and layout of your site when viewed on any device, and without losing focus on important content.

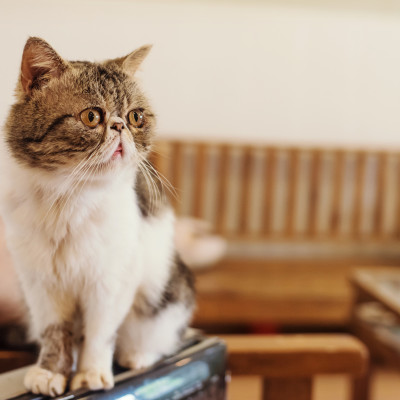
For example, the following photo was uploaded to the cloud:

Original upload photo

Now we need to adapt this image to fit in three different pages on a website: in landscape (e.g., 800x200), in portrait (e.g., 300x600) and as a square (e.g., 300x300). As you can see below, standard center cropping brings problematic results, as most of the cat is left out.

Regular portrait image cropping
Standard image cropping
Regular square image crop

Setting the gravity image cropping parameter to auto or using g_auto in the following on-the-fly image manipulation URL, generates the optimal cropping result, ensuring that the cat is always included.

Ruby:
cl_image_tag("sofa_cat.jpg", :width=>300, :height=>600, :gravity=>"auto", :crop=>"fill")
PHP:
cl_image_tag("sofa_cat.jpg", array("width"=>300, "height"=>600, "gravity"=>"auto", "crop"=>"fill"))
Python:
CloudinaryImage("sofa_cat.jpg").image(width=300, height=600, gravity="auto", crop="fill")
Node.js:
cloudinary.image("sofa_cat.jpg", {width: 300, height: 600, gravity: "auto", crop: "fill"})
Java:
cloudinary.url().transformation(new Transformation().width(300).height(600).gravity("auto").crop("fill")).imageTag("sofa_cat.jpg")
jQuery:
$.cloudinary.image("sofa_cat.jpg", {width: 300, height: 600, gravity: "auto", crop: "fill"})
.Net:
cloudinary.Api.UrlImgUp.Transform(new Transformation().Width(300).Height(600).Gravity("auto").Crop("fill")).BuildImageTag("sofa_cat.jpg")
Automatic portrait image cropping
Intelligent image cropping
Automatic square image crop

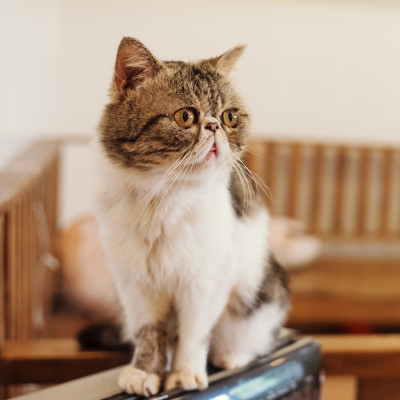
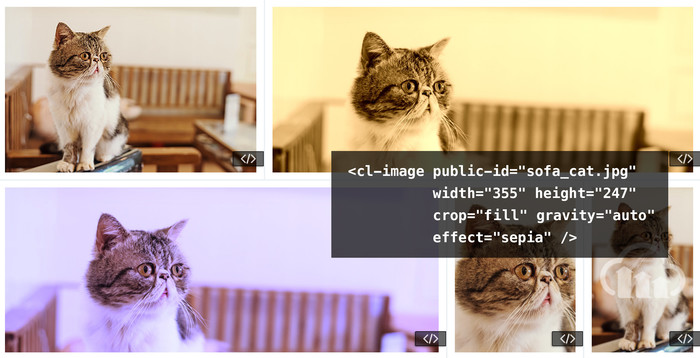
The images above used the popular fill crop mode, which tries to keep as much of the original image while cropping. However, sometimes websites prefer to display a more zoomed-in thumbnail emphasizing the person or object in the original image. For example, take a look at the following uploaded images:

Cat photo Car photo Red bike photo

For example, let's create a 300x270 thumbnail of each of the original images. The following images are dynamically created in the cloud using automatic face detection by setting gravity to face (g_face).

Ruby:
cl_image_tag("sofa_cat.jpg", :width=>300, :height=>270, :gravity=>"face", :crop=>"thumb")
PHP:
cl_image_tag("sofa_cat.jpg", array("width"=>300, "height"=>270, "gravity"=>"face", "crop"=>"thumb"))
Python:
CloudinaryImage("sofa_cat.jpg").image(width=300, height=270, gravity="face", crop="thumb")
Node.js:
cloudinary.image("sofa_cat.jpg", {width: 300, height: 270, gravity: "face", crop: "thumb"})
Java:
cloudinary.url().transformation(new Transformation().width(300).height(270).gravity("face").crop("thumb")).imageTag("sofa_cat.jpg")
jQuery:
$.cloudinary.image("sofa_cat.jpg", {width: 300, height: 270, gravity: "face", crop: "thumb"})
.Net:
cloudinary.Api.UrlImgUp.Transform(new Transformation().Width(300).Height(270).Gravity("face").Crop("thumb")).BuildImageTag("sofa_cat.jpg")
Face detection based cropped thumbnail Face detection based cropped thumbnail Face detection based cropped thumbnail

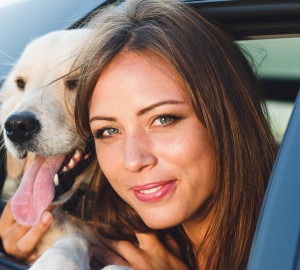
The results above are nice, but they are not optimal thumbnails for the original photos. We see more of the blurry sofa instead of the nice cat, it's hard to see that there's a dog next to the lady, and no one will know that a red bike was in the original image.

Cloudinary's automatic cropping algorithm in the thumbnail generation mode focuses on the area of interest - not only on facial close ups - intelligently analyzing the image content. The thumbnails below are created by setting the crop mode to thumb and the gravity to auto (c_thumb,g_auto). These thumbnails effectively reflect the story behind each photo.

Ruby:
cl_image_tag("sofa_cat.jpg", :width=>300, :height=>270, :gravity=>"auto", :crop=>"thumb")
PHP:
cl_image_tag("sofa_cat.jpg", array("width"=>300, "height"=>270, "gravity"=>"auto", "crop"=>"thumb"))
Python:
CloudinaryImage("sofa_cat.jpg").image(width=300, height=270, gravity="auto", crop="thumb")
Node.js:
cloudinary.image("sofa_cat.jpg", {width: 300, height: 270, gravity: "auto", crop: "thumb"})
Java:
cloudinary.url().transformation(new Transformation().width(300).height(270).gravity("auto").crop("thumb")).imageTag("sofa_cat.jpg")
jQuery:
$.cloudinary.image("sofa_cat.jpg", {width: 300, height: 270, gravity: "auto", crop: "thumb"})
.Net:
cloudinary.Api.UrlImgUp.Transform(new Transformation().Width(300).Height(270).Gravity("auto").Crop("thumb")).BuildImageTag("sofa_cat.jpg")
Automatically cropped thumbnail Smartly cropped thumbnail Intelligently cropped thumbnail

Try out the automatic cropping interactive demo page and see the 'Automatic cropping' documentation for more details.

Intelligent content-aware encoding - 'q_auto'

Developers and designers tend to refrain from experimenting with image quality adjustments for fear of degrading the visual quality. However, adjusting the quality compression level doesn’t always lead to a loss of visual quality. In fact, precise adjustment of the compression level complemented by fine tuning of the encoding settings can significantly reduce the file size without any degradation noticeable to the human eye. So, what’s the standard quality setting that works for all images? Unfortunately, there is no single setting that is optimal for all images because it depends on a combination of the compression algorithm, the image format and the actual image content.

Cloudinary automates the file size versus quality trade-off decision, on the fly, by using perceptual metrics and heuristics that tune the encoding settings and select the appropriate image format based on the specific image content and format.

The intelligent encoding algorithm analyzes every image to find the best quality compression level and the optimal encoding settings based on the image content and the viewing browser, in order to produce a perceptually fine image while minimizing the file size.

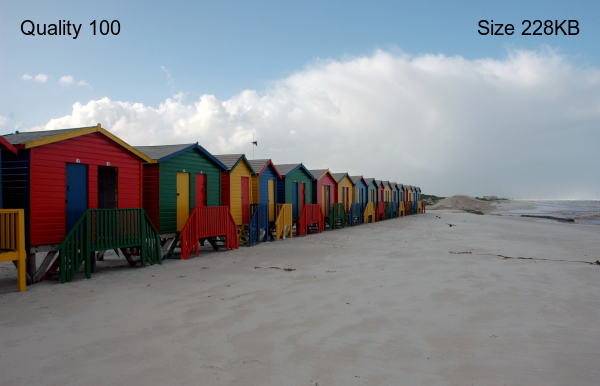
For example, the following 500px wide image was encoded as a JPEG with a quality of 90 (without chroma subsampling). The image looks quite good and weighs 58.3KB.

Ruby:
cl_image_tag("cld_popsicles.jpg", :width=>500, :quality=>90)
PHP:
cl_image_tag("cld_popsicles.jpg", array("width"=>500, "quality"=>90))
Python:
CloudinaryImage("cld_popsicles.jpg").image(width=500, quality=90)
Node.js:
cloudinary.image("cld_popsicles.jpg", {width: 500, quality: 90})
Java:
cloudinary.url().transformation(new Transformation().width(500).quality(90)).imageTag("cld_popsicles.jpg")
jQuery:
$.cloudinary.image("cld_popsicles.jpg", {width: 500, quality: 90})
.Net:
cloudinary.Api.UrlImgUp.Transform(new Transformation().Width(500).Quality(90)).BuildImageTag("cld_popsicles.jpg")
Encoded JPEG of quality 90

Developers who want to optimize performance and save file size, might select a more aggressive compression quality level. However, as you can see below the resulting image might have disturbing artifacts, while the file size is smaller and weighs 24KB.

Ruby:
cl_image_tag("cld_popsicles.jpg", :width=>500, :quality=>50)
PHP:
cl_image_tag("cld_popsicles.jpg", array("width"=>500, "quality"=>50))
Python:
CloudinaryImage("cld_popsicles.jpg").image(width=500, quality=50)
Node.js:
cloudinary.image("cld_popsicles.jpg", {width: 500, quality: 50})
Java:
cloudinary.url().transformation(new Transformation().width(500).quality(50)).imageTag("cld_popsicles.jpg")
jQuery:
$.cloudinary.image("cld_popsicles.jpg", {width: 500, quality: 50})
.Net:
cloudinary.Api.UrlImgUp.Transform(new Transformation().Width(500).Quality(50)).BuildImageTag("cld_popsicles.jpg")
JPEG of low 50 quality

Now, setting the quality manipulation parameter to auto (q_auto) tells Cloudinary to analyze the image and find the optimal image encoding settings and compression quality level. The resulting image looks quite good and weighs only 39.6KB, which means a saving of 32% over a standard 90 quality encoded image.

Ruby:
cl_image_tag("cld_popsicles.jpg", :width=>500, :quality=>"auto")
PHP:
cl_image_tag("cld_popsicles.jpg", array("width"=>500, "quality"=>"auto"))
Python:
CloudinaryImage("cld_popsicles.jpg").image(width=500, quality="auto")
Node.js:
cloudinary.image("cld_popsicles.jpg", {width: 500, quality: "auto"})
Java:
cloudinary.url().transformation(new Transformation().width(500).quality("auto")).imageTag("cld_popsicles.jpg")
jQuery:
$.cloudinary.image("cld_popsicles.jpg", {width: 500, quality: "auto"})
.Net:
cloudinary.Api.UrlImgUp.Transform(new Transformation().Width(500).Quality("auto")).BuildImageTag("cld_popsicles.jpg")
Automatic JPEG quality

The significance of the performance optimization depends on the content of every individual image. For example, the following image weighs 63.7KB using regular JPEG encoding with a quality of 90, and only 25.1KB (a 61% saving) with quality set to auto, while still looking great.

Automatically cropped thumbnail Intelligently cropped thumbnail

Furthermore, when a user enables data saving mode, the browser sends the Save-Data: on Client Hint request header, and Cloudinary automatically switches to a more aggressive automatic quality level and encoding settings selection.

Try out the automatic quality interactive demo page and see the Automatic quality and encoding settings documentation for more details.

Dynamic format selection - 'f_auto'

Developers are expected to select optimal image formats for different scenarios based on the image content and the viewing device/browser. For example, JPEG should be used for a captured photograph or for faster loading while PNG should be used for illustrations or drawings or when using a transparent background. Additional logic should also be considered for modern formats such as WebP and JPEG-XR, if the viewing browser is Chrome or Internet-Explorer/Edge.

Image formats can have a significant impact on the page load time and bandwidth - for example using WebP over JPEG can result in a 30% file size reduction, which can lead to faster page loads resulting in improved site engagement and conversion rates.

The browser and format compatibility requirements seem simple, but manually adopting the format logic for many images can be complex and inefficient.

To optimize image delivery, Cloudinary can dynamically select the most efficient format, based on the content and viewing browser, and convert the image to that format on the fly. For example, it automatically delivers images as WebP to Chrome or JPEG-XR to Internet Explorer or Edge. No more manual conversion of images to the most efficient formats.

Transparent WebP delivery and JPEG-XR delivery were introduced a couple of years ago. Now, you can combine automatic format selection with automatic image encoding and quality selection. For example, the same image as above with q_auto,f_auto will be encoded as WebP for Chrome users, consuming only 16.2KB and still look great. Users of Internet-Explorer/Edge will get a JPEG-XR and users of other browsers will get a JPEG.

Ruby:
cl_image_tag("sofa_cat.jpg", :width=>750, :quality=>"auto", :fetch_format=>:auto)
PHP:
cl_image_tag("sofa_cat.jpg", array("width"=>750, "quality"=>"auto", "fetch_format"=>"auto"))
Python:
CloudinaryImage("sofa_cat.jpg").image(width=750, quality="auto", fetch_format="auto")
Node.js:
cloudinary.image("sofa_cat.jpg", {width: 750, quality: "auto", fetch_format: "auto"})
Java:
cloudinary.url().transformation(new Transformation().width(750).quality("auto").fetchFormat("auto")).imageTag("sofa_cat.jpg")
jQuery:
$.cloudinary.image("sofa_cat.jpg", {width: 750, quality: "auto", fetch_format: "auto"})
.Net:
cloudinary.Api.UrlImgUp.Transform(new Transformation().Width(750).Quality("auto").FetchFormat("auto")).BuildImageTag("sofa_cat.jpg")
Automatic format and quality selection

The combination of q_auto and f_auto is even more powerful together than either of them separately. The algorithm might detect that the PNG format (or the lossless WebP format) is a better fit for specific images that contain content such as drawings. For some images, even the PNG8 format can be automatically selected for providing great looking results with a very efficient file size.

For example, the following URL dynamically generates a 500px wide version of a drawing using automatic image encoding and quality selection (q_auto without f_auto).

Ruby:
cl_image_tag("flowers_and_birds.jpg", :width=>500, :quality=>"auto")
PHP:
cl_image_tag("flowers_and_birds.jpg", array("width"=>500, "quality"=>"auto"))
Python:
CloudinaryImage("flowers_and_birds.jpg").image(width=500, quality="auto")
Node.js:
cloudinary.image("flowers_and_birds.jpg", {width: 500, quality: "auto"})
Java:
cloudinary.url().transformation(new Transformation().width(500).quality("auto")).imageTag("flowers_and_birds.jpg")
jQuery:
$.cloudinary.image("flowers_and_birds.jpg", {width: 500, quality: "auto"})
.Net:
cloudinary.Api.UrlImgUp.Transform(new Transformation().Width(500).Quality("auto")).BuildImageTag("flowers_and_birds.jpg")
Automatic quality selection of a cartoon

The result is a JPEG image that weighs 41KB. If you look carefully, you will see that the lossy nature of JPEG resulted in some unpleasant artifacts. Now, let's tell Cloudinary to combine both q_auto and f_auto. The result is shown below. The algorithm decided to encode the image using the PNG8 format. The image looks better, has no artifacts (the only artifacts are from the original high-quality JPEG image), and weighs even less - just 34.8KB.

Ruby:
cl_image_tag("flowers_and_birds.jpg", :width=>500, :quality=>"auto", :fetch_format=>:auto)
PHP:
cl_image_tag("flowers_and_birds.jpg", array("width"=>500, "quality"=>"auto", "fetch_format"=>"auto"))
Python:
CloudinaryImage("flowers_and_birds.jpg").image(width=500, quality="auto", fetch_format="auto")
Node.js:
cloudinary.image("flowers_and_birds.jpg", {width: 500, quality: "auto", fetch_format: "auto"})
Java:
cloudinary.url().transformation(new Transformation().width(500).quality("auto").fetchFormat("auto")).imageTag("flowers_and_birds.jpg")
jQuery:
$.cloudinary.image("flowers_and_birds.jpg", {width: 500, quality: "auto", fetch_format: "auto"})
.Net:
cloudinary.Api.UrlImgUp.Transform(new Transformation().Width(500).Quality("auto").FetchFormat("auto")).BuildImageTag("flowers_and_birds.jpg")
Automatic and format selection of a cartoon

See Automatic format selection documentation page for more details.

Automatic responsive images - 'w_auto' and 'dpr_auto'

To implement responsive design, developers need to create multiple versions of every image to make it look perfect on any device, in any resolution, pixel density or orientation.

Generating, managing, marking-up, and delivering these numerous image versions can be a daunting task. Cloudinary simplifies dynamic image delivery for responsive websites on Retina and regular displays by automating the image width and DPR value decision based on the viewing device, display size and layout.

Using Google's Client Hints, Cloudinary determines the required width of an image based on the browser's viewport-width or the layout width, and then calculates the optimal resolution for displaying the image on that device. Furthermore, Cloudinary can dynamically select image-specific breakpoints by determining the required number of versions of every image in order to balance the optimal dimensions vs. bandwidth reduction trade-off.

This means that developers simply need to have a single high resolution version of every image. Cloudinary automatically adapts the image to fit the viewport, layout and resolution on any device using a single dynamic URL - ensuring a visually seamless user experience while improving performance.

Generating images of different width and DPR values via the same dynamic URL is done by setting the width and dpr manipulation parameters to auto (dpr_auto,w_auto). The Client Hints request headers are automatically processed to retrieve the best fitting image dimensions.

For example, the following URL first crops an image to a 16:9 aspect ratio and requests automatic DPR and width delivery. The device's DPR is rounded up to an integer value (1.0, 2.0, 3.0, etc.) and the actual required width value is rounded up to the closest multiple of 100 pixels (by default). The example below also limits the delivered image to 2000px wide in case that the Client Hints are not available.

Ruby:
cl_image_tag("car_lady_dog.jpg", :client_hints=>true, :transformation=>[
  {:gravity=>"auto", :aspect_ratio=>"16:9", :crop=>"fill"},
  {:dpr=>"auto", :width=>"auto"},
  {:width=>2000, :crop=>"limit"}
  ])
PHP:
cl_image_tag("car_lady_dog.jpg", array("client_hints"=>true, "transformation"=>array(
  array("gravity"=>"auto", "aspect_ratio"=>"16:9", "crop"=>"fill"),
  array("dpr"=>"auto", "width"=>"auto"),
  array("width"=>2000, "crop"=>"limit")
  )))
Python:
CloudinaryImage("car_lady_dog.jpg").image(client_hints=True, transformation=[
  {"gravity": "auto", "aspect_ratio": "16:9", "crop": "fill"},
  {"dpr": "auto", "width": "auto"},
  {"width": 2000, "crop": "limit"}
  ])
Node.js:
cloudinary.image("car_lady_dog.jpg", {client_hints: true, transformation: [
  {gravity: "auto", aspect_ratio: "16:9", crop: "fill"},
  {dpr: "auto", width: "auto"},
  {width: 2000, crop: "limit"}
  ]})
Java:
cloudinary.url().transformation(new Transformation()
  .gravity("auto").aspectRatio("16:9").crop("fill").chain()
  .dpr("auto").width("auto").chain()
  .width(2000).crop("limit")).clientHints(true).imageTag("car_lady_dog.jpg")
jQuery:
$.cloudinary.image("car_lady_dog.jpg", {client_hints: true, transformation: [
  {gravity: "auto", aspect_ratio: "16:9", crop: "fill"},
  {dpr: "auto", width: "auto"},
  {width: 2000, crop: "limit"}
  ]})
.Net:
cloudinary.Api.UrlImgUp.Transform(new Transformation()
  .Gravity("auto").AspectRatio("16:9").Crop("fill").Chain()
  .Dpr("auto").Width("auto").Chain()
  .Width(2000).Crop("limit")).ClientHints(true).BuildImageTag("car_lady_dog.jpg")

The following URL simulates the Client Hints header, specifying a fallback width of 387 pixels, which is used in the case that the Client Hint header is not available. In this case, the generated image is rounded up to 400 pixels wide, which weighs only 29.9KB compared to the 414KB of the the maximum 2000px wide image.

Ruby:
cl_image_tag("car_lady_dog.jpg", :client_hints=>true, :transformation=>[
  {:gravity=>"auto", :aspect_ratio=>"16:9", :crop=>"fill"},
  {:width=>"auto:100:387"}
  ])
PHP:
cl_image_tag("car_lady_dog.jpg", array("client_hints"=>true, "transformation"=>array(
  array("gravity"=>"auto", "aspect_ratio"=>"16:9", "crop"=>"fill"),
  array("width"=>"auto:100:387")
  )))
Python:
CloudinaryImage("car_lady_dog.jpg").image(client_hints=True, transformation=[
  {"gravity": "auto", "aspect_ratio": "16:9", "crop": "fill"},
  {"width": "auto:100:387"}
  ])
Node.js:
cloudinary.image("car_lady_dog.jpg", {client_hints: true, transformation: [
  {gravity: "auto", aspect_ratio: "16:9", crop: "fill"},
  {width: "auto:100:387"}
  ]})
Java:
cloudinary.url().transformation(new Transformation()
  .gravity("auto").aspectRatio("16:9").crop("fill").chain()
  .width("auto:100:387")).clientHints(true).imageTag("car_lady_dog.jpg")
jQuery:
$.cloudinary.image("car_lady_dog.jpg", {client_hints: true, transformation: [
  {gravity: "auto", aspect_ratio: "16:9", crop: "fill"},
  {width: "auto:100:387"}
  ]})
.Net:
cloudinary.Api.UrlImgUp.Transform(new Transformation()
  .Gravity("auto").AspectRatio("16:9").Crop("fill").Chain()
  .Width("auto:100:387")).ClientHints(true).BuildImageTag("car_lady_dog.jpg")
Automatic responsive image

One image for all screen resolutions and different devices is not enough. An image for every pixel change in width is too much, while an image for every 100 pixels difference might be an arbitrary threshold - so how can someone automatically choose the optimal responsive image sizes?  

Fortunately, Cloudinary's new automatic responsive images solution now supports dynamic generation of optimal breakpoints for each individual image on-the-fly. Here's an example of a URL that calculates and returns the optimal breakpoints as shown below.

Ruby:
cl_image_tag("car_lady_dog.jpg", :client_hints=>true, :transformation=>[
  {:gravity=>"auto", :aspect_ratio=>"16:9", :crop=>"fill"},
  {:width=>"auto:breakpoints:json"}
  ])
PHP:
cl_image_tag("car_lady_dog.jpg", array("client_hints"=>true, "transformation"=>array(
  array("gravity"=>"auto", "aspect_ratio"=>"16:9", "crop"=>"fill"),
  array("width"=>"auto:breakpoints:json")
  )))
Python:
CloudinaryImage("car_lady_dog.jpg").image(client_hints=True, transformation=[
  {"gravity": "auto", "aspect_ratio": "16:9", "crop": "fill"},
  {"width": "auto:breakpoints:json"}
  ])
Node.js:
cloudinary.image("car_lady_dog.jpg", {client_hints: true, transformation: [
  {gravity: "auto", aspect_ratio: "16:9", crop: "fill"},
  {width: "auto:breakpoints:json"}
  ]})
Java:
cloudinary.url().transformation(new Transformation()
  .gravity("auto").aspectRatio("16:9").crop("fill").chain()
  .width("auto:breakpoints:json")).clientHints(true).imageTag("car_lady_dog.jpg")
jQuery:
$.cloudinary.image("car_lady_dog.jpg", {client_hints: true, transformation: [
  {gravity: "auto", aspect_ratio: "16:9", crop: "fill"},
  {width: "auto:breakpoints:json"}
  ]})
.Net:
cloudinary.Api.UrlImgUp.Transform(new Transformation()
  .Gravity("auto").AspectRatio("16:9").Crop("fill").Chain()
  .Width("auto:breakpoints:json")).ClientHints(true).BuildImageTag("car_lady_dog.jpg")
{"breakpoints":[50,335,507,648,793,919,1000]}

The breakpoints are seamlessly used behind the scenes, so a single URL like the following one will return an image with a width equal to the breakpoint closest to the required display dimensions. For example, if the required width is 387px, an image that is 507 pixels wide will be dynamically generated in the cloud and delivered to users.

Ruby:
cl_image_tag("car_lady_dog.jpg", :client_hints=>true, :transformation=>[
  {:gravity=>"auto", :aspect_ratio=>"16:9", :crop=>"fill"},
  {:dpr=>"auto"},
  {:width=>"auto:breakpoints:387"}
  ])
PHP:
cl_image_tag("car_lady_dog.jpg", array("client_hints"=>true, "transformation"=>array(
  array("gravity"=>"auto", "aspect_ratio"=>"16:9", "crop"=>"fill"),
  array("dpr"=>"auto"),
  array("width"=>"auto:breakpoints:387")
  )))
Python:
CloudinaryImage("car_lady_dog.jpg").image(client_hints=True, transformation=[
  {"gravity": "auto", "aspect_ratio": "16:9", "crop": "fill"},
  {"dpr": "auto"},
  {"width": "auto:breakpoints:387"}
  ])
Node.js:
cloudinary.image("car_lady_dog.jpg", {client_hints: true, transformation: [
  {gravity: "auto", aspect_ratio: "16:9", crop: "fill"},
  {dpr: "auto"},
  {width: "auto:breakpoints:387"}
  ]})
Java:
cloudinary.url().transformation(new Transformation()
  .gravity("auto").aspectRatio("16:9").crop("fill").chain()
  .dpr("auto").chain()
  .width("auto:breakpoints:387")).clientHints(true).imageTag("car_lady_dog.jpg")
jQuery:
$.cloudinary.image("car_lady_dog.jpg", {client_hints: true, transformation: [
  {gravity: "auto", aspect_ratio: "16:9", crop: "fill"},
  {dpr: "auto"},
  {width: "auto:breakpoints:387"}
  ]})
.Net:
cloudinary.Api.UrlImgUp.Transform(new Transformation()
  .Gravity("auto").AspectRatio("16:9").Crop("fill").Chain()
  .Dpr("auto").Chain()
  .Width("auto:breakpoints:387")).ClientHints(true).BuildImageTag("car_lady_dog.jpg")
Automatic width with responsive breakpoints

Client Hints are currently only supported by the Chrome, Opera and Android browsers, and they require adding a meta header to your HTML page for enabling their usage. For other browsers, you may want to specify a fallback width value to resize the image.

See a live sample page of Automatic Responsive Images With Client Hints and the Automatic responsive images documentation page for more details.

Going forward

We believe that the four image automation capabilities that were introduced here are extremely useful for any web developer. From my personal experience, once you start using the new features, you will probably find it hard to recall what you did beforehand.

More than 120,000 developers have signed up to Cloudinary and over 3,000 of them are active paying customers. Our vision is to answer all their image (and video) related needs, and we believe that the new automatic algorithms are a big step towards realizing this vision.

Automatic algorithms, as intelligent as they can be, are not always perfect and the quality of the result might be subjective. Therefore, Cloudinary supports a manual override via the API or the UI: override automatic cropping by specifying custom coordinates for the image, and override the automatically selected quality level by specifying a custom level. The manual overriding actions are also used as feedback for our algorithms, allowing us to further enhance and fine tune the algorithms until as many images as possible are solved.

All image manipulation and delivery features introduced here are now available with no extra charge for all Cloudinary's plans, including the free plan.

In our upcoming posts, we’ll share more in-depth details about each of our new automation capabilities. Stay tuned, and as always, we would appreciate your feedback. Try it out?

Note: For customers with a custom domain name, the features that involve Client-Hints processing (w_auto and q_auto with Save-Data support) need to be set up. In addition, responsive breakpoints support (w_auto:breakpoints) with certain CDN providers might involve certain additional costs. Contact us for more details.

Cloudinary WOWs with full automation at Velocity web performance conference

$
0
0
Wow Velocity
Attending our first Velocity Web Performance Conference, we wanted to WOW attendees with the Cloudinary solution. And WOW them we did, with the announcement of our new “Images Solved” enhancements, which offer fully automated content- and context-aware image adaptation
 
We decided to launch these new features at this Velocity event because it focuses on web performance. And as we’ve discussed in previous blogs, how images and videos are handled play a big part in load time and bandwidth usage of websites. Velocity gave us a great opportunity to talk with DevOps about how Cloudinary can help address many of the challenges they’re facing in managing media, simplifying the ability to transform images, while improving the user experience and saving them money in bandwidth costs. 
 
As our CEO Itai Lahan noted, “Adapting an image to fit the graphic design on various devices and browsers, while optimizing performance, is both an art and science. Perfecting the image for every possible scenario can be a laborious process, and oftentimes is not feasible given time and manpower constraints, particularly when they must scale these efforts across thousands of images, or more, for a single site.”
 
For the past several years, Cloudinary has prided itself on delivering the tools to greatly simplify image management, but there were still a few manual steps that web developers needed to take. With the full automation we announced last week, we’ve simplified the process even further, providing the tools to enable developers to scale image management and deliver the best image to each user while automatically adjusting for each individual device, resolution, image content and graphic design layout.
 
Now with Cloudinary, you can upload a single high-resolution copy of an image, which is then automatically adapted in real time to focus on the most important region of the image, at the optimal quality and encoder settings, and then responsively delivered on any device at the proper resolution. The new automated features include: 
 
  • Automatic Content-Aware Cropping – New content-aware cropping algorithms detect the region of interest in every image and then crop them on the fly using dynamic URLs to fit the graphic design and layout, on any device.
  • Intelligent Content-Aware Encoding – Automates the file size versus quality tradeoff decision by analyzing every image to find the best quality compression level and optimal encoder and encoder settings based on the image content and the viewing browser. This process produces an image that looks fine to the naked eye, while minimizing the file size.
  • Automatic Responsive Images – Determines the layout width of an image on a user’s device and the density of their screen, then decides how big of an image that user will need, and select and deliver an optimal resource – all at the CDN level.
  • Dynamic Format Selection – Optimizes image delivery by dynamically selecting the most efficient format, based on the image’s unique content and viewing browser, and converts the image to this format, in real time.
The debut of our fully automated solution was well received by Velocity attendees.  We talked to a number of prominent brands – including those who run ecommerce, photo processing, real estate, auction, search engine and news sites. What we discovered is that many of these companies are using their own in-house image management systems, and are finding that these systems don’t scale as they employ responsive design and need various versions of the same image. Many of them admitted that even though they know responsive design is an absolute requirement, they didn’t understand all the complexities of doing it and how to manage the images in that environment.
 
Velocity team
 
In the exhibit hall, we did demos of Cloudinary’s automation, even showing one large company, in a matter of seconds, how they could fix a problematic image on their homepage, which they had been struggling to adjust using their own system.  It’s safe to say that we WOW’d this company and many others with our demo….as well as our cool giveaways.
 
You can learn more about the technical details behind our “Images Solved” enhancements from a blog post written by our CPO Nadav Soferman.  And if you want to give it a try yourself, and be WOW’d with the simplicity, you can test drive these new features by signing up for free.
 

Simplifying image rich website development - interactive demo

$
0
0
Image manipulation interactive demo
Developing a great website and maintaining it can be a challenging and time-consuming task, even for the most talented developer. You need to meet graphic design requirements for any device according to the latest design trends, and constantly find ways to optimize your website performance, for any browser. 
We can save you a lot of time and effort. Cloudinary takes care of the entire image management pipeline: image upload, a rich set of manipulation and optimization capabilities, cloud storage, administration and super-fast CDN delivery. 
 
We invite you to experience Cloudinary in action with our new interactive demo. 
The demo will walk you through visual image manipulation and optimization examples, as well as some use-cases of popular website implementations. All this is accompanied by ready-to-use code samples in Ruby on Rails, PHP, Node JS, Angular JS, jQuery and more.  
 
 
Here are the top 5 demo highlights that can save a lot of time and effort in your website or app development.

1. Upload images directly from the user's browser

Rather than users uploading images to your own servers, or using a cloud storage solution that still requires that you handle the upload yourself, Cloudinary lets you upload images directly from the user's browser with no server-side work at all. The interactive demo uses our very own upload widget to upload images directly from the browser to Cloudinary. 
 
The upload widget is a complete UI solution you can embed in your website with a single line of Javascript code. It allows your users to upload selected images from any device or using a remote URL. The upload widget can also be customized in any look & feel and configured to support capturing photos from your users' camera, interactive cropping, thumbnail previews, and more

2. Resize & crop images on-the-fly to fit any layout

Every image is uploaded once, and stored once. From then onwards it is reused and instantly delivered in any size and aspect ratio, to fit multiple device layouts and resolutions, using a single URL with on-the-fly manipulation or a single line of code. This is even more powerful the next time you want to redesign your website - there is no manual image work required, simply change that one line of code. 
 
Resize and crop images from code
 
Other than scaling to any size, images can be intelligently cropped to maximize the visibility of important areas within the image, whether using automatic face detection, or auto-detected areas of interest.

3. Dynamically apply effects, add watermarks and overlay texts to fit any graphic design

Graphic design or other requirements usually involve more than resizing and cropping. The interactive demo page shows how to apply effects, such as sharpening the image, artistic filters, colorization, and more. It also shows how you can add watermarks and text overlays, or create thumbnails based on automatic face detection - on-the-fly using dynamic delivery URLs
 
Effects, watermark and overlays
 

4. Optimize image size and website performance

Images typically account for the majority of a website's bandwidth, and it's important to take the necessary steps to optimize them. In the interactive demo, you can see exactly how much bandwidth you could be saving by adjusting the compression quality or converting to different image formats (depending on browser support). And yes, this too, with a single URL or line of code. 
Optimal image size and performance
 
Cloudinary can also optimize the file size vs. the perceived visual quality, on-the-fly, by intelligently tuning encoding and compression settings and then selecting the appropriate image format based on the specific image's content. This is done with our intelligent quality selection algorithm.

5. Explore popular website implementation examples

Putting it all together - below is a screenshot from the interactive demo, showing how Cloudinary can be used to easily create product galleries for e-commerce sites: browsing between different product images (or colors using thumbnails), and allowing users to zoom in on every detail. 
 
Image management in ecommerce
 
The interactive demo presents some examples of how Cloudinary can be used to build and optimize e-commerce sites, news & media sites, or social sites and apps.
 
The examples are fully responsive - try them out on any device or resolution, and notice how the optimal image is delivered every time using Javascript code that detects the device DPR and the allocated width. 

Summary

One of our main goals when creating this interactive demo was to show how easily you can build a responsive website with user uploaded images, that perfectly fits the graphic design and layout of your website or app.
 
Every feature you see in the interactive demo, and a whole lot more, is available as part of our free plan. We're very excited to finally make this demo publicly available. You can use it as a quick reference guide - grab some code samples, and try them out. We hope you like it :)


Conference season is in full swing: Attracting attention at AWS and YGLF in Israel

$
0
0
Israeli conferences
If it’s June, Cloudinary must be in the throes of conference season. In a recent blog post, we discussed how we WOW’d the crowd with our fully automated image management tools, exhibiting at Velocity Santa Clara. But that wasn’t the only place we have been wowing developers and the cloud community; we also attended two events in Israel last month.
 
The first was June 16th at the AWS Summit Tel Aviv 2016. With a focus on the cloud, and attracting some of the biggest brand names in Israel and around the globe, AWS was a great event for us to showcase our company and demonstrate our technology. We’ve been attending this event for the past three years. This year a majority of attendees were especially interested in our video solution. They’ve already been working with images for a long time and they understand how to optimize them. But the addition of more video content in websites and applications is posing serious challenges – the files are larger and are slowing down their website performance, making the choice of the correct format more relevant and pressing than ever. Our demos showed them how Cloudinary makes managing videos just as easy as images. 
 
The second event, You Gotta Love Frontend (YGLF) Conference, in its second year, brings together a highly focused group of 800 or so developers. We were excited to meet such a relevant audience, several of whom are existing Cloudinary users. Being mainly front-end developers, they encounter the issues we address on a daily basis, and Cloudinary’s solution and benefits were immediately clear. A few seconds into the demo, already impressed by Cloudinary, the attendees started asking lots of interesting and relevant questions, engaging in framework specific discussions and feature requests.
 
Israeli conferences fun
 
YGLF also brough together many interesting speakers and key influencers of the web development world, including: 
 
Christian Heilmann (Developer Evangelist, Edge browser team at Microsoft) gave an inspiring opening keynote about "Automating the wrong things". 
At Cloudinary, we were flattered that Christian recommended Cloudinary's image management solution as an example of a solution that is definitely automating the RIGHT things.
 
Vitaly Friedman (Editor in Chief, Smashing Magazine) gave a great talk about cutting-edge responsive web design. For example, exposing powerful CSS techniques for creating responsive emails, although Vitaly himself said "don't try this at home". 
Vitaly discussed responsive image challenges and specifically showed Cloudinary's Responsive Image Breakpoints Generator solution.
 
Bruce Lawson (deputy CTO at Opera) is the man behind the exciting <picture> html tag concept that enables art-direction-based responsive images in websites. Bruce reminded us how much of the world population still does not have access to the web in ways that people of western countries take for granted. He emphasized the importance of optimizing images and using more aggressive compression to allow people with slow/poor Internet connectivity to still enjoy the very media-rich web.
 
In addition, many visitors to our booth mentioned hearing a recent podcast (in Hebrew) by our CPO and co-founder Nadav Soferman, during which he talked about Cloudinary’s bootstrap beginnings. As start-up founders themselves, these visitors  wanted to learn more about our history and strategies for success in bootstrapping.  
Cocktail bar

And if you thought we only focused on serious business at YGLF, you’d be mistaken. We also treated attendees to their own custom cocktails from the Imperial Bar. 
 
Now that it’s July, our schedule isn’t slowing down. Just last week we were at AWS London, and you can catch us this week at AWS Santa Clara. We hope to see you!  
 

One pixel is worth three thousand words

$
0
0

1px image comparison hexdump

A couple of months ago while taking a break from implementing cool new features like q_auto and g_auto, I was joking in our team chat about how well various image formats “compress” one-pixel images. In response, Orly — who runs the blog — asked me if I’d write a post about single-pixel images. I said: "Sure, why not. But it will be a very short blog post. After all, there’s not much you can say about a single pixel."

Looks like I was wrong. Very wrong.

What can you do with one pixel?

Back in the early days of the web, one-pixel images were widely used as a poor man’s solution to do things we now do with CSS. Spacing, creating lines or rectangles, semi-transparent backgrounds: there’s quite a lot you can do by simply scaling one pixel to arbitrary dimensions. Another use of one-pixel images, still a common practice today, is as a web beacon, for tracking or analytics.

In responsive web design, one-pixel images are often used as temporary placeholders while the page is loading. Since most browsers do not support client-hints, some responsive image solutions wait for the page to fully load in order to determine the actual rendered image sizes, and then replace a one-pixel image with the right breakpoint image using JavaScript.

Broken image example

There is one other use of single-pixel images: they can be used as ‘default’ images. If for whatever reason the actual image that you want to show cannot be found, it might in some cases be better to hide that fact (by showing one transparent pixel) than to return a “404 - Not Found” error, which will usually be rendered by browsers as a “broken image” icon. In both cases, you don’t get to see the intended image, but it might look a bit more professional if you don’t ‘rub it in’ by showing a broken image icon.

OK, it looks like one-pixel images do have some uses. So, what’s the best way to encode a 1x1 image?

Obviously, this is a fringe case for image compression formats. If the “image” only consists of a single pixel, there sure is not a lot of data to compress. In fact, the uncompressed data is just one bit to four bytes – depending on how you interpret the data: black & white (1 bit), grayscale (1 byte), grayscale + alpha (2 bytes), RGB (3 bytes), or RGBA (4 bytes).

But you can’t encode just the data. In any image format, you need to specify how to interpret the data. At the very least, you need to know the width and height of the image, and the number of bits or bytes per pixel.

Headers

Typically, to encode the width and height, four bytes are used: two bytes per number (if it were only one byte, the maximum image dimension would be 255x255). Let’s say that we need another byte to encode the color type of the image (e.g. grayscale, RGB or RGBA). In this minimalistic image format, a single-pixel image would take at least 6 bytes (e.g. for a white pixel) and at most 9 bytes (for a semi-transparent, arbitrary color pixel).

However, actual image formats tend to have a “header” that contains quite a bit more information. First of all, the first few bytes of any image format contain a fixed identifier that is only there to say “Hey! I’m a file in this particular file format!”. This fixed sequence of bytes is also known as the magic number. For example, a GIF file always starts with either GIF87a or GIF89a (depending on which version of the GIF spec is used), a PNG file always starts with an 8-byte sequence that includes PNG, JPEG files have a header that contains the string JFIF or Exif, and so on.

Headers can contain all sorts of meta-information about an image. Some of it is format-specific information to indicate what kind of subformat is used, and is necessary to decode the pixels correctly. Some of it might not be necessary to decode the pixels, but is still useful to know how to render them – e.g. color profiles, orientation, gamma, or dots-per-pixel. Some of it might be arbitrary metadata, like comments, timestamps, copyright notices, or GPS coordinates. These things might be optional, or they might be obligatory; it depends on the format specification. Of course all of this metadata has some cost in terms of file size. So let’s focus on “minimal” files, where all of the non-obligatory metadata has been stripped. Otherwise we might be wasting precious bytes on silly things.

Besides headers, image formats may have other kinds of “overhead”. They may contain all kinds of markers and checksums, intended to make the format more robust in case of transmission errors or other forms of corruption. Also, sometimes some kind of padding is required, to ensure that the data gets aligned properly.

One-pixel images – the smallest possible images – reveal exactly how much “overhead” there is in an image format. Let’s take a look.

Here is a hexdump of a 67-byte PNG file, representing a 1x1 white pixel:

00000000  89 50 4e 47 0d 0a 1a 0a  00 00 00 0d 49 48 44 52  |.PNG........IHDR|
00000010  00 00 00 01 00 00 00 01  01 00 00 00 00 37 6e f9  |.............7n.|
00000020  24 00 00 00 0a 49 44 41  54 78 01 63 68 00 00 00  |$....IDATx.ch...|
00000030  82 00 81 4c 17 d7 df 00  00 00 00 49 45 4e 44 ae  |...L.......IEND.|
00000040  42 60 82                                          |B`.|

This file consists of the 8-byte PNG magic number, followed by a header chunk (IHDR) which contains 13 bytes, an image data chunk (IDAT) with 10 bytes of “compressed” image data, and an end marker (IEND). Every chunk starts with a 4-byte chunk length and a 4-byte chunk identifier and ends with a 4-byte chunk checksum, and these three chunks are obligatory, so that’s another 36 bytes, for a total file size of 67 bytes.

A black pixel is also 67 bytes in PNG; a fully transparent pixel is 68 bytes, and an arbitrary RGBA color will be between 67 and 70 bytes.

JPEG has a longer header. The smallest one-pixel JPEG is 160 bytes (Update: 141 bytes). And it cannot be transparent, because JPEG does not support an alpha channel.

GIF is the most compact (in terms of headers) amongst the three universally supported image formats. A white pixel can be encoded as a valid GIF file in just 35 bytes:

00000000  47 49 46 38 37 61 01 00  01 00 80 01 00 00 00 00  |GIF87a..........|
00000010  ff ff ff 2c 00 00 00 00  01 00 01 00 00 02 02 4c  |...,...........L|
00000020  01 00 3b                                          |..;|

and a fully transparent pixel can be done in 43 bytes:

00000000  47 49 46 38 39 61 01 00  01 00 80 01 00 00 00 00  |GIF89a..........|
00000010  ff ff ff 21 f9 04 01 0a  00 01 00 2c 00 00 00 00  |...!.......,....|
00000020  01 00 01 00 00 02 02 4c  01 00 3b                 |.......L..;|

Note that for all of the above formats, you can come up with even smaller files that will still decode to a one-pixel image in all or most browsers, but they are not valid with respect to the format specifications, which means that an image decoder might at any time complain (rightfully) that the file is corrupt, and show the broken image icon which we were trying to avoid.

So what’s the best format for a one-pixel image on the web? That depends. If it’s an opaque pixel, then the answer is GIF. If it’s a fully transparent pixel, then the answer is also GIF. But if it’s a semi-transparent pixel, then the answer is PNG, since GIF only supports all-or-nothing transparency.

Not that all of this matters very much. All of these files fit easily in a single network package, so in practice, there is no real speed difference – and the storage needed for this is negligible anyway. But still, it’s an amusing thing to look at, at least for image format geeks like me.

What about other, more exotic file formats?

If you use WebP for one-pixel images, be sure to use lossless WebP. A single-pixel lossless WebP image is between 34 and 38 bytes. A single-pixel lossy WebP image is between 44 and 104 bytes, depending mostly on whether there’s an alpha channel or not. For example, this is a fully transparent pixel as a 34-byte lossless WebP:

00000000  52 49 46 46 1a 00 00 00  57 45 42 50 56 50 38 4c  |RIFF....WEBPVP8L|
00000010  0d 00 00 00 2f 00 00 00  10 07 10 11 11 88 88 fe  |..../...........|
00000020  07 00                                             |..|

and here is the same pixel as a lossy (default) WebP of 82 bytes:

00000000  52 49 46 46 4a 00 00 00  57 45 42 50 56 50 38 58  |RIFFJ...WEBPVP8X|
00000010  0a 00 00 00 10 00 00 00  00 00 00 00 00 00 41 4c  |..............AL|
00000020  50 48 0b 00 00 00 01 07  10 11 11 88 88 fe 07 00  |PH..............|
00000030  00 00 56 50 38 20 18 00  00 00 30 01 00 9d 01 2a  |..VP8 ....0....*|
00000040  01 00 01 00 02 00 34 25  a4 00 03 70 00 fe fb fd  |......4%...p....|
00000050  50 00                                             |P.|

The main difference between the two, is that a lossy WebP with transparency is actually stored internally as two images, thrown together into one container file: one lossy image for the RGB values, and one lossless image for the alpha values.

BPG

For Bellard’s BPG format, which also has a lossless and a lossy mode, it’s the other way around. The lossy BPG encoding of a single white pixel is 31 bytes, the smallest we’ve seen so far:

00000000  42 50 47 fb 00 00 01 01  00 03 92 47 40 44 01 c1  |BPG........G@D..|
00000010  71 81 12 00 00 01 26 01  af c0 b6 20 bc b6 fc     |q.....&.... ...|

The lossless BPG for the same white pixel is 59 bytes. However, a fully transparent pixel is 57 or 113 bytes as a lossy or lossless BPG, respectively. Interestingly, for a single white pixel, BPG wins versus WebP (31 byte BPG vs 38 byte WebP), but for a single transparent pixel, WebP wins versus BPG (34 byte WebP vs 57 byte BPG).

FLIF

And then there’s FLIF. As the main creator of the Free Lossless Image Format, obviously I cannot forget about that one. Here’s a 15 byte FLIF file for one white pixel:

00000000  46 4c 49 46 31 31 00 01  00 01 18 44 c6 19 c3     |FLIF11.....D...|

And here’s a 14 byte file for a black pixel:

00000000  46 4c 49 46 31 31 00 01  00 01 1e 18 b7 ff        |FLIF11........|

The black pixel file is one byte smaller because the number zero happens to compress better than the number 255. The header is pretty simple: the first four bytes are always “FLIF”, the next byte is a human-readable indication of the color and interlacing type. In this case it is “1”, which means we have just one color channel (i.e. it’s a grayscale image). The next byte indicates the color depth: “1” means one byte per channel. And the next four bytes are the image dimensions, in this case 0x0001 by 0x0001. The last four or five bytes are the actual compressed data.

One fully transparent pixel is also 14 bytes in FLIF:

00000000  46 4c 49 46 34 31 00 01  00 01 4f fd 72 80        |FLIF41....O.r.|

In this case, we have 4 color channels (RGBA) instead of just one. You might expect the data section to be longer in this file (after all, there are four times as many color channels), but that’s not the case: since the alpha value happens to be zero (it’s a fully transparent pixel), the RGB values are considered irrelevant so they don’t end up being encoded at all.

For an arbitrary RGBA color, the FLIF file can be up to 20 bytes.

OK, so FLIF is the clear winner in the “one pixel” category of some weird image encoding competition. If only this were an important thing to compete at :)

Actually, no. FLIF isn’t the winner. Remember the minimalistic (and non-existent) image format I mentioned in the beginning? The one that would encode single-pixel images in 6 to 9 bytes? Well that format doesn’t exist, so I suppose it doesn’t count. But there is an image format that does exist, and which gets quite close to that.

It’s called the Portable Bitmap format (PBM), and it’s an uncompressed image format from the 1980s. Here’s how you could encode a single white pixel as a PBM file in just 8 bytes:

00000000  50 31 0a 31 20 31 0a 30                           |P1.1 1.0|

Actually, forget about the hexdump, this is a human-readable file format. You can open it in a text editor if you want (at least this particular subformat):

P1
1 1
0

The first line (“P1”) indicates that this is a black & white image. Not grayscale; there are only two colors: black (which confusingly gets the number 1) and white (0). The second line indicates the image dimensions. And then it’s just a whitespace-delimited list of numbers, one number per pixel. So in this case just the number 0.

If you need something other than pure white or black, you can use the PGM format to get one pixel in any other shade of gray in just 12 bytes, or the PPM format to get any RGB color in just 14 bytes. This is always smaller than the corresponding FLIF file (or any other compressed format, for that matter).

The traditional PNM family (PBM, PGM and PPM) does not support transparency. There is an extension of PNM though, called Portable Arbitrary Map (PAM), which does support images with transparency. Unfortunately for our current purposes, its syntax is quite a bit more verbose. The smallest valid PAM file that encodes a fully transparent pixel, is the following:

P7
WIDTH 1
HEIGHT 1
DEPTH 4
MAXVAL 1
TUPLTYPE RGB_ALPHA
ENDHDR
\0\0\0\0

On the last line there are four zero (NULL) bytes. The above file is 67 bytes. You might be tempted to use grayscale+alpha instead of RGBA, because that would save two bytes in the data section. But that results in a 71 byte file, since you have to change the TUPLTYPE from RGB_ALPHA to GRAYSCALE_ALPHA. Oh and by the way, your image software might not like the use of MAXVAL 1, so you might need to change that to MAXVAL 255 (which takes two more bytes).

So all in all, for one-pixel images, when there’s no transparency involved, PNM is the smallest (8 to 14 bytes for PNM vs 14 to 18 bytes for FLIF), but when there is transparency, FLIF is smallest (14 to 20 bytes for FLIF vs 67 to 69 bytes for PAM).

Here is a summary table that gives the (optimal) file sizes for various one-pixel images:


white

black

gray

yellow

#FFFF00

transparent

semitransparent

#1337BABE

PNG

67

67

67

69

68

70

GIF

35

35

43

35

43

/

JPEG

160

160

159

288

/

/

Lossy WebP

44

44

44

64

82

92

Lossless WebP

38

34

38

36

34

38

Lossy BPG

31

31

29

36

57

62

Lossless BPG

59

59

37

124

113

160

FLIF

15

14

15

18

14

20

PNM/PAM

8

8

12

14

67

69

It might seem a bit surprising that an uncompressed image format actually beats most of the compressed formats at this particular task. But it’s not that surprising if you think about it. One-pixel images are in a sense the worst-case scenario for image compression: they’re all headers and overhead, and very little data. And the very little data there is cannot really be compressed because compression depends on predictability, and how are you supposed to predict one single pixel?

In part two of this blog post I will discuss the other extreme. How well do extremely predictable single-color images perform in various formats? Stay tuned….

A one-color image is worth two thousand words

$
0
0

One color image analysis

In part one (One pixel is worth three thousand words) of this turned-to-be-two-part blog post, I discussed one-pixel images and how well different image formats “compress” these images. I was surprised how much there is to be said about the matter. This was supposed to be a short blog post, describing one-pixel images and how they compress, and instead it became a glorious monster (and also a two part blog post…).

Seems that my fellow image compression enthusiasts were as excited as I am about this subject! This blog post sparked a fascinating Reddit discussion, in which other formats like BMP and TIFF are considered, and a 141-byte one-pixel JPEG file was given (smaller than the 160-byte JPEG file that I thought was minimal).

With that in mind, I’m happy to introduce part two, where we’ll look at single-color images and examine them in length. I hope you find it interesting and would love to hear your thoughts and insights!

The most predictable image

As we saw in part one, single-pixel images are the worst-case scenario for image compression: they’re all headers and overhead, and very little data. You can’t really compress anything, since compression depends on predictability, and how are you supposed to predict one single pixel?

In this second part of the blog post, we go to the other extreme: extremely predictable images.

The most predictable image is a large rectangle in a single color. In other words, a scaled-up version of the one-pixel images I discussed in part one. An empty canvas, if you want. A blank sheet.

Compression algorithms should be really good at compressing an image where every pixel is the same color. It’s the best-case scenario, the ultimate in predictability – once you’ve seen the first pixel, you’ve seen them all.

Let’s take a single white pixel and scale it up to increasingly larger squares, and see how the various image formats perform. I wrote a little script to do just that. Here’s the result:

Comparison of single color square images in white

Since we’re looking at squares, the number of pixels is, well, the square of the number on the x-axis: as the width of the square goes from 1 to 5000 pixels, the size of the image goes from 1 pixel to 25 megapixels. So it’s not surprising that some of the curves look like quadratic  functions. The uncompressed PBM format obviously has a file size that is (asymptotically) linear in the number of pixels (1 bit per pixel in this case). But JPEG and lossy WebP are also linear in the number of pixels (quadratic in the width of the square) – just with a better constant factor. In other words, they seem to have some inevitable cost per pixel. For JPEG, it looks like you need at least 2 bits per 8x8 macroblock.

This means that JPEG and lossy WebP have a theoretical limit on the compression ratio you can achieve with them: you can’t do better than 0.031 bits per pixel (for JPEG) or 0.014 bits per pixel (for lossy WebP).

Most of the other formats do not seem to have such a limitation. They do not look like a quadratic curve in the above plot. Let’s see what we have here.

  • GIF has a rather peculiar curve: it keeps going in a straight line for quite a while, but then it’s like it ‘shifts gears’ twice: first at some point just before 3000x3000, and then again  just after 4000x4000. I don’t know the explanation for this behavior.
  • The PNG curve goes in a more or less straight line, with some ‘coughs’ and ‘jumps’ around powers of two (1024, 2048, 4096) which might be due to the changing behavior of the underlying zlib compression at such boundary points.
  • Lossy BPG and lossless BPG are quite close to one another – you can tell that these are just two different settings of the same compression algorithm, in contrast to WebP where the lossy and the lossless variant are completely unrelated algorithms. The weird thing with BPG is that the file size fluctuates up and down quite strongly as the image gets larger. It’s easier to see this if you zoom in on part of the plot: Comparison of single color square images in white - zoom

For example, a 568x568 white square takes 232 bytes as a lossless BPG, while a slightly larger 569x569 white square takes only 144 bytes. Weird. * Lossless WebP has a nice low curve: a 25 megapixel white square (5000x5000) still only takes 1012 bytes. * FLIF is the king of this competition: it doesn’t matter what the image dimensions are, if all pixels are white, the FLIF file will be 19 bytes. This is a side-effect of a more general, quite simple compression technique FLIF uses. For each color channel (in this case there is only one: luma), the header can optionally contain a lower bound and an upper bound on the values that actually occur in the image. By reducing the range of values, better compression can be achieved. In this case, the range is reduced to one single value (white, or 255 if you express it as an 8-bit number). Once you know that this is the range, every pixel becomes as cheap as it can be: exactly zero bits.

In the plots above, it’s still a bit hard to see the asymptotic behavior of the various formats. Let’s plot the data in a different way: let’s look at the relative file size, i.e. the bits needed per pixel. Instead of looking at the number of bits per pixel, which would be very small, let’s look at the number of pixels per bit. The bang for the buck, so to speak. Here is a plot of the compressed white squares, with pixels per bit on the (logarithmic) Y-axis:

Comparison of single color square images in white - pixels per bit

As expected, uncompressed PBM very quickly converges to 1 pixel per bit, as the overhead of the header and padding becomes less and less important. JPEG and lossy WebP also quite quickly converge to what appear to be their theoretical limits – 32 pixels per bit, and just above 70 pixels per bit, respectively.

GIF is more interesting: it keeps getting more and more pixels per bit, until it almost gets to 200 pixels per bit. It then seems to repeatedly bump its head against that ceiling.

PNG quite rapidly goes over that 200 ppb ceiling and keeps getting better, though above about 1000x1000, the improvement gets much slower and bumpier.

BPG and lossless WebP behave in a similar way: first they get better and better very rapidly, but then improvement gets slower and the pixels per bit curve becomes nearly horizontal. They can both achieve more than 1000 pixels per bit.

FLIF ‘cheated’ by not having to encode anything at all, so obviously it rapidly grows and keeps growing.

How far can we take this? Well, the largest image dimension that is supported by all of the above formats, is 16383x16383 pixels (268 megapixels). Let’s see what we get for this huge white square:

Format

Bytes

Pixels per bit

PBM

33,552,399

1.00

PNG

53,132

631.45

GIF

182,225

184.11

JPEG

1,048,737

31.99

Lossy WebP

477,334

70.29

Lossless WebP

10,368

3,235.95

Lossy BPG

16,734

2,004.90

Lossless BPG

18,032

1,860.60

FLIF

19

1,765,807

Would there be any difference if the huge square was black instead of white? Let’s look at the pixels-per-bit plot.

Comparison of single color square images in black - pixels per bit

And here are the numbers for a huge 268-megapixel black square:

Format

Bytes

Pixels per bit

PBM

33,552,399

1.00

PNG

32,645

1,027.73

GIF

182,225

184.11

JPEG

1,048,737

31.99

Lossy WebP

477,334

70.29

Lossless WebP

10,366

3,236.57

Lossy BPG

16,734

2,004.90

Lossless BPG

18,032

1,860.60

FLIF

15

2,236,689

It turns out that for some formats, there actually is a difference between black and white squares, and black is always more compact than white. In PNG, it makes quite a big difference: a huge white square is 53 KB, while a huge black square is only 32 KB. Also, the pixels-per-bit curve looks much smoother for black squares than for white squares.

You might wonder what causes this difference between white and black in PNG. The explanation is that the image data in a PNG is basically PNM+zlib, with one important difference: a “filter” can be applied to make the data compress better. PNG supports five filter types (None, Sub, Up, Average and Paeth), and each image row can have a different filter. Every row gets prefixed with one extra byte which indicates the filter type for that row.

Now what is the best way to encode a fully white image in PNG? Well, it does not really matter much which filter type you use – whichever you pick, the actual filtered data bytes will either be mostly 0 or mostly 255. The thing is, if you pick filter type None (encoded as 0), then the filtered data is all 255, while if you pick any other filter type (encoded as 1 to 4), then the filtered data becomes mostly all zeroes. In any case, you don’t get a big sequence of identical bytes – there is an interruption at the beginning of each row. You get a repetitive pattern, with a length that depends on the width of the image. This explains the jumps around widths that are a power of two: those are the points where zlib needs more bits to represent the LZ77 distances.

A fully black image is easier: you can just pick filter type 0. The filtered data is all zeroes whatever you do, so the data to be compressed is one big sequence of only zeroes. And that is pretty much the best-case scenario for zlib, so you get pretty close to zlib’s theoretical limit, which is a 1032:1 compression ratio.

A fully transparent image gets more or less the same compression as a fully black image, for the same reason: it’s one big sequence of zeroes (just a longer sequence because there’s the extra alpha channel).

If you examine the 32 KB huge black square PNG file, you’ll notice that even though it is already compressed over a thousand times, the resulting compressed data is still very repetitive. In other words, the compressed data can be compressed even further. Indeed: running gzip on this 32 KB PNG file produces a .gz file of just 225 bytes.

We couldn't resist creating this border as a one pixel image... :-)

Wow. This was a pretty long and technical blogpost, and yet we’ve only covered the simplest possible kind of images: first one single pixel, and then the same single pixel scaled-up to larger and larger squares. While these are certainly not the most useful, nor the most representative types of images, they can still tell us something about the limits of the image formats which we have considered: PNG, GIF, JPEG, uncompressed PNM/PAM, lossy and lossless WebP and BPG, and FLIF. We’ve seen the worst-case and the best-case behavior of these image formats: from 160 bytes for a single pixel, all the way down to 15 bytes for 268 megapixels.

If you made it this far, congratulations! I hope you learned something new while reading all of this. I sure did while writing it!

10 great jQuery sliders - and 5 ways to build one yourself

$
0
0
10 Great jQuery Sliders
Cloudinary offers a cloud-based image and video management solution to help developers manage and optimize their images. Because images are important to you and to us, we wanted to share our thoughts on a popular trend that highlights rotating images at the top of a website homepage - image sliders.
 
Image sliders can be used to rotate banners or allow users to browse through multiple images with animation effects and CSS3 transitions. And in our opinion, jQuery is the hands-down #1 choice for implementing sliders, so we chose to devote a post to highlight our top picks. 
 
Below is a list of 10 ready-made jQuery Sliders that provide a good solution in terms of quality, ease of user, design and features. And for those who want to get their hands dirty, we provide some of the best tutorials and code samples that will help you build your own jQuery slider.

10 jQuery Sliders Ready to Use

ResponsiveSlides.js

ResponsiveSlides.js is a tiny jQuery plugin that creates a responsive slider using elements inside a container. It works with a wide range of browsers including all IE versions from IE6 and up. It also adds css max-width support for IE6 and other browsers that don't natively support it. The only dependency is jQuery (1.6 and up supported) and that all the images are the same size.
 
Options: File links, markup, CSS, slideshow, customizable options.
License: Open Source (MIT)
 
ResponsiveSlides JS
 

OWL Carousel

A touch enabled jQuery plugin that lets you create a responsive carousel slider. Responsive, offers a useful default version but very customizable, JSON support, desktop-only support, specific browser customization.
 
Options: Slide display options, display speed, autoplay, navigation, responsive/desktop-only, CSS, lazy load, use JSON file support, callbacks and more. 
License: Open Source (MIT)
OWL Carousel Sliders

BXSlider

A fully responsive slider, popular and well-supported on Github. Slides can contain images, video or HTML. Touch and swipe support built-in. Small file size, theme and simple to implement. Uses CSS transitions for slide animation, with native hardware acceleration. Supports Firefox, Chrome, Safari, iOS Android, IE7+.
 
Options: Horizontal, vertical and fade modes, transition duration, margin between slides, starting slide, random start, slide selector, infinite loop, hiding control on end, captions, text ticker, adaptive height, animations as CSS or jQuery, preload images, swipe threshold, numbered pagination, full customization of slider controls, full callback API and public methods.
License: Open Source (MIT)
 
BXSlider 

Slick

Fully responsive, scales with its container. Popular and well-supported on Github. Uses CSS3 when available, fully functional when not. Swipe enabled, supports desktop mouse dragging and arrow key navigation.
 
Options: Separate settings per breakpoint, single/multiple items, variable width, adaptive height, lazy loading, infinite looping, add, remove, filter & un-filter slides,
autoplay, dots, arrows, callbacks.
License: Open Source
 
 Slick Sliders

Unslider

An ultra-simple jQuery slider, responsive and supports mobile with swipe. Despite being small, Unslider is flexible and extensible: you can change pretty much anything via options/settings, methods or callback events. The barebones HTML required for Unslider is just this: <div class="banner"><ul><li>This is my slider.</li><li>Pretty cool, huh?</li></ul></div>

Options: Right-to-left support, configurable animation, events, autoplay, speed, delay, keyboard control, automatic clickable navigation, arrow controls.
License: Open Source (WTFPL)
 
Unslider
 

WooThemes FlexSlider 2

A fully responsive slider. Easy-to-use markup, supported by all major browsers. Features include: horizontal/vertical slider and fade animations, multiple slider support, Callback API, hardware accelerated touch slide support and custom navigation options. 
 
Options: Installation, file links, markup, animation type, easing, direction, looping, smooth height animation, slideshow, slideshow speed, slide randomization, video, sliding with keyboard arrows or mousewheel, pause/play element.
License: Open Source (MIT)
 
WooThemes FlexSlider 2 

Swiper

Mobile touch slider with hardware-accelerated transitions. Intended to be used in mobile websites, mobile web apps and mobile native/hybrid apps. Primary support for iOS and also for Android, Windows Phone 8.
 
Options: Initialization, hash navigation, parallax, lazy loading, emitter API/events, HTML layout, CSS styles/size, CDN support.
License: Open Source (MIT)
 
Swiper Sliders

Super Simple Slider

Simple and small, includes arrow key support, works with any HTML content, browser friendly and responsive.
 
Options: Slideshow, order slide display, transition, speed, show/hide navigation. 
License: Open Source (WTFPL)
 
Super Simple Slider 

Basic jQuery Slider

Developed to be as simple and lightweight as possible, with clean semantic markup. 
 
Options: Responsive, width/height, animation, control/marker configuration, interaction, presentational options. 
License: Free
 
Basic jQuery Slider 

Animate Slider

A jQuery Slider plugin with specific animations for each element. Uses predefined animation classes and adds them to each slider element and also allows addition of classes with delay for each animation. 
 
Options: Autoplay, time, animations, fade/bounce/rotate/enter left or right, delay slide display. 
License: Open Source (MIT)
 
Animate Slider 

5 Ways to Build Your Own Slider

We collected a few great write ups from across the web showing step by step how you can easily create your own slider.
 
 
Site Point Sliders 
 
Christian Heilmann Sliders 

 
Design Chemical Sliders 

 
JC Designs Sliders 

 
Liquidosity Sliders
 

Summary

We hope you enjoyed this compilation of different ways to build sliders on your site using jQuery. If you’re a user of jQuery and have additional image-related tasks on your website, or want some help preparing and optimizing the images for your slider, check out Cloudinary’s jQuery integration. We offer a very easy way to upload images, deliver them to users via CDN, and perform advanced image manipulations on the fly with one line of code. If you want to try it out, sign up for our free plan
 
And of course, please let us know in the comments below if you’ve tried out any of the sliders of code samples above and have any thoughts, and if you can share additional jQuery-based slider solutions.

Smart automatic image cropping: Maybe you CAN always get what you want

$
0
0

auto-crop your images to get what you want

The Rolling Stones claim, “You can’t always get what you want”.

And when your application needs to crop hundreds or thousands of images to specific sizes within a strictly defined UI design, that frustrating Rolling Stones phrase may be ringing in your ears.

But maybe it doesn’t have to.

There’s no feasible way to crop so many images manually, especially for user-generated content that must be displayed immediately. What you really need is a way to automatically crop all those images to fit your design (or even multiple, responsive designs for different devices). But you need to feel confident that the main area of interest will remain in the final cropped images, regardless of the varied sizes, content, and layout of the original images.

You may already have heard that Cloudinary provides a bunch of automation algorithms that can intelligently adjust your images on-the-fly to automatically deliver the best cropping, quality, and optimization for each image and device. (If you missed it, you can check out Introducing smart cropping, intelligent quality selection and automated responsive images.)

In this article, we’ll do a deep-dive into the smart cropping element of this solution.

In a nutshell, it’s a content-aware algorithm that helps you achieve the best cropping result, regardless of the required dimensions, the main subject, or the positioning and layout of the elements in the picture.

For example, if a user uploaded the portrait-oriented bugs-in-a-flower photo shown on the left, and your app used default (centered) cropping to convert it to a small square image, you would end up with the unfortunate result shown on the right...

Bugs in a flower photo - Original

Bugs in a flower photo - default, centered cropping

But if you simply set the gravity parameter to auto (g_auto in URLs), the algorithm automatically finds the most important elements of the picture on-the-fly, and you get exactly what you want!

Ruby:
cl_image_tag("yellow_flower_2bugs.jpg", :gravity=>"auto", :height=>150, :width=>150, :crop=>"fill")
PHP:
cl_image_tag("yellow_flower_2bugs.jpg", array("gravity"=>"auto", "height"=>150, "width"=>150, "crop"=>"fill"))
Python:
CloudinaryImage("yellow_flower_2bugs.jpg").image(gravity="auto", height=150, width=150, crop="fill")
Node.js:
cloudinary.image("yellow_flower_2bugs.jpg", {gravity: "auto", height: 150, width: 150, crop: "fill"})
Java:
cloudinary.url().transformation(new Transformation().gravity("auto").height(150).width(150).crop("fill")).imageTag("yellow_flower_2bugs.jpg")
jQuery:
$.cloudinary.image("yellow_flower_2bugs.jpg", {gravity: "auto", height: 150, width: 150, crop: "fill"})
.Net:
cloudinary.Api.UrlImgUp.Transform(new Transformation().Gravity("auto").Height(150).Width(150).Crop("fill")).BuildImageTag("yellow_flower_2bugs.jpg")
Bugs in a flower photo - g_auto cropping

Responsive layouts, art direction, and cropping - A Web developer’s challenge:

The art direction for modern websites often requires displaying the same image in different places, shapes, and sizes.

For example, a site’s home page might show square image thumbnails that link to selected articles. Each of those images might be shown as a large landscape picture on the top of the relevant article page, while a zoomed-in excerpt from the same picture might be shown lower down in the article. Other sizes might be used next to search results or in a collage.

Add to this the fact that each of the images probably needs to be presented in totally different sizes and aspect ratios when shown on the responsive mobile version of the site. Plus, larger images may also need to resize responsively as a browser is resized.

When you multiply all these considerations times the many, many images on a site, the number of unique croppings required becomes somewhat mind boggling. For example, imagine each color below is a unique photo in your site. This gives a tiny glimpse into how many different crops could be required for each image (color) and how many crops overall:

diagram - so many unique croppings

The same image is often shown in varying shapes and sizes
throughout your site and on different devices

And what if the graphic designer shows up one morning with plans to change the look and feel of your site, and you have to change all the shapes and sizes displayed in each and every scenario? I feel a headache coming on…

Luckily, you can use Cloudinary’s transformation capabilities to take a single, high quality original image and crop it on-the-fly to different sizes and aspect ratios, so that you don’t have to crop and re-crop all those images manually. Phew!

But a problem arises if you can’t predict the layout of each image in advance, and how to crop them for each of the required dimensions without losing (or even slicing right through) the most important content. This becomes near impossible when a lot of your images come from user-generated content.

Face-detection based cropping (supported by Cloudinary) works nicely if you expect images to be portrait photographs. But what if your site is showing images of tourist sites, or customers’ favorite meals at local restaurants, or sports action shots?

There’s no way to guess in advance whether to focus on the top, middle, or one side of the pictures. And you can’t even assume that any people in the picture are the main or only region of interest.

Take this photo of a couple sitting in front of a mountain scene:

Couple and mountain scene - original

If you try generating default thumbnails, using facial recognition, or just request a standard crop using center, some of your displayed images might end up like these:

300 X 250 moderate landscape 200 X 300 portrait 200 X 200 thumbnail

Yikes!

Content-Aware Automated Cropping - A Web developer's answer

All you need to do to prevent all of the messy scenarios shown above, is to include the g_auto image manipulation parameter in your delivery URL.

Behind this simple parameter setting is a complex algorithm that evaluates the image pixel by pixel and assigns each area of interest a priority value. If there are faces in an image, they will automatically (unless you specify otherwise) earn a high priority, but other prominent areas of your picture also win high priority points.

g_auto algorithm simulation

In the end, the algorithm chooses the part of the picture containing the most prominent areas in the photo, within the constraints of the other cropping parameters you specify, much the same as a real person would do… replacing the completely infeasible alternative of having a real person sitting 24 hours a day to manually analyze and crop every single one of your professional graphics as well as all user-uploaded content.

And the whole thing happens in the cloud, on-the-fly, so that the resulting cropped image is quickly distributed across the CDN and to your users.

Remember those three awful image crops from earlier in this article? Check out how they look when we add g_auto to the URL:

300 X 250 moderate landscape 200 X 300 portrait 200 X 200 thumbnail


So far, we’ve mostly seen examples of how g_auto works when using the fill cropping mode. You can also use g_auto with the thumb cropping mode to zoom in more on the main subjects while still retaining the most important content.

Let’s try this with our flower and bugs picture from the beginning of this article.

  • If we use the default (center) gravity, we cut off the best part.
  • If we try another area of focus, such as south, which may be useful for some images, we get useless content for this one.
  • But with g_auto, we get a nicely zoomed view of our flower and bugs, right in the center.
150 X 150 thumb with default
(center) gravity
150 X 150 thumb with g_south 150 X 150 thumb with g_auto

If you want to exert some extra influence on what the algorithm thinks is important, you can use one of the special auto gravity parameters, for example to tell it to give higher or lower priority to faces, or to impact the aggressiveness of the zoom when using g_auto with thumbnail cropping. For details, have a look at the Automatic cropping documentation.

Of course no algorithm is perfect one-hundred percent of the time, and what’s important in an image can sometimes be subjective. So for these special exceptions, you can save custom cropping coordinates with a particular image. You can set these coordinates in an upload command, using the Admin API, or using the Media Library UI. Any specified coordinates will override the g_auto algorithm, or you can optionally set your transformation to still use the g_auto algorithm, but to give a higher priority to your specified coordinates.

At Cloudinary, we love to learn and get better, so when you use custom coordinate overrides, we use that as input that can potentially improve our algorithm in the future.

Cropping for Responsive Design

We mentioned above that one of the many reasons you may need to crop images relates to resizing in response to browser size.

To get the best image crops when your responsive art direction requires different aspect ratios for different screen sizes, just use automatic image cropping (g_auto) together with your fill or thumb crops in the Cloudinary URLs that you supply in your <srcset> and <picture> tags. The responsive images and art-directed responsive images posts, teach you just how to use these tags.

You can even take a step further and add the w_auto or dpr_auto values to your URL, which use Google Client Hints to automatically determine the required width of an image based on the browser's viewport-width or the layout width.

Another option is to use the free Responsive Breakpoints Generator or the Cloudinary API to help you find the optimal responsive image dimensions in each case.

Find out more in the responsive breakpoints generation blog post.

The Bottom Line

So, what’s the bottom line of all this? What’s the main point?
It’s simply that the main point is not always on the bottom line… or the top or the middle for that matter.

With Cloudinary’s content-aware automatic image cropping option, you no longer have to bet on a majority-rule strategy, always focusing on the center or top of all images, nor do you have to get a graphic artist to crop every image manually. Instead, a sophisticated algorithm running in the cloud evaluates each image on-the-fly, and then generates and delivers the image that fits the specified dimensions and is most likely to contain the main focus of the image, enabling you, your graphic artist, and your customers to ‘get what you want’!

This smart automated cropping feature is one element within the full Cloudinary end-to-end offering, which includes programmatic image upload, cloud storage, powerful administration, fast CDN delivery, and a comprehensive image manipulation SDK that enables developers to incorporate these functionalities in their Web and mobile applications with simple code one-liners.

All of the above is available with all Cloudinary's plans, including the free plan.
Open a free account and try it yourself.

The holy grail of image optimization OR balancing visual quality and file size

$
0
0

Automatic image quality

One of the most important things to know about compressing image files is that a smaller file size comes at the cost of a lower image quality. How much lower, and whether low enough to make a difference visually, depends on the image. Compression can be very effective at reducing the size of the image, and besides lowering the costs of storage space and bandwidth, a reduced image size goes a long way to retaining your users’ attention with faster, smaller downloads.

On the other hand, a lot of developers are afraid to use aggressive compression for fear of degrading the visual quality, and tend to err on the side of caution, assigning higher quality values than are really needed. But adjusting the quality compression level doesn’t always lead to a loss of visual quality. Precise adjustment of the compression level, complemented by fine-tuning of the encoding settings, can significantly reduce the file size without any degradation noticeable to the human eye.

Selecting the quality setting

So, what’s the standard quality and encoding setting that works for all images? Unfortunately, there is no single setting that is optimal for all images, and simply lowering the image quality to a new setting is problematic:

  1. The image quality setting is usually specified on a sliding scale between 0 and 100, but what does this number actually represent for different image formats such as JPEG, WebP, and PNG? The compression algorithms used are complex and varied, so it's not always known what these quality settings actually mean without a lot of experimentation. Different algorithms and formats tend to implement the settings in different ways, so any specific quality (e.g. 70) also means different things in different contexts and for different formats.
  2. The contents of an image determines to a large degree how well it can be compressed before losing visual quality. For example, does the image contain a huge range of colors? A large degree of complicated detail? Smooth color gradients? Selecting a single default quality setting for all your images fails to account for these differences in images: where one image may display perfectly with a given quality setting (e.g. 60), another image with different content may have visual artifacts with the same quality setting.
  3. The size of the image can require a different quality setting for each size displayed. Where an image of a certain size may display perfectly with a given quality setting (e.g. 75), the same image scaled to a different size may have visual artifacts with the same quality setting. An image's quality setting should be optimized for each of the resized images and not just one quality setting for all sizes.

Taking the above points into consideration is all well and good when you have the time to fiddle with each image and find the optimal quality setting that gives the biggest saving on file size without affecting the visual quality. However, this time consuming process is not efficient when you have to fine tune a huge number of images, never mind the impossibility of manually finding the optimal quality if you have a lot of user-uploaded images to display.

The interactive image example below shows the effect that the various quality settings have on an image's visual quality. The image is scaled down to a width of 600 pixels and initially displayed with a quality setting of 100. Click on the quality buttons below the image to see how different quality settings impact the image quality.

Quality: 100 Size: 228KB
10 20 30 40 50 60 70 80 90 100

As you click between the quality settings from lowest to highest, initially there is a huge increase in the visual quality for a relatively small increase in file size, but towards the higher quality settings there is little to no improvement in the visual quality for a big increase in file size. The example JPEG image also highlights how different image content is visually affected by the various quality settings. The most prominent changes when transitioning down to lower qualities happens with the text overlays in the image, which become noticeable at relatively high quality settings. The smooth color gradients in the sky are the next to show the visual effects of compression and the complicated detail of the huts and the beach show obvious artifacts only at very low qualities.

Automatic image quality - q_auto

Cloudinary can automate the file size versus visual quality trade-off decision, on-the-fly, by using perceptual metrics and heuristics that tune the encoding settings and select the appropriate image quality based on the specific image content and format. Analyzing every image individually to find the optimal compression level and image encoding settings allows for precise adjustment of the compression level complemented by fine tuning of the encoding settings, and can significantly reduce the file size without any degradation noticeable to the human eye.

To perform automatic quality selection and image encoding adjustments, simply add the quality parameter set to auto (q_auto in URLs). For example, using the same beach image scaled down to a width of 600 pixels and delivered with automatic quality (19.5KB - a saving of almost 60% in file size compared to 90 quality):

Ruby:
cl_image_tag("beach_huts.jpg", :transformation=>[
  {:width=>600},
  {:quality=>"auto"}
  ])
PHP:
cl_image_tag("beach_huts.jpg", array("transformation"=>array(
  array("width"=>600),
  array("quality"=>"auto")
  )))
Python:
CloudinaryImage("beach_huts.jpg").image(transformation=[
  {"width": 600},
  {"quality": "auto"}
  ])
Node.js:
cloudinary.image("beach_huts.jpg", {transformation: [
  {width: 600},
  {quality: "auto"}
  ]})
Java:
cloudinary.url().transformation(new Transformation()
  .width(600).chain()
  .quality("auto")).imageTag("beach_huts.jpg")
jQuery:
$.cloudinary.image("beach_huts.jpg", {transformation: [
  {width: 600},
  {quality: "auto"}
  ]})
.Net:
cloudinary.Api.UrlImgUp.Transform(new Transformation()
  .Width(600).Chain()
  .Quality("auto")).BuildImageTag("beach_huts.jpg")
Image delivered with automatic image quality

Automatic image quality - fine tuning

How you ultimately use the image may also influence the quality/size trade-off decision. For example:

  • Is the image used as a thumbnail link to a high quality version?
  • Do you sell images, or display high resolution images for printing, so that the visual quality is something you don't want to compromise at all?
  • Will the image receive a lot of traffic and therefore bandwidth considerations become even more important?

To address these and other considerations, you can influence how aggressively the quality automation algorithm reduces the file size, by adding an extra value to the q_auto parameter that describes the level of visual quality to aim for (best, good, eco, or low).

The interactive image example below shows the effect that the various auto quality settings have on the visual quality of the same beach image used in the first example above, also scaled down to a width of 600 pixels. The image is initially displayed with a quality setting of 100, and clicking on one of the buttons below the image will display the image using that particular quality setting.

Quality: 100 Size: 228KB
auto:low auto:eco auto:good auto:best 80 100

The different automatic quality settings can be summarized as follows:

  • q_auto:best - The least aggressive algorithm, which compresses the files as much as possible without compromising the visual quality at all.
  • q_auto:good - Delivers a relatively small file size with good visual quality. The image might include a few minor visual artifacts that are only apparent on very close visual inspection of the image. This setting is the optimal balance between file size and visual quality.
  • q_auto:eco - A more aggressive algorithm, which prioritizes smaller files at the cost of a slightly lower visual quality that is only apparent on close visual inspection.
  • q_auto:low - The most aggressive algorithm, which results in the smallest files, allowing for lower visual quality.

Automatic quality default values

By default, specifying q_auto is the same as specifying q_auto:good, however this default value changes if the requesting browser has Save-Data support enabled, in which case q_auto defaults to q_auto:eco. Save-Data support is a feature included in the Client-Hints standard, which is already supported by Chrome and Opera browsers.

Note: For customers with a custom domain name or private CDN distribution, the Client-Hints processing needs to be set up: contact us for more details.

Automatic image quality - with automatic image format

Take your image optimization to the next level by combining automatic image quality selection with automatic image format selection. The Cloudinary algorithm can then check if a different format (e.g. PNG8) is a better fit for a specific image based on its content. Some formats such as WebP and JPEG-XR are also more efficient for delivering web images, but they are not supported by all browsers. To optimize the image delivery, Cloudinary can also dynamically select the most efficient image format to deliver, based on the browser requesting the image.

To include automatic format selection for image delivery, simply add the format parameter and set it to auto (f_auto in URLs). For example, the same beach image as above, delivered with both automatic quality selection and automatic format selection (q_auto,f_auto), will be delivered as WebP (13.2KB) to Chrome browsers, JPEG-XR (15KB) to Internet-Explorer/Edge browsers, and JPEG (19.5KB) to all other browsers:

Ruby:
cl_image_tag("beach_huts.jpg", :transformation=>[
  {:width=>600},
  {:quality=>"auto", :fetch_format=>:auto}
  ])
PHP:
cl_image_tag("beach_huts.jpg", array("transformation"=>array(
  array("width"=>600),
  array("quality"=>"auto", "fetch_format"=>"auto")
  )))
Python:
CloudinaryImage("beach_huts.jpg").image(transformation=[
  {"width": 600},
  {"quality": "auto", "fetch_format": "auto"}
  ])
Node.js:
cloudinary.image("beach_huts.jpg", {transformation: [
  {width: 600},
  {quality: "auto", fetch_format: "auto"}
  ]})
Java:
cloudinary.url().transformation(new Transformation()
  .width(600).chain()
  .quality("auto").fetchFormat("auto")).imageTag("beach_huts.jpg")
jQuery:
$.cloudinary.image("beach_huts.jpg", {transformation: [
  {width: 600},
  {quality: "auto", fetch_format: "auto"}
  ]})
.Net:
cloudinary.Api.UrlImgUp.Transform(new Transformation()
  .Width(600).Chain()
  .Quality("auto").FetchFormat("auto")).BuildImageTag("beach_huts.jpg")
q_auto with f_auto

The combination of q_auto and f_auto is even more powerful when used together than either of them separately. The algorithm might detect that the PNG format is a better fit for specific images that contain content such as drawings. For some images, even the PNG8 format can be automatically selected for providing great looking results with a very efficient file size.

For example, the following URL dynamically generates a 500 pixels wide version of a drawing only using automatic image quality selection (q_auto without f_auto).

Ruby:
cl_image_tag("flowers_and_birds.jpg", :width=>500, :quality=>"auto")
PHP:
cl_image_tag("flowers_and_birds.jpg", array("width"=>500, "quality"=>"auto"))
Python:
CloudinaryImage("flowers_and_birds.jpg").image(width=500, quality="auto")
Node.js:
cloudinary.image("flowers_and_birds.jpg", {width: 500, quality: "auto"})
Java:
cloudinary.url().transformation(new Transformation().width(500).quality("auto")).imageTag("flowers_and_birds.jpg")
jQuery:
$.cloudinary.image("flowers_and_birds.jpg", {width: 500, quality: "auto"})
.Net:
cloudinary.Api.UrlImgUp.Transform(new Transformation().Width(500).Quality("auto")).BuildImageTag("flowers_and_birds.jpg")
Automatic quality selection of a cartoon

The result is a JPEG image (41KB) where, if you look carefully, you can see that the lossy nature of the JPEG format resulted in some visual artifacts. In the next example with the same drawing, we will combine both q_auto and f_auto:

Ruby:
cl_image_tag("flowers_and_birds.jpg", :width=>500, :quality=>"auto", :fetch_format=>:auto)
PHP:
cl_image_tag("flowers_and_birds.jpg", array("width"=>500, "quality"=>"auto", "fetch_format"=>"auto"))
Python:
CloudinaryImage("flowers_and_birds.jpg").image(width=500, quality="auto", fetch_format="auto")
Node.js:
cloudinary.image("flowers_and_birds.jpg", {width: 500, quality: "auto", fetch_format: "auto"})
Java:
cloudinary.url().transformation(new Transformation().width(500).quality("auto").fetchFormat("auto")).imageTag("flowers_and_birds.jpg")
jQuery:
$.cloudinary.image("flowers_and_birds.jpg", {width: 500, quality: "auto", fetch_format: "auto"})
.Net:
cloudinary.Api.UrlImgUp.Transform(new Transformation().Width(500).Quality("auto").FetchFormat("auto")).BuildImageTag("flowers_and_birds.jpg")
Automatic quality and format selection of a cartoon

In this case, the algorithm decided to encode the image using the PNG8 format. The image looks better, has no artifacts, and weighs even less - just 34.8KB.

See the Automatic format selection documentation page for more details.

The bottom line: automate quality selection for all your images

Selecting an optimized quality setting for every image can now be easily automated with Cloudinary's quality selection algorithm. The feature can also be combined with automatic format selection for a powerful and dynamic solution that delivers all your images using minimal bandwidth and maximum visual quality.

Try out the automatic quality interactive demo page and see the Automatic quality and encoding settings documentation for more details. All image manipulation and delivery features introduced here are available with no extra charge for all Cloudinary's plans, including the free plan.

Viewing all 601 articles
Browse latest View live