This year at SXSW, we’re infusing Cloudinary’s powerful Visual APIs to the SXSW Hackathon, where teams compete on high-tech creativity during a straight 24-hour programming event. Taking place at TechSpace, this exciting event will culminate with demos and awards at the Hilton (Salon C) on Wed, March 15 at 2pm.
Image may be NSFW. Clik here to view.
Our challenge for the SXSW Hackathon is the Lifestyle Hack, where we’re asking teams to build an application that enriches the human experience; It can be a mobile or web app and even a bot! To qualify, teams need to use Cloudinary and demonstrate in a compelling way that their high-tech creation facilitates a lifestyle improvement.
Image may be NSFW. Clik here to view.
Lifestyle Example #1:
Gaming: Engage players in a gamified experience that educates users on making smart lifestyle choices to promote good health and their well-being.
Lifestyle Example #2:
Activity: Guide users through individual or group activities that entail educational experiences via use of stored or web-accessible pictures.
Lifestyle Example #3:
Shopping: Implement commerce solutions that help users select products based on their lifestyle merit via use of visual cues and ranking methods.
Cloudinary personnel will be available onsite to provide technical assistance and answer questions related to visual APIs during the hackathon.
The winning team, selected among those qualified for a Cloudinary prize, gets 12 months of a Cloudinary Advanced plan (valued upwards of $2,500!) and free promotion via social media coverage for the team and its solution.
No programmer could imagine a world without variables. Neither can Cloudinary. That’s why Cloudinary now offers image transformations that support user-defined variables.
Using Cloudinary, you can already deliver transformed images with a variety of transformations, including resizing, cropping, rotating, a huge toolbox of special effects and filters, text and image overlays, and more, all of which you can deliver responsively, on-the-fly, and optimized for quick delivery via CDN.
But there are many scenarios when you may want to set up a fixed set of transformations to be applied to a variety of media assets, with one or a few variations depending on the specific image to be delivered, or on other factors that are determined at a later time.
By including user-defined variables in your transformations, you can assign different values to specific elements of the transformation when you deliver the file. For example, you could:
Apply resizing, cropping, and certain special effect transformations to all images, but use a variable for the text overlay element of the transformation, so that each image can be customized with a user’s name.
Calculate the required width of an overlay based on the evaluation of a condition, and then pass that number as a variable value to the transformation component where the overlay is applied.
Set certain elements of your Web site profile images, such as size, circular shape, quality, and more, but allow your users to select from special effects and artistic filters to apply.
Until now, goals like these could only be accomplished through a combination of transformation API and your own application code. Now you can do it all within the transformation code.
User-defined variables can be useful in conjunction with conditional transformations. You can simplify and improve the legibility of conditional transformation code by assigning different values to variables based on conditions, and then pass the relevant value to the transformation code in a separate component of a chained transformation.
You can also now apply arithmetic operators to numeric parameters or user-defined variables representing numeric parameters. To make it more interesting, your user-defined variables can even take on the value of an already known parameter value adjusted by some arithmetic expression. For example, you could assign the textwidth variable to be equal to the width of the image minus 10. Then you could create a text overlay whose width is assigned the value of the textwidth variable.
User-defined variables are even more valuable when working with named transformations, which enable you to keep your transformation code completely separate from your URL delivery code, and now enable you to keep variable values separate from your transformation code as well.
Between variables, conditional transformations, arithmetic expressions, and the function-like named transformations, you've nearly got everything you need to consider the Cloudinary transformation API a programming language in and of itself.
In general, to include a user-defined variable in your transformation, you just specify any variable name of your choice preceded by the $ sign, instead of a static parameter value, and you assign values to your variable similar to the way you would for a regular parameter.
As you can see in this simplified example, we created a user-defined variable named imgwidth, initialized it with the value 270, and then later assigned the imgwidth variable to the width parameter.
You use variables for string parameters in a similar way, but you bound the string value with ! ! characters in the assignment, for example, !MyStringValue!.
For example, have a look at this basket of strings.
There are several transformations, but the value of the effect gets a different string value in each case, controlled by a variable:
Below, we show how to deliver the sepia image on the right: we assign the !sepia! string to the $effect variable, and then we set the effect transformation parameter to use whatever value is in the $effect parameter:
Note: You can substitute user-defined variables for the value of all single-value numeric transformation parameters and some of the string transformation parameters. (See the documentation for the exact list.)
To simplify the examples above, we demonstrated assigning variable values and using the variables within transformations, together in the same delivery URL.
However, in most real-life scenarios, you will probably use variable transformations within a named transformation. A named transformation is kind of like a transformation function you can 'call' from any transformation URL. But until now, you couldn't pass any external values to the named transformation. Now with user-defined variables you can.
User-defined variables thus enable a complete separation of the transformation from the values used for delivery; a separation of the design and content logic from the technical logic.
This separation takes named transformations to a whole new level, making it significantly easier to reuse common transformations for many images, even when some specific adjustments must be made to the transformation depending on the specific image, the location where the image is displayed, or other dependencies.
For example, we've saved a transformation similar to the one used in the canyon photo above, in a named transformation called signed_photos. The named transformation sets the font type and size, the location of the text overlay, parameters that define the semi-transparent background for the text, and also includes variables for the photographer's name and for the final width of the photo to deliver:
Using that named transformation, you could then deliver any image by assigning the relevant photographer name and the final width you want for the resulting image, and then specifying the named transformation and any public ID:
Suppose you have a news site that always displays the two most recent news stories in the form of large square thumbnail links of 220x220 pixels, with 20 pixels between each. Below those, older news stories are displayed with small square image links (100x100), also with 20 pixels between each photo.
You could create a named transformation that sets the quality, crop type, gravity, and other image improvements, and additionally sets both the width and height to a $size variable that will be defined externally. For example, the t_news_square named transformation might be defined as: c_fill,e_improve,g_auto:faces,z_0.7,q_auto,w_$size,h_$size,
The delivery URLs for the large image thumbnails would set the $size variable to a value of 220:
Imagine that users upload a profile photo to your social media app and you need to display the photo on their profile page as a portrait-oriented rectangle with rounded corners, on their homepage as a square, and as a small circular chat head on the chat page. The zooming on each photo should adjust according to the size and shape of the image. And of course you know that as your site design changes in the future, these values might change.
But regardless of the above adjustments, you always want to use the same quality, format, and face recognition settings for all photos.
With variables, you simply create a named transformation (called profile_pic in our example) with static settings for the permanent elements, and variables for the size (aspect ratio & final width) and the radius (rounding):
The profile_pic named transformation looks like this: $zoom_$aratio_sub_0.4/ ar_$aratio,c_thumb,f_auto,g_face,q_auto,r_$rounding,w_$width,z_$zoom
This named transformation takes advantage of arithmetic operators (subtraction in this case) to achieve a zoom that changes with the aspect ratio. Thus the 1:1 images (aspect ratio = 1) end up with a closer zoom, achieving a headshot, but not too close, while portrait images (aspect ratio < 1) have a smaller zoom, and thus show more of the whole body.
The round chat head picture shown above on the right would be delivered with a value of 1.0 for $aratio, 75 for $width, and 20 for $rounding:
Let's say you want to post the winners of a photo contest. The winning photos are delivered with a banner graphic overlay displaying the name of the winner and the place that he or she won. You want to post all photos at their original size, but both the width of the banner overlay and total width of the text (regardless of the length of the winners’ names) must be relative to the size of the photo.
You can accomplish this by creating user-defined variables for all the varying elements along with arithmetic operators and relative values. For example, we want the banner to be 90% of the photo's width and 15% of it's height. The text fits well on the banner when it's about 45% of the total image width, but the distance of the text from the bottom of the image has to be relative to the height of the resized banner. Of course we want the winner's name and where they placed, to be variables as well.
The transformation that achieves all this is somewhat complex, but that's OK. We just need to work it out once and then put it into a named transformation.
So the delivery of each winning photo is a snap!
For example, all we have to do to deliver the first place photo is set the $name variable to "Jen Fine" and the $award variable to "First":
"Change is the only constant." The phrase was coined by Greek philosophers over 2500 years ago, but it has never been truer than it is today. With the supersonic pace of Web technology development and non-stop improvements and new directions in UI design, having static values anywhere can be a hinderance.
But static values no longer need to weigh down your image transformation code. Take advantage of user-defined variables in named transformations to enable quick and flexible adjustments while maximizing code reuse and consistency across a variety of media assets.
This article demonstrated a bunch of ideas to get you started with user-defined variable transformations, but the sky's the limit. User-defined variables are supported with all Cloudinary plans, including the free one, so if you don't have a Cloudinary account yet, take a few seconds to get a free account now, and show us what you've got!
Who doesn't love some striking imagery to drive your point home? Whether you're selling a product or service, trying to communicate complex ideas, or simply captivate the emotions of your users, pictures can do that. Everyone knows they work, and everyone loves them.
Well, everyone except the actual web servers. Thankfully, they have not yet gained sentience, so we don't have to worry about their feelings. Even so, there is a cost to having images take up around 70% of all bandwidth.
It costs us in terms of storage space, sure. More importantly, it cost both servers and users in terms of bandwidth and data caps.
A long time ago (in Internet Years) browser developers figured out they could load and render pages faster if they started loading more than one external resource at a time. So they did. Now, while scripts and CSS are still downloading, your browser will usually try to grab all of the images, too.
That way, in theory, it's all ready to go as soon as the CSS and JS tell the browser what to do with all of those images. Well, it's ready to go sooner, in any case.
But what if the user doesn't scroll all the way down the page? What if they never see many or most of those images? That's wasted data on both ends.
This is where we turn to lazy loading.
How this works
For the uninitiated, lazy loading is simply waiting to load the images until the user gets to them. Only the necessary images are ever loaded, saving potential gigabytes upon gigabytes of bandwidth. The more users your site has, the more you save.
Don't take it from me. Take it from Chris Coyier of CSS-Tricks fame.
On a high traffic site, say 2 million of 5 million users visit a blog post with a lot of images on it, but never scroll down. Below the fold, there is 750k of images. That’s going to save you a boatload of bandwidth (1.5 million megabytes…)
But even that is just a quote, though it comes from a pretty smart guy. If you want a real-world example, look at this post-mortem by NYStudio+107. They used lazy loading (and a few other important techniques, but we're focused on lazy loading right now) to drop from a page load time of 107.8 seconds to 2.8 seconds.
It's not a proof-of-concept either. It's a real-world site they built. Incidentally, the blog post itself uses lazy-loading, so there's another example.
Ok, that's awesome! Let's do it!
Okay, but there are a few things to think about:
This is only useful if you have a lot of images below the fold. If you just have a hero image and then a bunch of text... it's not worth it. Consider your content.
Lazy loading is not a built-in browser feature. It has to be done with JavaScript. Adding lazy loading will increase the overall complexity of any project. This will cost in terms of development time and testing.
Doing it wrong may result in users not seeing images at all.
Now, if you have all of that covered, and you still want to do this, here are a couple of tips:
Load images just before they enter the viewport whenever possible. It won't always work, but it's the ideal.
Since the above tip won't always work, you're going to need to reserve space for the images. If you don't, you may see the rest of the layout jumping around, and that's never cool.
You can use background colors, loading animations, or even tiny image previews to let users know that something will be loading in that extra space.
Have a fallback solution. Always have a fallback solution.
Again, it would be better if they never saw it, but these things happen.
Tools
We would never end an article like this without telling you where to start. The library I'd recommend is called lazysizes. It supports both responsive and normal images, and can also work with other elements like iframes.
Even better, it can automatically generate the appropriate "sizes" attribute for your responsive images on the fly. So you'll never have to set those manually again.
It's designed to be fast, extendable, and play nice with other JS libraries. It's also designed to never hide content from search engines, so it shouldn't impact your SEO.
Conclusion
It's time to get lazy, people! (I couldn't resist.)
The only real downside is the JavaScript dependency. In the future, you may be able to skip the JS, once the IntersectionObserver API is implemented in all browsers. Right now, only Chrome and Opera support it fully, and out of the box.
That small issue aside, this technique could save you, and your site, a lot of data. Data is money, for both you and your users.
Image may be NSFW. Clik here to view.
Ezequiel Bruni is a web/UX designer, writer, and aspiring e-sports commentator. When he's not up to his finely-chiseled ears in wire-frames and front-end code, or ranting about the same, he indulges in video games, beer, pizza, video games, fantasy novels, stand-up comedy, and video games..
We all know that images attract interest and increase engagement, but with the huge overload of images out there, we sometimes need to get creative to stand out in the crowd. Your users who upload photos to your site or app may also be looking for those same creative opportunities. A quick look at the most popular social media apps and their continually increasing toolbox of special photo effects shows the increasing trend in popularity and demand for these fun ways of expressing one’s identity.
Cartoonifying a photo is one great way to accomplish this.
Graphic designers can manually apply a cartoon effect to photos using a combination of features in sophisticated graphics applications. There are also a variety of online applications where you can upload a photo and get a cartoon version (of varying quality) returned. But these manual methods don’t scale if you have many photos where you want to apply this effect. And offering this feature to your users for the content they upload to your site requires a complex algorithm.
In short, you need a simple way to apply cartoon effects programmatically.
Cloudinary’s image management solution includes a broad set of cloud-based image manipulation capabilities. The manipulation takes place on-the-fly when the dynamic image URLs are first accessed, and then they are immediately cached on CDN servers for even faster delivery.
The new cartoonify effect is yet another way that Cloudinary enables its customers to quickly, easily, and optimally deliver transformed photos that have just the right impact. With a single parameter and a couple optional attributes, you can give any image a unique cartoonified look and feel.
For a default cartoonify effect, it couldn’t be simpler! Just add the cartoonify parameter (e_cartoonify) to your image tag definition, and the original image gets cartoonified and delivered on-the-fly. Of-course you can also combine this cartoon effect with any other transformation your heart desires.
Here’s the transformation code for that last image, which takes advantage of the text overlay, placement gravity, radius, outline, and background color features, in addition to cartoonify:
For added control on your cartoonified image, you can adjust the line strength of the black outlines and the color reduction impact. (As you increase the color_reduction value, and thus decrease the number of colors in the image, the image also gets a higher saturation boost, and a few other adjustments, all leading to a less realistic look).
For example, the following images show the original image, compared to cartoonified versions with different adjustments in line strength and color reduction.
Yes, it’s that simple: one parameter added to your delivery URL or passed on as an option to your users when they upload their profile pics or other images, and the required cartoonification algorithms are automatically applied to the photo.
And don’t forget that cartoon-like images are more than just another cool effect. Cartoonified images can help capture an audience, and they may be more memorable to your users among the plethora of regular photos in every web page on the net.
Additionally, when used in the appropriate context, cartoonified images may be able to express an intended tone, emotion, or personality better than the original photo. And according to marketing consultant, Marcia Hoeck, emotion is (not surprisingly) better at triggering the circuits in the brain that activate behavior and decisions than logic is.
You now know how simple it can be to programmatically cartoonify any image with Cloudinary. And you can do it with any Cloudinary account, including a free one.
So the next time you are looking for just the right creative image that will get your users to tune into your message, consider 'tooning it.
Image may be NSFW. Clik here to view.HTML5 is the latest evolution of the HTML standard. It is bundled with a lot of new elements and attributes that makes semantics, connectivity, performance, device access, 2D/3D graphics and styling better on the web.
Before HTML5, videos could only be played in a browser with plugins like Flash. HTML 5 changed the game, making video and audio first-class citizens on the web by enabling the manipulation of multimedia content using the <audio> and video tags.
With HTML 5, users can now get browser-native video players without involving any third-party scripts or plugins.
Below is a list of the browser versions that fully supports the <video> element tag.
Google Chrome v4.0+
Internet Explorer v9.0+
Mozilla Firefox v3.5+
Safari v4.0+
Opera v10.5+
In this blog post, we’ll take a deep dive into some of the popular HTML5 video players and specifically highlight their strengths and weaknesses. You have the right to know which HTML5 video player is better suited for your project.
VideoJS is a free and open-source HTML5 video player built with JavaScript and CSS. It is used on more than 400,000 websites. As at this writing, it has more than 15,000 stars on Github. It supports Flash.
Note: Flash technology is built into the project for versions less than 6.0.0. If you are using the latest version of VideoJS and you need flash support for fallback, then you also need to involve the videojs-flash project.
VideoJS supports playback on desktops and mobile devices. It is skinnable. The player skin is built from HTML and CSS, so you can build your own skins. Here are some examples of different skin implementations:
Then in the body you can use the <video> tag like so:
<videoid="my-player"class="video-js"controlspreload="auto"poster="//vjs.zencdn.net/v/oceans.png"data-setup='{}'><sourcesrc="//vjs.zencdn.net/v/oceans.mp4"type="video/mp4"></source><sourcesrc="//vjs.zencdn.net/v/oceans.webm"type="video/webm"></source><sourcesrc="//vjs.zencdn.net/v/oceans.ogv"type="video/ogg"></source><pclass="vjs-no-js">
To view this video please enable JavaScript, and consider upgrading to a
web browser that
<ahref="http://videojs.com/html5-video-support/"target="_blank">
supports HTML5 video
</a></p></video>
Be sure to add a class of video-js to the video tag in your HTML. Once the page loads, VideoJS will find the element and automatically set up a player.
Note: You can also fetch these files from npm like so npm install Video.js.
You can also programmatically invoke it like so:
var options = {};
var player = videojs('my-player', options, functiononPlayerReady() {
videojs.log('Your player is ready!');
// In this context, `this` is the player that was created by Video.js.this.play();
// How about an event listener?this.on('ended', function() {
videojs.log('Awww...over so soon?!');
});
});
The JW Player is an HTML5 video player that renders beautifully on desktop and mobile browsers. The JW Player is a video player that provides a lot of functionalities. The HTML5 video player boasts of a video hosting platform that offers the ability to upload and stream 360 degrees video.
Currently, the JW Player is live on more than 2 million websites.
The JW Player supports the following:
4K resolution
Adaptive bitrate streaming
Live streams
Monoscopic video support
Gyroscope motion support
Customizable UI
360 degree video playback in magic window mode and immersive VR mode with a premium license.
Adding 360 degree video playback to native Android and iOs apps using JW Player VR SDK Beta.
Widevine, Playready, Fairplay and ClearKey DRM
Video advertising standards, VAST, VPAID 1, VPAID 2 and Google IMA
This video player is the most feature-filled player in this list. It’s a very robust HTML5 player.
You can use a JW video player by simply including the necessary js file and including your KEY from your JW Player account like so:
<script src='https://content.jwplatform.com/libraries/L7fM8L0h.js'></script>
<script>jwplayer.key='YOUR_KEY';</script>
_this should be loaded from the head_
And loading the player by using the jwplayer function like so:
<divid='myElement'>Loading the player...</div><scripttype='text/javascript'> jwplayer("myElement").setup({"file": "/uploads/example.mp4","image": "/uploads/example.jpg" });</script>
Once the player has been set up, you can programmatically call API methods on it. JW Player supports the following event triggers: on, off, once and trigger. An example is this:
<script>jwplayer("myElement").on('complete', function(){ alert("Complete fired - Your content has completed!");});</script>
_Listens on the complete event. Once the video finishes a playback, it invokes the callback function_
You can also load multiple JW Players on the same page, as long as they have different ids.
This free and open source HTML5 video player supports the following features:
Pre- and post-roll Ads (VAST)
True fullscreen
Flash fallback with RTMP support
VLC web plugin support
Quality selection and toggling
Cue-points for media synced events
OSMF support for HDS streaming and DVR
It’s built on jQuery. Therefore you need to import jQuery when trying to implement Projekktor HTML5 Video player in your application and also import the necessary CSS and JS files like so:
This HTML 5 video player was developed by the Paypal Accessibility team. It supports the following features:
Captions, using the VTT caption file
Internalization of the text strings used for the controls
Option provided to set the number of seconds to rewind and forward
AccessibIlity for keyboard-only and screen reader users.
Unfortunately, it has the following limitations:
No support for SRT files.
Controls have a minimum width of 360px
No support for ads or ad networks
Only one caption file per video is supported.
Image may be NSFW. Clik here to view.
A better and clearer way to view the features these HTML5 video players possess is via a clear-cut comparison table. Take a good look at the table below comparing the video players highlighted above and other video players in the community.
Video on HTML5 is multimedia content on steroids for web browsers. There are several HTML5 video players available on the Open Web, but not every player will suit your project use case.
Here, we have covered the capabilities and limitations of these video players. Cloudinary, an end-to-end solution, can assist with all of your video management needs. Cloudinary enables you to upload and transcode videos, resize and crop them for responsive design, apply effects and filters, create thumbnails, add captions and overlays, optimize playback and deliver them via a global CDN. Check out Cloudinary’s documentation for more information on how to integrate it in your apps.
I hope our comparison guides you in choosing the right HTML5 video player for your next project and that you give Cloudinary a test drive in to see how all of its feature and functionality can make video easier to manage. Let me know in the comments section if there are great HTML5 video players out there that I omitted. And after using Cloudinary, let us know your favorite features and the benefits you were able to derive from it.
Image may be NSFW. Clik here to view.
Prosper Otemuyiwa is a Food Ninja, Open Source Advocate & Self-acclaimed Developer Evangelist.
Image may be NSFW. Clik here to view.
When analyzing use of website or mobile application storage, there’s no doubt that media files, such as video clips and images, use the most space. Migrating these files to the cloud and storing them in a location where they are available online makes perfect sense, but images and videos often require additional transformations before they are delivered to end users.
Images need to be transformed to optimal formats, resized and cropped for various aspect ratios, especially if you have a responsive site. In addition, you may want to apply special effects and overlays. Videos, too, need to be optimized for web delivery, transcoded to support different resolution options and streamed using adaptive streaming, as well as making other modifications. Then, when your media files are stored on the cloud, you’ll want fast delivery via content deliver networks (CDNs) to ensure a great user experience.
Cloudinary, a cloud-based service that supports all image and video management needs for websites and mobile apps, delivers all of these capabilities. In order to start using Cloudinary, you first need to set up a free plan to start. Then you will have to migrate your images and videos to your Cloudinary account. Here’s how you get started:
The code samples provided here are in Node.js. However Cloudinary publishes SDKs in several languages. You can find the various options listed here.
In case your development language isn’t there, Cloudinary supports the option of uploading images using a direct HTTP call to the API, as explained here.
Image manipulation and delivery also can be implemented by providing the transformation parameters as part of the URL directly.
Open a Cloudinary free account.
Go to Cloudinary and click “sign up for free.” Fill out the registration form. Here you can change your default cloud name to your preferred name. In these examples my cloud name is “cld-name.”
Follow the instructions according to the required SDK documentation as listed here.
Much like when you move to a new apartment, you need to ask yourself, do I need to move all my files or is it a good opportunity to leave some of it behind? To answer those questions, let’s consider several migration options, each fitting with a different scenario.
Migrating all existing content in one phase – This requires uploading all your media files. This option fits one of the following use cases:
All of your images and videos are actively used.
You intend to shut down your existing media storage.
Implement this migration by creating a script that runs on your media assets and for each file it calls the upload API call. Cloudinary’s upload API call supports uploading files from various sources, including a local path, a remote HTTP or HTTPS URL, a remote S3 URL, a Data URI or an FTP URL.
When uploading a file, you can define your own unique Id (as shown below). If it is not defined, the call will create one randomly. Here is an example of uploading a file from your local computer:
Lazy migration – Uploading a media file only when it is requested by your website or app user for the first time. This option is effective when you have a long tail of media assets, not all of them are active, and you are not sure which ones are still in use.
Using the Cloudinary management console or the API, you can define a mapping between a folder name in your Cloudinary media library and a base remote URL, which links to your images online folder. For example, if your images are available at:
https://example.fileserver.com/media/, the API call shown below will map https://example.fileserver.com/media/ to a Cloudinary folder called: media
The first user who calls the Cloudinary URL will trigger an automatic upload of the image to Cloudinary. Any subsequent request for the same image will be delivered via the CDN.
The following API call also will return the required URL:
cloudinary.url("media/koala.jpg");
Hybrid approach – Run a script to upload the “hot” group of your most commonly used media assets and use the “lazy migration” option to upload the rest. This option works best when you have a defined subset of your media assets that drives most of your traffic.
Fetch assets – Fetch media assets from remote locations and store them for a predefined period. Use this option when your images and videos originate from various online sources and they are used for a short timespan, as in news items.
For example, the following code is used to deliver a remote image of Jennifer Lawrence fetched by Cloudinary from WikiMedia.
Cloudinary is able to manipulate images and videos on-the-fly upon request or upon upload, so you only need to upload the highest resolution of one image or video. There is no need to upload large/medium/small variants.
If all of your media assets are not public, you can upload them and restrict their availability:
Private files – The original files are not available unless accessed via a signed URL. Another option to provide access is creating a time-expired download URL. The following code example uploads the file as private:
Authenticated files - The original files, as well as their derived ones, are not available unless accessed via a signed URL. For increased security, cookie-based authentication can be setup as well, in order to access them.
Whitelisting referral domains – An additional optional security layer that restricts the access to your media assets is to setup a whitelist of referral domains. Then only URL requests arriving from those domains are allowed to access the file.
A convenient way to create a centralized upload policy is defining an upload preset. This enables you to define the transformations you would like to do once, then use the preset name to activate it upon upload. You can define several upload presets and use them according to different policies you have, for example watermark all images or transcode a video rendition of 640p wide resolution.
When you define an upload preset, you can set a transformation that will change the original file and then only the transformed file will be stored. This option is called an incoming transformation. You can also define transformations that will be created as derived files, which will be stored in addition to the original file. This process is called an eager transformation. Using Cloudinary, you can transform the images and video on-the-fly, therefore these options are required for cases where you would like to process the transformation immediately upon upload.
As an example, the following code creates an upload preset that adds the tag remote. The unsigned parameter determines if the preset can be used for unsigned uploads, which can be done from the client side without having the API secret. The allowed_formats parameter defines the file formats allowed to be used with this preset.
You can tell Cloudinary to notify your application as soon as the upload completes by adding the notification_url parameter to the upload method and setting it to any valid HTTP or HTTPS URL. You also can set the notification_url parameter globally for all uploads on the Upload Settings page in the Cloudinary Management Console, instead of individually for each upload call.
Following a successful migration, you need to start uploading all new media assets to Cloudinary. There are several ways to do it: manually via the Cloudinary account console, calling the upload API, or using automatic upload. Another easy way to do this is using the ready-made upload widget.
Cloudinary's upload widget includes a complete graphical interface. The widget supports a drag and drop functionality, interactive cropping, upload progress indication and thumbnail previews. The widget also monitors and handles uploading errors. The following code example shows how to open the widget:
The steps detailed above are just the beginning of the journey of moving your media assets to the cloud. Once uploaded, Cloudinary supports a long list of image manipulation options, and the same goes for video. In addition, images can be optimized for faster delivery and support responsive design.
Now is the time to let go, send your media assets to the cloud and set them free.
Cloudinary has been tracking Guetzli since it was soft-launched in October; it has been amazing to watch news about it bubble up into the pop-techpress.
The popular take: Guetzli is an ingenious, Google-backed shot in the arm for the dusty/trusty old JPEG format, which – if you’re willing to wait for its extremely computationally intensive algorithms – produces JPEGs that are 35% smaller (or better) than was previously possible.
Has Google managed to squeeze blood from a stone? I’ve been running some tests to find out; the truth is more complicated, nuanced, and, I think, interesting. Read on!
Butteraugli Brains
Lossy encoders throw data away. Good ones do so artfully, so that we don’t notice. A well-encoded lossy image will look just like the lossless original (to our fickle yet fallible human eyes), despite containing a fraction of its information.
Imaging R&D is most-reliably guided by real-world experiments, in which real people are really asked what they subjectively notice. There are many (many) situations where that kind of testing is impossible, though, and you need an objective, mathematical model that estimates subjective “quality.”
For decades, the image quality metric of choice was PSNR: a tidy piece of information theory which measures the signal of the original against the encoder’s lossy artifacts, or noise.
In 2004, a handful of researchers introduced a new, arguably better, model: SSIM. SSIM was built on a few key insights about some high-level perceptual concepts. Turns out, we pay special attention to patterns and “structures” (and often ignore the really bright bits of an image).
Guetzli’s raison d’être is a brand new metric for image quality, developed by researchers at Google, called Butteraugli.
Butteraugli takes modeling the complicated and particular ways that our biological systems actually work to a new level: cells in the retina. Its project description includes the phrases, “low density of blue cones in the fovea” and “more accurate modeling of ganglion cells,” for goodness sake!
Butteraugli is brand new, largely untested, and really interesting. It’s the brains behind Guetzli.
Binary Search Brawn
In most encoders, when you select a “quality” at encode time you’re picking an integer between 1-100 that the encoder’s designers have arbitrarily mapped to a set of arcane technical parameters. As a result, encoding with a “quality” of 86 doesn’t mean that the resulting JPEG will be “86 percent good” in any objective or portable way. Photoshop’s 86 != libjpeg’s 86, and even with the same encoder and input quality, output quality, as measured by metrics like Butteraugli or SSIM, will vary from image to image.
Cloudinary’s q_auto tries to do better. q_auto’s four quality levels (:best, :good (the default), :eco and :low) don’t map to specific sets of arcane encoder settings – instead, via heuristics, a trial encode or two, and some quick checks with a custom SSIM metric, q_auto dials up custom encoding parameters for every image, tailoring them to fit each image’s unique compression characteristics. q_auto lets you select an output quality. A q_auto image will always look good; a q_auto:best image will always look great.
Guetzli takes this idea to its logical extreme. When you select a Guetzli quality, what you’re actually selecting is a specific Butteraugli score; Guetzli then does dozens of full encodes, methodically dialing parameters up and down and measuring the results, until it achieves that precise score.
This stubborn precision, more than anything, is what makes Guetzli so slow. Which brings me to my next point.
Strong Opinions
Guetzli is a very focused, opinionated piece of technology, I found this out the first time I ran it:
$ guetzli --quality 80 original.png guetzli.jpg
Guetzli should be called with quality >= 84, otherwise the
output will have noticeable artifacts. If you want to
proceed anyway, please edit the source code.
Guetzli processing failed
“Please edit the source code”! The sass!
The second run threw me, too: I’d heard it was “slow,” but encoding a one-megapixel image ate up 300 MB of RAM and took a minute and a half. Mozjpeg completes the same task in 300ms.
The Guetzli folks have explained the limited quality range; turns out, Butteraugli is only smart at high quality levels. And they’ve been forthright about the fact that their tool is ripe for optimization. But as it stands, their encoder burns through vast quantities of memory and processing power in order to output JPEGs with precise, and rather high, levels of Butteraugli-calculated “quality.”
My first impressions: both the Guetzli and the q_auto look quite good. Up close, both seem slightly “fuzzier” than the original. But neither really seems much better or worse than the other – and the q_auto comes in 19% lighter, by bytes.
Breaking out my pixel-peepers, I could start to see some more interesting differences. In Mona’s face, q_auto appears smoother; Guetzli, blockier.
Image may be NSFW. Clik here to view.Image may be NSFW. Clik here to view.
This is evidence of Guetzli working as designed. Guetzli aggressively snaps JPEG DCT coefficients to 0, which results in lots of rather solid 8×8 blocks. It can afford to be aggressive because Butteraugli knows which artifacts we’re likely to notice when the image is viewed at a given resolution and distance1. Block-boundary artifacts that are invisible to my unassisted eyes mean it’s working.
Under the loupe, the Guetzli also looks a bit crisper, preserving more of the hairline cracks in the painting’s glaze.
Image may be NSFW. Clik here to view.Image may be NSFW. Clik here to view.
Guetzli appears to be spending everything that it saved in smooth areas like the face (and 20% more) on fine details like this.
So, which is better? DSSIM2 slightly prefers the q_auto over the Guetzli; to my (unassisted) eyes it’s a toss-up. But, again, the Guetzli came in ~20% heavier at it’s lowest-possible quality setting. I was starting to have some doubts about Google’s “35% better for the web” claim.
This time, the two JPEGs weigh just about the same. And while DSSIM still prefers the q_auto; I think the Guetzli is evidently superior. It looks “cleaner”, with fewer ringing artifacts around the image’s many high-contrast edges.
Image may be NSFW. Clik here to view.Image may be NSFW. Clik here to view.
One bad thing: Guetzli completely erases some of the fine, light-gray lines in the background drapes.
Image may be NSFW. Clik here to view.Image may be NSFW. Clik here to view.
Oops! Overzealous zeroing, methinks. Still: point to Guetzli.
A dash of data
Single image comparisons are great, but in order to further evaluate Guetzli, I needed some data. So I asked Jon for a good set of test images, cobbled together some bash, brushed up on my D3, and futzed endlessly with the particulars of this interactive chart:
Each blue dot represents an image. The x-axis represents the amount-of-compression, and the y, “quality”. Lower is better for both; a dot at (0, 0) would represent an (impossible) image that’s identical to the original and takes up no space on disk.
In other words, as you switch between encoders – dots moving down and to the left are good! Up and to the right? Bad. Up/left or down/right: more-or-less neutral.
If you click on the dots, you can see detailed single-image comparisons for yourself.
There’s a lot here; let’s break it down.
First, note that though the Guetzlis, mozjpegs, and libjpegs were all rendered with a --quality of 84, they all make different quality/compression trade-offs. In general, libjpeg produces heavier, higher-quality images; the average Guetzli is smaller, and the mozjpegs are slimmer still. The q_autos are the slimmest of all.
If you don’t equalize quality and measure file size, or equalize file size and test quality, comparisons between metrics are often misleading and easily gamed.
Different levels of quality are different problems; to get a sense of which encoder is “better” in a general sense, you need test it against others at a wide, useful, range of qualities.
I have, of course, done neither of those things. So! Understand that this chart presents a handful of mismatched snapshots – not a complete picture of how these different codecs stack up against one another. I still think there are useful lessons to be learned here (especially with regards to Guetzli’s methods and limits), but if I see anybody linking to this chart and saying “mozjpeg rulz” or “Guetzli droolz” I’ll be very, very sad.
With that in mind, let’s look at the relative qualities. While the Guetzlis are bigger than the mozjpegs and q_autos, to DSSIM, they look worse. But if we switch our quality metric from DSSIM to Butteraugli, the Guetzlis arrange themselves into a perfect, high-quality, horizontal line and blow every other encoder’s results out of the water. Google’s own tests have shown similar results. One key takeaway from all of this for me has been: when Google says “Guetzli is 35% better”, they mean, “it’s 35% better as measured by a metric of our own design, which we built Guetzli specifically to optimize for.”
A couple of other general observations:
Setting Guetzli aside, DSSIM and Butteraugli mostly agree on the general shapes of the other encoders’ performances. Huh!
q_auto’s qualities are more tightly grouped, with fewer and less-extreme outliers than any other encoder (except for Guetzli as measured by Butteraugli). Jon! (You probably already knew this but) your thing! It works!
Clicking on a bunch of the dots to see these images for myself confirmed my initial impressions.
The Guetzlis are consistently blockier than the other encoders’ images, but in ways that are usually (but not always) hard for me to notice without a loupe.
But perhaps most importantly: most3 of these images look really good. The apparent quality that Guetzli is producing at its lowest setting is still rather high, and it’s a shame that it doesn’t allow you to trade any more of that quality in, in exchange for more compression. So if you’re archiving originals and want to keep the quality top-notch, or have images that really suffer from JPEG’s typical ringing artifacts – Guetzli’s great! But if you want the smallest-possible JPEG that will still look good on the web, most of the time, you can probably do better than Guetzli.
New and exciting
So, Guetzli. Its strong opinions, dramatic tradeoffs, and tight restrictions might be a good fit for your use case, or they might not. The truth is more complicated than the “35% better” breakthrough that’s been making headlines – but it’s more interesting, too. Guetzli embodies new ideas about what’s important and possible in image compression, and on that basis alone: I’m a fan, and I look forward to tracking its progress.
I’m curious how much of a liability responsive images are, for Guetzli, here? How wide is its assumed viewing scenario window? ↩︎
A particularly fast and smart SSIM implementation that measures distance, rather than similarity. ↩︎
Not all of them, though! One interesting exception is this woman’s face, which q_auto noticeably over-compresses. Apparently, while DSSIM measures the mean squared error of the whole image, Butteraugli scores represent maximum local error. This means that, if an image (like this one) is mostly low-information but has a small, high-information area, DSSIM says, “hey, great job with this giant solid wall of blue!” without understanding the importance of the errors in the woman’s face. Butteraugli gets it right. ↩︎
Image may be NSFW. Clik here to view.JPEG 2000 is not dead! There are several conversations online about the usability of JPEG 2000 and why it is not commonly used like the other image formats such as JPEG, PNG, GIF and others. In this article, we’ll discuss the pros and cons of JPEG 2000 in relation to other acceptable image formats.
JPEG 2000 is an image encoding system that was created by the Joint Photographic Experts Group in 2000 with the intention of superseding the original JPEG standard. JPEG 2000 uses the state-of-the-art compression techniques based on a discrete wavelength transformation, enabling users to implement lossless compressions.
JPEG 2000 was intended to create an image coding system for many types of still images (bi-level, gray-level, color, multi-component) with different characteristics. It also would enable different imaging models, such as real-time transmission, image library archival, limited buffer and client/server, within a unified system.
It is used to compress image data that typically comes from digital cameras, scanners, frame grabbers, medical and satellite systems, and photo-retouching programs.
The goal of JPEG 2000 was to create a better version of JPEG, so let’s examine its benefits.
Supports progressive decoding, which is an efficient code-stream that enables a viewer to see a lower quality version of a particular image while the whole file has not been fully received or downloaded. The image quality progressively improves as more data bits are downloaded from the source.
When compared to JPEG, which only supports lossy compression, JPEG 2000 supports lossless (bit-preserving) and lossy compression within a single codestream.
Offers transparency preservation in images.
Includes a flexible file format. It has the .jp2 and .jpx file formats, which enable handling of color-space information, metadata and interactivity in networked applications. According to the RFC 3745, the MIME types for JPEG 2000 are image/jp2, video/mj2, image/jpx, and image/jpm.
Offers higher compression ratios for lossy compression. According to data from case studies, JPEG 2000 can compress images from 20 percent to 200 percent more than JPEG. The peak signal-to-noise ratio or the root mean square is typically used to measure the compression efficiency for lossy compression.
Superior image quality compared to a JPEG file of the same size .
Similar to the TIFF image format, JPEG 2000 is:
Capable of describing bi-level, grayscale, palette-color and full-color image data in several color spaces.
Enables the inclusion of an unlimited amount of private or special-purpose information within the metadata of its file format.
Designed to be extensible and to evolve gracefully as new needs arise.
Developers can actually choose the best space or time tradeoff for their applications because JPEG 2000 includes a number of compression schemes.
Offers large image handling (greater than 64k x 64k pixels) without tiling.
Is capable of handling both natural and computer-generated imagery.
Offers a single decompression architecture.
Delivers low bit-rate compression performance effective down to below 0.25 bits per pixel for high resolution gray-scale images.
In a video broadcast production workflow, adopting JPEG 2000 offers several advantages too, including::
An intra-frame compression scheme that encodes each frame independently. This makes JPEG 2000 great for content editing applications, since the video signal can be cut at any place without repercussion.
Bit-errors in a JPEG 2000 create less visual artifacts than MPEG solutions.
Ultra low latency, which is very important for live TV content.
Scalability in both resolutions and quality.
Robust pixel shifts thus sustaining the same quality in a chain of successive compression-decompression processes over the same original material.
As awesome as JPEG 2000 is, there are some undesirable effects that has impeded its universal use and support.
No universal browser support.
The format is not backward compatible. Users (developers, digital companies and others) wanting to use JPEG 2000 would have to code in a new standard while also supporting the original JPEG.
Encoding JPEG 2000 files is resource intensive (CPU intensive, new code). It requires much more memory for processing. This might not be an issue in 2017 because of how advanced our machines are now, but back in 2000 when the file format was released, it was a significant issue.
Websites and camera manufacturers were not ready to accept the format until it was widely adopted.
Encoding JPEG 2000 is not as fast and easy as encoding in JPEG.
It’s not content adaptive when compared to JPEG. Choosing a bitrate that is very low will make a mess of an image.The target bitrate will have to be adjusted manually depending on the content of the image.
Even though it appears that JPEG 2000 is dead in general photography space, it is king in the medical world and wireless multimedia space. Medical diagnostic imaging, such as MRI, CT or X-ray scans are likely to be encoded as JPEG 2000. It is also required for digital cinema operations. Requirements in data compression for digital cinema include high dynamic range, different color spaces, high image resolutions and lossless compression, which is made possible by using JPEG 2000.
JPEG 2000 was created to be significantly better than JPEG. In a situation where you are not looking for universal browser support, then in my opinion, JPEG 2000 should be your go-to image format.
Hopefully, big companies like Sony, Panasonic and developers worldwide will aggressively start adopting the JPEG 2000 standard across board, so that it can be a widely accepted format. With that, browser engines and software authors will have more incentives to support JPEG 2000.
Image may be NSFW. Clik here to view.
Prosper Otemuyiwa is a Food Ninja, Open Source Advocate & Self-acclaimed Developer Evangelist.
Image may be NSFW. Clik here to view.This article was originally posted on Scotch.io
In the early days of the web, the only thing that mattered was getting that content out to users no matter how long it took or what resources it consumed. As a matter of fact, users seemed to understand and were ready to wait till whenever there browser's loading spinner stops and the contents displayed.
Today, though, users’ patience has run out. They are no longer willing to wait because they know we – the engineers – can afford to give them a better experience.
While web content comes in different forms, today we will focus on video. Video optimization and delivery of a good viewing experience to users doesn’t come easy. Yes, flash is gone and HTML5 is here to stay; but don’t expect that you can just drop the video tag in your HTML and you’re done.
Let’s take a look at a common approach to delivering videos, popularly known as buffering.
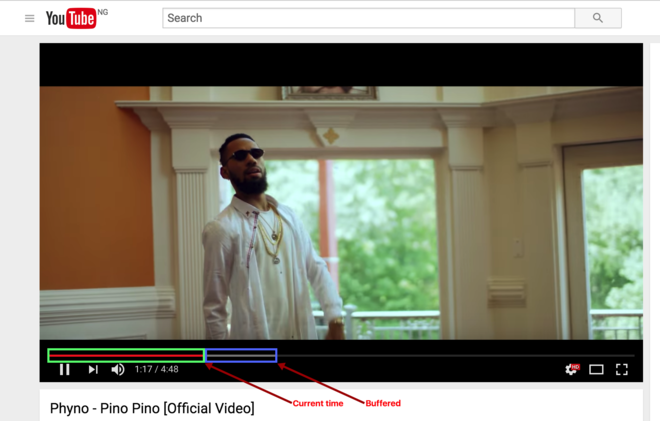
Most videos on the web do something that looks like a pre-fetch. You may notice the progress bar showing another indicator that is greater than or equal to the current play time. This is what Youtube's streaming looks like:
Image may be NSFW. Clik here to view.
The light gray portion of the progress bar indicates the buffered content.
YouTube dynamically adjusts the quality of that portion depending on the bandwidth and CPU capacity it detects. For example, if the bandwidth is poor, YouTube will pre-fetch the low-quality version of the above video. On the other hand, if the bandwidth is great, it would pre-fetch the high-quality version for rendering.
Put this together and users have a great experience whether or not their connectivity is superb or poor.
The key thing to keep in mind is not the fact that the video is pre-fetched, but rather that the pre-fetching is achieved with an intelligent strategy.
We also use this strategy at Scotch School to deliver video training courses:
Image may be NSFW. Clik here to view.
Now that we have a basic understanding of what buffering is, let’s see how we can employ an intelligent strategy that entails buffering based on the bandwidth or CPU capacity conditions.
Cloudinary offers a game-changing concept known as adaptive bitrate streaming (ABS), which is a video delivery technique that adjusts the quality of a video stream in real time according to detected bandwidth and CPU capacity. This approach enables videos to start quicker, with fewer buffering interruptions and at the best possible quality for the current device and network connection, to maximize user experience.
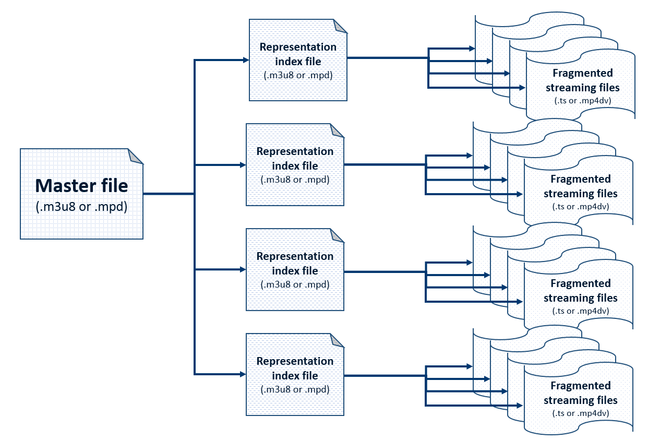
Videos provisioned using ABS are provided in versions known as representations, each with different quality and bitrates. Each video file must be accompanied by an index file that specifies predefined segments of the video. Additionally, there is a master playlist that points to the available representations with additional information about each one.
Image may be NSFW. Clik here to view.
You can use this Cloudinary feature to deliver a better viewing experience for your users at no cost.
To deliver videos using adaptive streaming, Cloudinary generates multiple copies of your video prepared at different resolutions, qualities and data rates. The copies of the videos are then automatically generated and delivered from a single original video, transcoded to either or both of the following protocols:
HTTP Live Streaming (HLS)
Dynamic Adaptive Streaming over HTTP (MPEG-DASH)
Now that we’ve explained the concept, let’s write some code to put the pieces of these puzzles together.
Cloudinary comes fully loaded with interesting features to make managing your media files an awesome experience. These features range from being a CDN for your media files (which means you can upload and store files to Cloudinary server) to manipulating your media files (as we discussed above).
Let’s take a look at how we can upload images from our Node servers to Cloudinary. Cloudinary offers a Node SDK that facilitates image uploads so you do not have to memorize the API URLs for doing this.
SDKs for PHP, Python, Ruby and .Net are also available with the same API methods.
Install the SDK by running:
$ npm install cloudinary --save
Import cloudinary to your code base:
var cloudinary = require('cloudinary');
Configure the SDK with your credentials (you can get one here):
This is mind blowing! Cloudinary generates the HTML for the various formats suitable for any given browser so we do not have to worry about that. Awesome, right?
Transformations are provided as configuration options and applied either once during upload (eager) or each time a user needs the media to be delivered (per request).
Cloudinary also provides a collection of predefined streaming profiles, where each profile defines a set of representations according to suggested best practices.
For example, the 4K profile creates eight different representations in 16:9 aspect ratio, from extremely high quality to audio only. Alternatively, the SD profile creates only three representations, all in 4:3 aspect ratio. Other commonly used profiles include the HD and Full HD profiles.
We are going to apply the streaming profile as an eager transformation to our upload logic:
We initiate a usual upload process with the SDK specifying the URL of the image we want to send to our Cloudinary server
An eager transformation is initiated. This transformation is an array that takes a streaming profile configuration. The dog.mp4 video is encoded into HLS format using a Full HD streaming profile.
This process could take a while so we ensure that the eager transformation is asynchronous by setting eager_async to true
You can deliver/embed your eagerly transformed videos using the .m3u8 (HLS) or .mpd (MPEG-DASH) file format (extension) and include the streaming_profile. You can as well provide other non-adaptive streaming-related transformation options.
Personally, I have avoided the responsibility of implementing such a responsive video feature in a website because of being held responsible for customer frustrations. Cloudinary made this so simple, and using the solutions was free for the amount of resources I needed.
Using the adaptive streaming strategy is a proven technique that enables you to deliver an optimal, smooth viewing experience. This feature is just a small part of what Cloudinary offers for video and image management. To learn more, look the documentation or get started here.
Image may be NSFW. Clik here to view.
Christian Nwamba is a code beast, with a passion for instructing computers and understanding it's language. In his next life, Chris hopes to remain a computer programmer.
Embedding and managing images and other media content in a mobile application is always challenging. The processes of downloading a media file from the web, storing it on the device, and then displaying it to the user are surprisingly and often frustratingly complex from a coding perspective. In addition, you probably want to add code that enables reusing images rather than downloading it every time, but you have to be smart about it to avoid clogging the precious storage space on your customer's device. Furthermore, your design probably requires that images be displayed in different sizes and DPRs in different devices, but creating and maintaining multiple versions of every image manually is virtually impossible.
In this article, I’ll demonstrate how you can handle all these tasks with just a few simple lines of code using the new Swift-based Cloudinary iOS SDK.
Cloudinary provides a cloud-based service to handle upload, storage, manipulation, and administration of images and other media content. The simple interface, combined with an extensive set of features, is particularly useful to mobile developers: it alleviates the burden of resource management, letting developers focus on their core application's features.
The latest version of the Cloudinary iOS SDK has been completely re-written in Swift and was developed with the following goals:
Adopt Swift’s design paradigms
Support both Swift 2.3 and Swift 3.0
Support developers still using Objective-C
Maintain a familiar API to ease the migration from the previous version of the Cloudinary iOS SDK
One of those big challenges we mentioned at the beginning of this article is the huge quantity of different screen sizes and resolutions you need to take into account. You can set up your app to display completely different designs depending on the screen real estate available, but if your different designs require displaying images at different sizes and scales, then preparing and maintaining multiple versions of every graphic quickly becomes unmanageable. And if you also need to resize user-generated content on-the-fly depending on display size, then you absolutely must have an automated solution.
Luckily, it's easy to make these adjustments on-the-fly using Cloudinary transformations with the iOS SDK.
Cloudinary transformations enable you to crop, scale, rotate, add shadows, outlines, backgrounds, and select from a huge set of artistic filters and special effects, simply by setting method values.
And of-course in addition to using these transformations to make your own app design responsive, you can also pass on all of these manipulation capabilities to your users as photo editing features in your app.
As a (major) added bonus, Cloudinary performs a number of automatic optimizations whenever it generates a transformed image. And beyond these, you can also take advantage of special optimization transformations like auto-quality and auto-format to ensure that every image you deliver uses minimum bandwidth while delivering the needed visual quality. For more details, see Image Optimization.
There is also a nice set of video-specific transcoding and transformation options available, including HTTP Live Streaming (HLS) output. The HLS transcoding feature enables you to automatically generate multiple representations at the quality and sizes you need in order to deliver video in the required HLS adaptive bitrate streaming format. Note: If your iOS app delivers video over cellular networks, and the video exceeds either 10 minutes overall or more than 5 MB of data in a five-minute period, you are required to deliver it using HTTP Live Streaming.
Transformations are represented with the CLDTransformation class. Here are a couple of examples. The first scales an image to a width of 500px. The second applies a sepia effect and rounds the corners of an image to a circle or ellipse.
let transformation = CLDTransformation().setWidth(500).setCrop(.scale)
let transformation2 = CLDTransformation().setEffect(.sepia).setRadius("max")
To generate the URL for an image or video asset:
let url = cloudinary.createUrl()
let imageUrl = url.generate("sample")
// http://res.cloudinary.com/demo/sample.jpg
To generate a URL with the transformation we created above:
let imageUrl = url.setTransformation(transformation2).generate("sample")
// http://res.cloudinary.com/demo/e_sepia,r_max/sample.jpg
The entire process can also be combined in a one liner:
let imageUrl = cloudinary.createUrl().setTransformation(CLDTransformation().setEffect(.sepia).setRadius("max")).generate("sample")
// http://res.cloudinary.com/demo/e_sepia,r_max/sample.jpg
So now you know how to generate cool looking, optimized images from Cloudinary, but you still need to display them to the user.
The Cloudinary SDK provides extensions to iOS UI elements, which make the presentation of an image easy. These extensions provide a single API that automatically fetches and downloads an image in the background, and sets it to be displayed in the UI.
Extensions are available for:
UIView
UIImageView
UIButton
In the following example, an image that was uploaded with the public id: public_id and a predefined transformation stored in transformation is assigned to the UIImageView variable named photoImageView.
// given a UIImageView named “photoImageView”
photoImageView.cldSetImage(publicId: publicId, cloudinary: cld, transformation: transformation)
As we explained above, the Cloudinary SDK automatically fetches and downloads your media resources for you as part of the delivery process, but if you just want to download without displaying, or you want to download separately for any other reason, here are the basics of what normally happens behind the scenes:
First, create a downloader instance:
let downloader = cloudinary.createDownloader()
Then fetch an image or video. Below, we use the image URL (imageURL) we created earlier.
To avoid blocking the application during the download, network access is performed asynchronously in a separate thread. Thus you must provide a callback closure to handle the results of the action.
downloader.fetchImage(imageUrl!) { (image, error) in
// image is an instance UIImage// error is an instance of NSError
}
Notice the callback structure: the last parameter is a closure that receives the downloaded image or an error object. In Swift ,this pattern is called a trailing closure. Swift provides syntactic sugar for trailing closures by allowing the parameter to be provided outside the parameter parentheses. Sweet!
An external URL pointing to an image available on the web
In addition to specifying the media file in your upload call, you also need to provide an unsigned upload preset. An unsigned upload preset is a Cloudinary feature that allows your users to upload directly to your Cloudinary account without having to sign the request. This feature is popular among mobile app developers as it provides close control over the uploaded material without requiring the storage of sensitive credentials on the mobile application.
Unsigned upload presets inherently have some protective limitations. For example, users can't overwrite existing images in your account. You can also set additional limitations when you define your upload preset, such as limiting the file size or type of files they can upload. You create and configure the unsigned upload preset in the Cloudinary console.
After you create the upload preset, you specify it in your upload code as follows:
let uploader = cloudinary.createUploader()
uploader.upload(data: imageData, uploadPreset: "presetname") { result, error in
           // do something
       }
The above shows the most basic upload example, but there are also a large number of optional upload parameters you can set in the upload call.
The result of the upload API call is a CLDUploadResult object that provides information about the uploaded image, as well as the public ID of the image and its URL.
Cloudinary's iOS implementation also puts emphasis on avoiding redundant downloads through caching.
The first time the fetchImage() method is called for a particular resource, Cloudinary stores it in the device cache. Each subsequent time that the fetchImage() method is called, it first tries to find the image in the local cache, and retrieves it from the cache if it was found. If it was not found in the cache, the image is downloaded from Cloudinary, stored in the cache and then returned to the caller. The device cache used for this purpose has a predefined maximum memory and disk space, that is cleaned out in FIFO order to make room for the latest images.
The Cloudinary iOS SDK was developed with a focus on the challenges that iOS developers face, especially uploading and downloading, and device sizing issues. Manipulation features enable you to easily deliver images in different sizes for different devices on-the-fly as well as treating you to a great toolbox of photo manipulation features that you can apply to your images and/or pass on to your users. HLS transcoding enables you to deliver video at the quality and size that best fits each user's device and network connection, and to answer iOS requirements. Optimization and caching features help you to preserve precious bytes and make the most of the available bandwidth with every delivered resource.
And all of this in a nice and neat Swift package that integrates seamlessly with your own Swift or Objective-C code.
Ready to swoop right in? If you don't have a Cloudinary account yet, take a minute to sign up for a free one, and spread your wings!
This is a reposting of an article written by David Walsh. Check out his blog HERE! Apps like Instagram are a testament to how brilliant a few color modifications can make a photo. We've seen hundreds of Instagram clones pop up, and even the CSS and Canvas specs have a
filter property which allows us to modify imagery. As nice as those APIs are, they only modify an image for view on the client side -- once the user tries to save the photo, they get the unmodified version. So how can you generate Instagram-like photos with artisitic filters? The awesome media service Cloudinary provides an easy method to generate artistic, filtered photos with a very simple API. Let's have a look!
The best way to interact with images is initially uploading them to Cloudinary, which is incredibly easy. Cloudinary provides APIs for all popular web languages, like PHP, Node.js, Python, Java, etc. The following will upload our sample image using Node.js:
With the image uploaded to Cloudinary, we can perform any number of transformations, background removals, and other optimizations, either on the fly via URL modification or via their sophisticated API.
Image Enhancement
Sometimes adding a few slight color modifications to a given image can provide the small improvement that keeps the image looking "natural" but spectacular. Cloudinary provides a useful set of enhancement transformations to bring out the vibrance in photos, including: improve, gamma, auto_brightness, auto_contrast, auto_color, fill_light, vibrance, contrast, and viesus_correct. The following URL pattern will get you a few of those enhancements:
Check out how awesome each of these enhancements make our sample image look:
Image may be NSFW. Clik here to view.
Sometimes the minimalist enhancement makes the image look best!
Adding Artistic Filters to Images
If you want to bring artistic flair to an image, or even let your users bring filters to their imagery (via your awesome app that uses Cloudinary, no doubt), you can bring those images to life by adding an art:(effect-name) effect to the image:
It's amazing what advanced math calculations can do to the display of an image. A simple image taken with any camera can be made to look majestic if you have a service like Cloudinary to bring the filter to fruition.
My second week at Mozilla I won a competition amongst the web developers to create something amazing, and what I created was a photo filtering app like Cloudinary. The problem was it used the canvas API which doesn't save out its filters, and it required knowing the math behind the filtering. However cute my app was, it was a nightmare for both users and developers. Cloudinary's API for using simple and artistic filters is incredibly easy -- coding your own route probably isn't worth it. Artistic filters are just another reason why you should jump at Cloudinary for your personal and app media!
Image may be NSFW. Clik here to view.
David Walsh is Senior Software Engineer at Mozilla, having worked extensively on the Mozilla Developer Network, Firefox OS TV, WebVR, internal tooling, and several other Mozilla efforts. He shares his knowledge on his blog at http://davidwalsh.name. You can also find him at @davidwalshblog on Twitter.
Websites of all kinds enhance user experience with images. In fact, images appear on almost every Web page. Some of the images are uploaded by users, some are proprietary, and some come from 3rd parties. Regardless of origin, many of these images include text elements, and sometimes you need to be aware of or handle that text.
For example, you might need to:
Blur or pixelate texts that you don't want displayed on your website
Cover text in an uploaded image with another image
Have an automatic way to extract the text content so you can programmatically analyze it or perform operations based on the detected text. For example, you might want to make sure uploaded images do not contain too much text, or maybe you want to tag your images based on keywords detected in them.
These are common needs, but it's a hassle to do these things manually, even for your own proprietary images, and not an option for images that are uploaded by your users for immediate display.
The good news: This article will show you how you can handle all these and other text detection scenarios, on-the-fly, with only one or a few lines of code. Here are a couple examples:
Extracting text from images programmatically is a technology that has existed at some level for many years and is usually referred to as OCR (Optical Character Recognition).
In recent years, advanced systems have been developed that are capable of producing a high degree of recognition accuracy for most fonts and languages. Although no system is 100% accurate, the better ones are getting close.
Image may be NSFW. Clik here to view.
At Cloudinary, our mission is to offer a comprehensive solution for all elements of image and media management, enabling web and app developers to invest their full focus on the main purpose of their own site, or app. That’s why we decided to offer our new OCR Text Detection and Extraction add-on, which streamlines our extensive image manipulation capabilities with one of the most advanced and precise OCR text extraction engines: Google’s Cloud Vision.
Suppose your website helps people find their next dream car. It’s a free service for the buyers of course. It’s also fair for the sellers who list all their cars for free, and pay a commission only if the car sells through your site. But some dealers forget to follow the website policy, and they list their direct phone number on the image. A problem? Not with the new OCR Text Extraction and Detection add-on. Take a look at how easy it is to cover any embedded text in an uploaded image using a simple OCR transformation.
For example, the dynamic manipulation URL (and corresponding SDK code) shown below performs OCR detection and adds an an image as an overlay on top of any detected text. Everything is done on-the-fly in the cloud by simply adding 2 parameters to the code that builds the URL:
Set the overlay parameter to the quikcar_logo image (l_quikcar_logo in the URL)
Set the gravity (location for the overlay) to ocr_text (g_ocr_text in the URL)
You maintain a blog where you and other users post regularly. To enhance engagement, you make sure to embed lots of interesting images in every article. You don’t want anybody to think that your posts are commercially biased, but these days, (almost) everything is branded. Using Cloudinary’s OCR add-on, it again takes just one line of SDK code (or a manually built URL) with a few parameters to blur out that brand name.
In this case, we take advantage of the blur_region effect at its top blurring strength (2000), and again use that ocr_text gravity so that all detected text regions are blurred:
Say that your website is based on user generated content and your income is based on click-through rates. Your users are of-course also interested in maximizing views of their posts. It is a known and proven fact that images catch the eyes of users and increase engagement. But it's also known that images containing significant amounts of text are less engaging and may harm the overall experience. For example, Facebook limits the exposure of ads that are text-heavy.
Luckily, you can help your users to avoid uploading images with excessive text content by using the OCR add-on to analyze the percentage of an image that contains text.
When you include the ocr parameter in your upload command, the JSON response includes all of the detected text and the exact bounding boxes coordinates of each word or text element. Combining this data with some simple math, you can write some simple code to:
Allow images with less than 15% to be uploaded freely.
Provide a warning for images with 15%-30% text, recommending that they use a less text-heavy image, but still allow them to continue if they choose.
Reject images with more than 30% text.
Here's a look at an excerpt from an upload response showing the bounding box of an individual text element extracted from an image:
And here's some simple sample code (using Ruby on Rails) that accomplishes the text percentage validation described above by calculating the space taken by each of the individual bounding boxes of all text detected in an image:
if result['info']['ocr']['adv_ocr']['status'] == 'complete'
data = result['info']['ocr']['adv_ocr']['data']
boxes = data.first["textAnnotations"][1..-1].map{|poly| poly["boundingPoly"]
["vertices"]}.map{|vertices| vertices.values_at(0,2)}
areas = boxes.map{|box| (box.first["x"]-box.second["x"])
.abs * (box.first["y"]-box.second["y"]).abs}
total_areas = areas.sum
coverage = total_areas.to_f / (result["width"] * result["height"]) * 100
puts casewhen coverage < 15"Only #{coverage.round(2)}% of your image contains text. This is a valid image!"when coverage < 30"#{coverage.round(2)}% of your image contains text. For better engagement, it is recommended to upload an image with less text."else"We're sorry. #{coverage.round(2)}% of your image contains text. Please use another image."endend
If a customer uploaded the first image below, the above code would return 12.54% and thus would be allowed to continue, the second image would return ~16%, and thus would receive a warning, but the third image would return nearly 35%, and would be (politely) rejected.
In this article, we've demonstrated a few ways you can use the OCR Text Detection and Extraction add-on to automatically blur, pixelate, overlay, and extract text from your images.
Want to know more? For a deeper look at the add-on's abilities and additional use-case scenarios with sample code, have a look at the add-on documentation.
Ready to give it a try? If you aren't already a Cloudinary customer, you are welcome to sign up for a free account and try the add-on along with the rest of the Cloudinary features.
Have some great ideas for how to make use of the OCR Text Detection and Extraction add-on in your site or app? We’d be happy to hear what you think and appreciate any feedback.
Like it or not, visuals tell better stories than words. But using images and videos on a website presents challenges. This article is a follow-up to Website Image Performance Improvement, in which we discussed how to upload, store, manipulate, optimize and deliver images, efficiently and effectively. Now, let's talk video.
Much like we talked in our previous article about the managing images on your website, you may also have a need to render video content. Trust me -- simply throwing a <video> tag with an accurate source to the browser does not deliver user satisfaction. At a high level, you need to consider the website layout, video quality and delivery, as well as address challenges, such as:
Adjusting video quality based on network conditions. For example, users in developing countries may have a slower internet connection compared to users in developed countries
Delivering content to mobile users
Transcoding for different browsers
Manipulating video, such as resizing, cropping and adding visual effects
All these requirements make video complex. You cannot just take care of videos in few hours. In fact, you may find it difficult to find answers to certain questions on video management. But, there is one swift solution -- Cloudinary.
Cloudinary is an all-in-one media management solution. In this article, we are going to delve into using Cloudinary to easily upload, manipulate and deliver videos.
Let's see how we can use Cloudinary in our Node application.
The cloud_name is enough when making and opening API calls like delivering videos. The key and secret are needed for secure calls, such as video uploads.
All you need to start managing videos is to upload the best video quality you have. You can manipulate videos on-the-fly using Cloudinary's comprehensive API and easy to use manipulation URLs. Therefore, there is no need to do that before uploading. Let's see a simple code example from Node for making a video upload:
It’s the same API method for images, but this time you have to explicitly tell the uploader that the resource type is video by passing the following as the third argument for the upload method:
In lazy transformation, the reverse becomes the case. Rather than manipulating videos during upload, you can store the best quality available and manipulate them on delivery.
Therefore, you have the control to dynamically generate a transformed variation of a given video when you are about to embed it in the browser:
You can adjust the size and width of your videos to fit the user’s screen, which will in turn reduce the amount of kilobytes that will need to be downloaded:
It is possible to use a desired format or quality level that suites a given video delivery situation. The fact that you uploaded an .mp4 video does not mean you have to upload another .webm version of that video. Cloudinary uses a feature called transcoding that enables you upload a single video and deliver it dynamically in different formats:
Cloudinary lets you add a variety of cool effects to your videos during playtime. Effects like fade in and fade out, visual noise, blur, saturation and lots more.
Let's see a simple example of using Cloudinary to apply fade in to a video at start and fade out at end:
It is possible to add text content to your video at a given play time. Let's add a text, "Cool Video", at the down-middle part of our video. The text should be displayed after 2 seconds and should be removed after 5 seconds:
Cloudinary can deliver videos optimally using a smart technique know as Adaptive Bitrate Streaming. This is a video delivery technique that adjusts the quality of a video stream in real time according to detected bandwidth and CPU capacity. With adaptive bitrate streaming, videos start quicker, with fewer buffering interruptions, and is delivered at the best possible quality for the current device and network connection, to maximize user experience.
An eager transformation is initiated during upload. This transformation is an array that takes a streaming profile configuration. The MLB_Vid.mp4 video is encoded into HLS format using a Full HD streaming profile.
Eliminate stretching or shrinking videos when adapting them for different screen dimensions. Based on the resizing and cropping transformation feature we have seen, you can perform automatic resizing and cropping to fit the graphic design and layout on any device, at any resolution, using Cloudinary’s powerful URL-based transformations.
Now is the time to step back and reflect. Compare what you could afford to do with your videos manually and how long it would take, to what you can accomplish with Cloudinary in your arsenal. With Cloudinary, you’ll improve your productivity with its robust features and be able to cater to whatever media management needs you might have. Get started by signing up if you haven't already!
Image may be NSFW. Clik here to view.
Christian Nwamba (CodeBeast), is a JavaScript Preacher, Community Builder and Developer Evangelist. In his next life, Chris hopes to remain a computer programmer.
I’m not going to lie, Progressive Web App (or PWA) have become a bit of a buzzword, with many developers singing its virtues and proclaiming that it solves all of their problems. Progressive Web Apps aren’t going to cure cancer or make you a billionaire on their own. But they can make your Web Apps a lot more approachable and performant.
Before we start talking about why you should care about Progressive Web Apps, maybe we should first explain what they are. A lot of people assume that Progressive Web Apps are a Google product, since the term was coined by Google employees Frances Berriman and Alex Russell. However, the phrase describes how one can build a web app using technologies from modern browsers to provide a more “native” app feel, and in the case of Progressive Web Apps on Android, actually behave entirely as native apps.
Re-engageable - Makes re-engagement easy through features like push notifications.
Installable - Allows users to add apps they find most useful to their home screen without the hassle of an app store.
Linkable - Easily shared via URL, does not require complex installation.
All of these characteristics are provided by a few technologies available to all modern browsers in the form of an HTTPS connection, Web manifest and service workers. For most developers, this means that you now have a lot more toys to deliver a better user experience. It also means that you can create a more interactive app regardless of the end-user network connection.
But why should you care about Progressive Web Apps? Well, most obvious is the ability to improve the user experience. Just by super-charging your existing app with Progressive Web App, end users will get a web app that looks and behaves like a native app, an experience they’re accustomed to.
The most complex, fascinating and useful part of the technology needed for Progressive Web Apps is the service worker, which carries out essential content functions via offline caching and remote access. In tandem with a service worker, an image backend like Cloudinary facilitates media handling tasks, such as optimization and data processing (sometimes referred to as an Image CDN).
Currently, the most complete service worker APIs are the fetch API, push notifications, caching and background sync (with periodic sync expected shortly). Push notifications give a great user experience and performance boost as you have to do fewer GET/POST loops in your UI javascript. However, the best performance boost is from the caching and background sync.
With the install event in the service worker, you can force the browser to get and cache all large assets, including CSS & JS files. It can also be useful for other assets used throughout the app and any assets bulky enough that justify an early get and cache. The sync event enables you to make requests when the device is back online and to cache them when the connection dies or become flaky, in order to queue what to load next.
The crown jewel of service worker events is the fetch. This event enables you to intercept and modify HTTP requests. A powerful use case example is to check, for every request, if the cache has a version with a relevant TTL and getting it, if it doesn’t. Imagine the power to get images and videos off a lightning fast CDN and being able to cache them (or pre-fetch them) based on other HTTP requests or data changes in the browser.
The majority of web apps produced are either data intensive or contain content that is download intensive, like images and videos. Such media is seeing increased use as good data connections instigate shoving more content down the pipe. As a result, user experience degrades considerably in areas of poor connectivity, even if you’ve optimized everything at the server-side.
Taking advantage of the fetch and sync events to cache the chunkier pieces, or even pre-fetch and cache them, means that your users get a better perceived experience and we, as developers, can worry less about the flakey bits between the servers and the browser.
If you are feeling ready to take the plunge and try making your web apps more progressive, tools do exist to point you in the right direction. The biggest and easiest to use of these is the Lighthouse project, which is a Google project but open for anyone to use. This test suite validates that your app follows the tenets required of a Progressive Web App. It’s also a great tool for checking performance and usability. It comes in many flavors - from a NodeJS-based CLI through to a Google Chrome extension.
Now you know what Progressive Web Apps are, why you should care about them and even where to make sure they fit the standard. So go ahead, play with modern browser features and make your apps better and more progressive!
Mike Elsmore loves building, tinkering and making odd things happen with code, using his time to share knowledge on rapid development and database technologies. Most of the time, he can be found in the middle of building a prototype that combines JavaScript, server tech and odd APIs. Mike also happens to be an active participant in the hacker subculture, taking part in hackathons and development conferences, as well as running his own.
Thrillophilia is India’s largest online tours and activities platform. Through its website and app, the company offers a one-stop solution for travelers looking for tours, activities and things to do. Users can choose from more than 10,000 activities in 200+ cities in India and 15 countries in Asia. Headquartered in Bangalore, India, the company was founded in 2011 and employs more than 50 people.
A visually rich and appealing platform, Thrillophilia supports more than 1 million images, with 250,000+ unique images distributed across 200,000 pages for the 10,000 tours and activities offered on the site. But, because Thrillophilia’s suppliers upload many of the raw images to the site, they often lack visual appeal because they are taken by cell phones or low-end cameras.
“We needed a robust solution to manage our images and deliver them quickly to our visitors - whether they were accessing content on our website or via our mobile app,” said Abhishek Daga, Thrillophilia’s co-founder. “More importantly, to ensure the integrity of our graphics, we needed an efficient means to enhance and autocorrect all images to make them look beautiful.”
With more than 1,000 new images being uploaded to the site each day, Thrillophilia developers found themselves having to focus on image manipulation and management, instead of their core duties.
Thrillophilia discovered Cloudinary in 2016, and quickly realized that it was the ideal solution for its image management and optimization needs. “We wanted a product that could take our original images, enhance them, resize them according to viewports and deliver them quickly, so we could ensure an enhanced user experience,” Daga said.
Cloudinary serves as a complete image solution for Thrillophilia. Users or company employees upload raw images in Cloudinary, and then leverage built-in tools like Viesus for automatic image correction and enhancement, and JPEGmini. “We ran multiple tests using Viesus with Cloudinary, and the combination enabled us to get the desired image results we wanted,” Daga added.
Once the images are enhanced, Cloudinary enables Thrillophilia to deliver the images in a variety of sizes, on the fly, to best meet the needs of user Each image is tailored to the user’s unique device, resolution or viewport.
“Cloudinary allows us to be efficient in managing our images,” said Daga. “Images of certain sizes are not created until they are requested by end users. Then we ensure that the correct tags and metadata is associated with each image, and it’s served by the Cloudinary content delivery network.”
Daga said that Cloudinary is very easy to use. Thrillophilia was able to get Cloudinary up and running for all its image management within two weeks, and the company saw immediate results.
“There was a significant difference in page load speeds after we started using Cloudinary,” Daga noted. “And by combining JPEGmini and Viesus, we were able to reduce the page size without compromising on image size.”
On average Thrillophilia was serving about 4TB of images per month. However, after adopting Cloudinary, this number was cut in half, saving on storage and bandwidth costs.
JPEG and PNG are the predominant formats used for image delivery on the web. According to a W3Techs survey, 74 percent of the websites worldwide use these formats, and for good reason: They are supported across all browsers. Still, there are newer image formats with better performance and a leading example is the WebP format. Here we'll show how to easily implement WebP in order to reduce your images weight by approx. 30 percent and improve your website and native apps image load time.
WebP is a modern image format developed by Google that is specifically designed for web delivery. It aims at creating smaller, better looking images that can help make the web faster. WebP typically achieves an average of 30% more compression than JPEG, without loss of image quality. Interestingly enough WebP is only supported by Chrome, Android and Opera browsers, which would be a compelling reason not to use it. However, Chrome usage has risen year-over-year, reaching 75 percent according to W3Schools survey. Opera adds another 1 percent, which means that optimization for Chrome (and Opera) is worth pursuing.
Looking into support for native apps, WebP is supported by Android (since it’s made by Google). Lossy WebP images are supported in Android 4.0 (API level 14) and higher, and lossless and transparent WebP images are supported in Android 4.3 (API level 18) and higher. WebP can also be implemented on iOS by using a dedicated library to encode and decode images. The library, is called libwebp, is available as precompiled binaries for iOS or as source code.
WebP supports:
Lossy and lossless compression options
Transparency
XMP (Extensible Metadata Platform) metadata
ICC (International Color Consortium) profiles
Animation
Color Space:
Lossy WebP works exclusively with 8-bit YUV420 format.
One way to implement WebP is using <picture>, which enables you to define different image sources. The browser will download the first option, according to the supported type. However this will require using a polyfill, such as picturefill, for browsers that don’t support HTML5 picture tag.
Instead of creating a WebP variant for each image, let's explore an easier alternative. Once an image is uploaded to Cloudinary, you can request it to be sent in the optimal image format according to the user browser. In case the image is requested from Chrome (or Opera), it will be automatically converted to WebP on the first request and then cached on the CDN for any subsequent request. By using the same URL for all image formats, effortlessly saving 30 percent image bandwidth on average. Using this method with Cloudinary also will deliver the image as JPEG to Firefox users and convert the image the same way to JPEG-XR for IE users (see more on automatic format).
In the case of a native mobile app, the WebP format can be fixed for the Android app using the same image already uploaded to Cloudinary and used for the web. For the native app, we can use the Android SDK or simply construct the URL.
On your Android App:
cloudinary.url().transformation(new Transformation().width(500).height(333).crop("fill")).fetchFormat("webp")).generate("dog.jpg")

The equivalent URL is: http://res.cloudinary.com/cld-name/image/upload/c_fill,f_webp,h_333,w_500/dog.jpg
The image quality setting, which is used to define the depth of the lossy compression, has an effect on the results as well. Finding the sweetspot for your images require analyzing which quality setting fits them. For example, you may test quality 80 and quality 90 to verify the image weight reduction and whether it meets the required visual quality.
However, since each image eventually has it own optimal quality setting, using Cloudinary’s automatic quality option (q_auto) will automatically find the quality level for each image according to the required visual level (more on automatic quality). Using both automatic format and quality achieves full automation and lets Cloudinary decide on-the-fly the best quality setting and format to deliver. The visual quality level itself can be set according to the delivery method. For example, you can use the default “good” visual quality level on the web and an “eco” level on your native mobile app in order to save more bandwidth.
cloudinary.url().transformation(new Transformation().width(500).height(333).crop("fill")).fetchFormat("webp").quality("auto:eco")).generate("dog.jpg")

The equivalent URL is: http://res.cloudinary.com/cld-name/image/upload/c_fill,f_webp,h_333,q_auto:eco,w_500/dog.jpg
Managing images can be challenging because supporting the same image with different sizes and crops for responsive design requires significant development effort. Still, since images are 60 percent to 65 percent of the average website, the savings are significant and therefore automating the process makes a lot of sense. Luckily all of this can be done on-the-fly using Cloudinary, so you can benefit from the advantages WebP provides without requiring additional development effort to support it.
Vue.js is a progressive frontend framework which is the latest workflow and productivity trend. Its simplicity and approachability is what makes Vue.js outstanding among the pool of frontend frameworks. You may not be using Vue.js right now because you already know other JS frameworks and don’t want to learn another. But it’s important to keep in mind that a good framework is built to improve on the weaknesses of the existing ones. This is exactly what Vue.js has done.
The most challenging aspect of building a product with a front-end framework is focusing on the complexity of the tool rather than the complexity of the actual problem being solved. It’s perhaps more frustrating when the tool is complex but the problem is a simple one (e.g. complex webpack config for a todo app). The term progressive, is used by Vue.js to describe how this challenge can be mitigated. Building a basic demo or small app? Vue.js is simple enough to handle that. How about a complex enterprise app? Vue.js is capable of produce cutting-edge solutions, as well.
Vue.js is approachable, easy to learn and fast. In this article, we're going to get started with Vue.js by building a gallery app. A gallery app is simple, yet vast enough, to show you all the basic concepts in Vue.js that are applicable to any other framework you might have used
To get up and running quickly with image uploads and delivery to/from the cloud, we will utilize Cloudinary which is a natural choice. Cloudinary is a tool we have put together to assure you peace of mind when it comes to internet media. Ranging from upload to delivery, and most importantly, transformations that suit your needs, Cloudinary employs cutting edge engineering solutions to make this a painless reality.
To showcase how simple Vue.js is, we are going to build our demo using Codepen Project by importing a Vue.js script tag. No tooling for bundles or transpiling. Let's just write JavaScript.
Create a new Codepen project using the Vue.js template shown on the sidebar:
Image may be NSFW. Clik here to view.
This generates a new project with very few components and an entry point. We will clear most of the boilerplate code to make room for our gallery app logics:
Vue is initialized using the Vue instance and passing all information about the app as object. The properties of this object is what defines how your app behaves and what data is bound to your app. Now, let's look at the three most popular properties:
The el property tells Vue where to mount the app instance in your HTML. That's why we have the div tag with a demo id.
data is a function that returns an object of data, which can be bound to the view as well as available in all the Vue methods via this. Two-way binding in Vue is achieved via the data object properties.
methods object is used to define methods that can be invoked from the view, as well as the Vue instance. This is the best place to put your event logic.
We will dig into details and see how these properties can be applied together to build a rich app.
var app = new Vue({
  el: '#demo',
  methods: {

  },
  data: function() {
    return {
     greeting: '',
    }
  }
})
This is a typical two-way data binding example. A data property, greeting, is bound to an input box (using v-model) and to a paragraph (using interpolation). When the value in the input box changes, the content of the paragraph will be updated with respect to the box.
Let's try something a bit more advanced:
<divid="demo"class="container"><header>Awesome Gallery</header><inputtype="text"v-model="greeting"class="form-control"/>
{{greeting}}
<divclass="row"><divclass="col-md-4"v-for="thumb in thumbs"><divclass="thumb"><imgv-bind:src="thumb.url"/></div></div></div></div>
In an attempt to replicate a real life app, we have extended the previous example to include an array of images stored in my Cloudinary server. This time we can't just bind the array to the view. Rather, we iterate over each of the array items and bind them to the view. This iteration is achievable with the help of Vue’s built in template v-for directive.
Another new and important addition is the v-bind directive. Vue won't allow you to interpolate in attributes, therefore, the v-bind directive is made responsible for attribute bindings.
Static information makes apps less interesting; we can do better. Rather than having the input box greet us, let's make it more useful (I am not saying greetings are useless :D). We can use the input to add more image URLs to our array by using a clickable button to initiate the process:
We updated the model from greeting string to thumb object with a url property to match the url property in the thumbs array's objects.
v-on is used to bind events in Vue. Therefore, we use that to bind a click event (v-on:click) to the button. This event should be handled by addThumb method.
Let's see the thumb property and the addThumb method:
Vue is a component-based and architected framework, which means that you can build reusable self-contained UI widgets and share them across your apps or even in external projects. For example, let's add a global component to display each of the thumbs:
Vue enables you to register the component using the component property in the Vue instance object argument. It also enables you to create a global component available everywhere in your app. We went with the latter option.
The component static method takes the name of the component and an object that describes the component. template, as you might have guessed, is the HTML we want rendered. props, on the other hand, is an array of properties we are expecting from whatever parent in which component is contained.
Let's use this component in our existing app. Change:
<divclass="row"><divclass="col-md-4"v-for="thumb in thumbs"><divclass="thumb"><imgv-bind:src="thumb.url"/></div></div></div>
to:
<divclass="row"><divclass="col-md-4"v-for="thumb in thumbs"><thumb-itemv-bind:thumb="thumb"></thumb-item></div></div>
The component is identified in the template using the component's name.
Another important topic to discuss in a Vue introduction is Vue's lifecycle hook. Vue maintains a state for its components -- from mounting your component to un-mounting. A lot of other phases are encountered in between. Lifecycle hooks help you tap in and perform operations at a given stage of your component life.
A good example is making a HTTP request when the component is created so we can render data from the request to the view or whatever suites your context:
The created lifecycle hook method is called when a component is created. This makes it a good place to fetch data. Therefore, we use axios to make a request to a list of images tagged gs-vue on my Cloudinary server.
NOTE
For security reasons, Cloudinary will not allow you to make requests like this from the client. The best method is to use the admin API via a backend SDK and then send the resource list to the client.
However, to enable access to list resources from client, you need to enable client resource listing. This is not recommended in a production environment, but is fine for demo purposes.
Cloudinary is a cloud-based media management tool. You can now worry less about image uploads, quality delivery, transformation and manipulation. Instead, you are able to focus on building your app while Cloudinary takes care of your media files.
The example in this article has been delivering images from a Cloudinary server. Let's try to make the app more flexible by allowing users to upload more images to the existing ones:
First, we update the input text box to file input. Rather than using a button, we just attach a change event to the file input. Then whenever we add a file, it's automatically handled by the upload method. We only want users to upload images, so we add a client validation by setting the accept attribute to image/*.
The upload handler is added to the methods object:
The cloudinary property holds an object with some Cloudinary credential:
The API key and cloud name are available on the Cloudinary dashboard.
Client uploads require upload preset to be set. Setting up an upload preset gives you a preset ID, which you need to provide during every upload.
One other Vue instance property that we haven't discussed is computed property. This is basically a getter and is handy when a using a method as a getter is an overkill. We just have one computed property -- clUrl.
The upload function creates a FormData instance, appends all the attributes of this upload and sends to Cloudinary API using axios. These attributes include the file, tags and the upload preset.
What’s most interesting about Vue.js is how simple it is to go from nothing to uploading an image to a server. The need for another supporting JavaScript library was minimal, not even a file upload library; just Vue.js library. We are just using axios to simplify what native fetch could have done.
We also saw how simple it is to upload images to Cloudinary for free. But Cloudinary enables even more. You can manipulate and transform these images just by tweaking URL parameters. You can learn about the awesome features of Cloudinary and sign up for a free account that enables you to do uploads/transformations and so much more.
Image may be NSFW. Clik here to view.
Christian Nwamba (CodeBeast), is a JavaScript Preacher, Community Builder and Developer Evangelist. In his next life, Chris hopes to remain a computer programmer.
React is a good tool when it comes to building flexible and reusable UI components. However, it's "one of those libraries" that cannot handle all the tasks involved in building a full fleshed UI project. Other supporting tools - such as a recently announced React SDK from Cloudinary - are available to provide solutions that the React core cannot.
In such cases where media (images and videos) becomes a heavy task to handle, Cloudinary simplifies the process with the new React SDK. Let's build and image library with Cloudinary and React using the Cloudinary React SDK.
The only requirements for using Cloudinary in your existing React project are to install the React SDK and the upload widget. If you do not have an existing React project and want to try these examples, take the following steps:
React (and React DOM) must be used since we are making a React app. The cloudinary-react dependency is Cloudinary's React SDK, which we will soon see how it works. axios is a tool for making HTTP requests and, in our case, we will use it request images from the Cloudinary server.
Before using the React SDK to deliver images from the Cloudinary servers, let's use the awesome Cloudinary upload widget to upload images. First, we need to add this widget to our index.html:
The uploadWidget member method is the handler invoked by the click event to handle our image upload by calling cloudinary.openUploadWidget. openUploadWidget takes a config object and the upload callback handler. The config object must have at least cloud_name and upload_preset properties with valid values. You can read more about Cloud Names and Upload Presets.
The Cloudinary React SDK has three major components, Image, CloudinaryContext and Transformation:
Image: This component is responsible for the actual delivery of images. It takes the image ID and asks the server for this image. When the image is provided, it is also responsible for painting the image on the browser.
Transformation: This component is used to apply transformations to images delivered with Image.
CloudinaryContext: You can specify Cloudinary configuration for each image on the Image component. This can be tedious when you are dealing with multiple images. CloudinaryContext allows you to apply configuration to a group of Images.
Most times you would end up with a structure like this:
Each image is tagged with xmas, which serves as a way to request images with this tag as a collection. This is exactly what we are using the axios library to do when the component mounts:
axios uses promises, so whenever the promise resolves in our case, we have a payload of images. We take advantage of React state to update our UI with the fetched resources.
Down to rendering, we configure the CloudinaryContext with our cloud_name, iterate over the gallery state that stores the images and displays them using the Image component. We also apply few transformations using the Transformation component.
For security reasons, Cloudinary will not allow you to make such request from the client unless you tell it to. The best way to go is to use the admin API via a backend SDK and then send the resource list to the client.
We are able to upload images and request for images to be displayed on the user's browsers. Here is how we update the displayed images instantly when the user uploads a new image:
uploadWidget() {
        let _this = this;
        cloudinary.openUploadWidget({ cloud_name: 'CLOUDNAME', upload_preset: 'PRESET', tags:['xmas']},
            function(error, result) {
            // Update gallery state with newly uploaded image
                _this.setState({gallery: _this.state.gallery.concat(result)})
            });
    }
Rather than logging the uploaded image information to the console, we update the gallery state, which bears the list of requested images, by concatenating the uploaded result to the gallery.
Image uploads, transformation and delivery has never been easier. These tasks have been a serious challenge for developers. Cloudinary has created a way to abstract all this hard work, enabling you to simply plug and play.
React has become more popular, as well as more mature, over the last four years since its release by Facebook. It has become one of the go-to technologies for people looking to componentize the front-end of any web application. It also helps that an entire mobile stack is built around React in the form of ReactNative. The components are wonderful, however there can be a burdensome learning curve. But, in the end, there’s the payoff of highly reusable code and a better user experience.
Image may be NSFW. Clik here to view.
To help people infuse React apps with image and video management services, Cloudinary provides a fully formed set of React components that can quickly be configured and dropped into your application. Your app is already equipped with management and manipulation of media assets and delivering them via a CDN, and you already have a React app delivering the content to your end user. Now, you may want to boost performance and make your end user’s experience even better. To do that you’ll want to follow the tenets of Progressive Web Apps.
What are Progressive Web Apps? There are many sources where you can learn more, including an article we recently wrote about why you should care. But how do you introduce that into an already complex stack of a React application? We’ll show you, step-by-step.
Is your application secure? All the features needed to turn your application into a Progressive Web App can only be used from a connection being served over HTTPS. If you are not doing so already, you can find guides for using services like CloudFlare to quickly implement an HTTPS cache in front of your application. When developing, localhost and 127.0.0.1 are considered to be secure and trusted endpoints, so you can develop without using certificates locally.
Is your application discoverable? Part of making a web app a Progressive Web App is introducing a web manifest. This JSON file describes the application, as well as assets, to make it easier to use on different devices. For the sake of Progressive Web Apps on Android, it helps with the app name, description, splash page, Chrome shell wrapper, and home screen icon.
The most basic web manifest looks like this:
It informs the browser of the preferred icon, similar to how the favicon works, and gives the name and brief description of the app itself. This information is used differently by each browser, from helping the internal history search to providing richer information for the “recently visited” pieces. But it is all designed to make the application easier to discover, or, in most cases, re-discover quickly. A more advanced file, like the one we use in our demo app, goes a step further and helps the browser interpret the app.
This file describes the basics for the app to become discoverable, as well as the metadata to make it easier for the browser to display the content and make it behave correctly as a near-native app. To make this manifest visible to the browser, you need to add the following tags to the <head> of your page:
These meta tags tell the browser (1) where to find the manifest, (2) the setup of the display and (3) the app’s theme color. It does this to make it discoverable and display correctly on mobile devices.
Does the app work offline? The next most important part of the app is to make sure it works offline (otherwise, by definition, it’s not a Progressive Web App). The way to do this is to register a service worker that will run in the background and process information from the cache, as well as from the internet when it has a network connection. Since not all popular browsers are compliant with the service worker specification, a bit of feature detection is necessary.
This code snippet checks that the service worker is part of the navigator object, and only if it’s available does it attempt to register a new one located at sw.js and gives it a scope relative to ./. If successful, it creates a new instance of sw.js and will execute the event code in the service worker. The complete service worker we use in this app can be found here. The file is being triggered by three key events:
Install Event: Generating a cache when the service worker is first registered, then proceeding to save all URLs that we want saved from the start.
Activate Event: Running when the service worker is recalled by the browser, e.g. when a new browser session is started. It performs general clean up to stop the cache from growing too large and deletes any caches that are no longer registered for use.
Fetch Event: Caching things on the fly is done whenever the browser makes any request. It fires the fetch event that we can intercept in the service worker. Here we can check against the cache for the item, and either serve a cached copy or fetch it. In the latter case, we cache the fetched item and serve it to the end-user.
The events above guarantee that the end users have everything they need in the browser, so they can continue to get use out of a web app when offline. This is essential for improving performance and user experience in areas of degraded signal when accessing the app over a bad mobile connection.
If you’d like to dive deeper into the example used here, copy the GitHub repo or fork the CodePen project to learn how to implement this yourself.
Mike Elsmore loves building, tinkering and making odd things happen with code, using his time to share knowledge on rapid development and database technologies. Most of the time, he can be found in the middle of building a prototype that combines JavaScript, server tech and odd APIs. Mike also happens to be an active participant in the hacker subculture, taking part in hackathons and development conferences, as well as running his own.
Last week, I was invited to an exclusive hackathon to build apps for musicians. The app team I was assigned to was tasked with building a video upload site for Bounce videos. Bounce is a style of music that originated in New Orleans. The app would be called BounceDotCom.com and there were plans to have Big Freedia, the Queen of Bounce, promote it. I knew the organizer could make things happen, so I jumped at the chance.
On the team was me, Brad Huber, and Doron Sherman, from Cloudinary. We had about 48 hours to make something happen. I showed up Monday evening, after the team had begun work, to figure out the plan and how I could help. There was a basic backend in Rails. I was going to come in early the next day and get to work on the frontend in JavaScript and React.
Now, people may know that I prefer ClojureScript myself over JavaScript. But I'm also a pragmatist. Although I think I could have done the job in ClojureScript in probably less time and code, I know that finding another ClojureScripter would be a difficult. It would tie the app to me. Any updates would depend on my schedule. Doing it in pure JavaScript would give much more flexibility, particularly for something where resources are tight and the future is unknown.
The next morning, I got to work setting up the React frontend so I could test it. I used create-react-app to get started. It comes with a dev setup so you can automatically reload your code as you save it. I'm a big fan of fast feedback. The save-and-reload workflow is not as good as you get in ClojureScript, but good enough for a small project like this. In ClojureScript, you don’t lose your current state when new code is reloaded, so there’s much less clicking.
My main focus at first was to get video uploads to work. I knew this would be the biggest challenge. Uploading files from multiple devices and posting to an API I was not familiar with was not something I wanted to mess around with on a short timeline. Plus, the app would be worthless without it. If people couldn't upload a video, the main concept of the site would not exist. Doron was a big help, providing the documentation when I needed it. Cloudinary offers many different solutions, including posting the video yourself or going through one of their widgets. For a 48-hour project, I chose a widget. There was no way I was going to trust that I could do it better in 48 hours.
When you’re working under sane conditions, spending a day to research your best option is well worth the investment. However, hackathon's are not sane. You want to quickly find something acceptable and move on. I found three different widgets that looked like they might work for our use case and our stack. In the end, the one that worked first was super easy. Just include this in the HTML:
You get the Cloud Name from your Cloudinary account. I had to create a preset in the dashboard that allowed for unsigned uploads so anyone could upload a video from their phone using only the frontend.
Image may be NSFW. Clik here to view.
To display the videos, I tried cloudinary-react and it worked very easily.
The component worked right out of the box, but we did have to fix some issues. It worked fine on desktop, but on my iPhone, the poster wasn't showing up. That's why I added the poster attribute manually in that code snippet. Problem solved. Luckily, Cloudinary is smart. If you ask for the .jpg file, it will give it to you and generate it if it needs to. If you ask for the .png, it does the same. It works better than you expect, because most services don't do this kind of transformation on the fly. But Cloudinary does, and it works the way you want it to work.
Notice that I set up a React ref for the video. I wanted to be able to stop and start the video in my scripts, so I needed a direct reference to the video element. The react-cloudinary components render out to regular HTML video elements.
I read the code. Yep, it's readable code. And when you're on the super tight deadline of a hackathon, you don't have time to read inefficient English text documentation. You go straight to the render() method. Code doesn't lie.
Another thing I learned from the code was that if the react-cloudinary components don’t understand a prop, they just pass them right down into the video element. So I could put onPlay, onEnded, and onPause callbacks right in there. A really nice touch.
The Cloudinary upload widget lets you upload videos and images. But there's no way to limit it to only videos. Well, not that I could find. If you said "only .mp4 files", it still lets you take a picture and try to upload it. Then it fails and you lose your picture. For our use case, that is a terrible user experience. People are having fun at a party, they take a really awesome picture they want to share with their friends, but instead the app drops the photo on the floor. The uploader works fine, but our app was never meant to host images. I could write a custom uploader, but I didn’t want to spend the time.
Image may be NSFW. Clik here to view.
So what did I do?
I made an executive decision: We would support photos. This required a small backend change that I could not make, since I am clueless when it comes to Rails and Ruby. We needed to record whether it was an image or a video along with the media id. I made the changes to the frontend that I could, and allowed images to be displayed, and recorded an issue for the necessary backend changes in the backlog.
Super easy. The only thing I wish for here is that you could tell whether it was an image or a video from the id. I could query the API, but we wanted to minimize the number of requests to keep latency low. Plus, on mobile, each HTTP request is just another chance to fail.
We could list videos (with inline playing and nice thumbnails) and upload new videos. We had a login system so we could identify users. Was it a nice app yet? No. Was it completely easy and straightforward? No, I can't say it was. But it was mostly forward progress. I mean, that was basically four hours of work to get video uploading with transcoding to multiple formats. Oh, and remember, it worked on desktop, iPhone, and Android with the same code. Not bad. And by “not bad”, I mean wow! A video app in a morning! I did not imagine this was possible before I met Cloudinary.
After lunch we started to put it on the open internet so we could have some kind of deployment pipeline. Until then, it was just me serving it from my laptop. We had some snags with that, too. For example, Heroku decided to upgrade its DNS to support SSL which did not allow us to add custom domains for a few hours. But in the end, we had everything hosted on Heroku.
At this point, it was 6 p.m. I had been adding a bunch of stuff to the backend backlog, since as I said, I don't know Rails. Lucky for us, Brad Huber, my teammate, knew plenty. I had to run but I would be back. I was hopeful to have all of my backend requests finished when I returned.
When I came back, it was on again. It was after 10 p.m. Some of my changes had been implemented, but not all. One of the things I requested was to be able to store arbitrary JSON data with users and with videos. In a hackathon, you just don't have time to mess around with designing a data model, and you certainly want to remove any reason to coordinate with the backend team. They have better things to do than add this field and that field to the model. It's much better to just let the frontend store whatever they want.
The break from coding had given me a new perspective on the app. I had been thinking about it mostly as a desktop web app. And our backend reflected that. It required users to register and login to upload a video. But after taking a break and seeing some issues logging in on some phones, I decided we needed to focus 100 percent on the main use case: the app would be demoed at a party the next night. People would want to pull out their phones, film some badass dancing, and upload it to share. They don't care about logging in. If they had to do that, they wouldn't have as much fun.
We got rid of the login. You go to BounceDotCom.com, you click a button, record some video, and upload it. It shows up. You rock. That night, we recruited a couple of designers to draw some designs and implement it.
And then we passed the point of no return.
I hadn't eaten dinner. There was some food left I could scavenge from. And then Doron offered me a bubble tea. Great, I thought. It looked milky and those tapioca balls could sustain me. I started drinking it. And then I realized, too late, that it was coffee. I'm super sensitive to caffeine, especially that late at night. I doubted I would sleep that night.
And I didn't.
I stayed up all night coding on this app. There were several things I needed to do. We wanted a strong viral component, so I added Facebook sharing. To do that you need some Open Graph metadata in your HTML and some JavaScript for Like buttons. I hacked on that through the night. But Cloudinary made this really easy. Here's a snippet from the HTML template:
<meta property="og:image" content="{{&image}}" />
{{#video}}
<meta property="og:video" content="{{&video}}" />
{{/video}}


That {{&image}} and {{&video}} get replaced on the backend by this:

if(pid && type === 'image') {
    image = `http://res.cloudinary.com/${CLOUD_NAME}/image/upload/${pid}.jpg`;
}
if(pid && type === 'video') {
    image = `http://res.cloudinary.com/${CLOUD_NAME}/video/upload/${pid}.jpg`;
    video = `http://res.cloudinary.com/${CLOUD_NAME}/video/upload/${pid}.mp4`;
}
That is, we can generate image URLs and video URLs pretty easily for Facebook to use. Liking and sharing work pretty well. And it was thanks to Cloudinary's ease of use.
Travis Laurendine, the organizer, showed me that if you send a link over iMessage, it embedded the video right in there. Hello!! That was totally unexpected.
I crashed pretty hard around 10 a.m. I took a four-hour nap. When I woke up, I loaded the app to find it purple and beautiful, thanks to those designers. I fixed some CSS and added a play button. Everything was coming together. I worked on it a little that afternoon, but nothing so intense as before.
In the end, the demo party never happened. It rained pretty hard and Jazz Fest kind of took over everything. But the app is there, still running and waiting.
With the main functionality of the app working, what’s next?
We have plans to migrate away from Heroku and onto a serverless cloud service. We don't really do much on the backend that couldn't be done cheaper and better on Google Cloud Platform or AWS. Using Lambda and Cloudinary, we basically have no overhead.
Low overhead is important for an app like this: if it doesn't take off, it costs next to nothing. But if it does, it will scale effortlessly. The other thing we might do is rewrite the uploading code. We're using the Cloudinary widget and we might want more control of the user experience. We'll want something customized where you click a button and it opens the camera, ready to record. However, I think that it will be complicated to get something working so well on all devices. It will have to wait. The Cloudinary widget works very well. It just does more than we need and those extra features could get confusing at a party.
I have to emphasize again that no one on the team had used Cloudinary before, except Doron, our contact at Cloudinary. Any app has engineering decisions that need to be made. Cloudinary’s employees, documentation, and code helped us stay on track. I am still surprised by how much we figured out and built in less than a day. The tools they give you, including the libraries, dashboard, and APIs, are where it really shines.
I look forward to hacking on this app in the future. And I’ll be dreaming up new ways to put Cloudinary to use.
Image may be NSFW. Clik here to view.
Eric Normand is a long time functional programmer excited to see it entering the mainstream. He loves teaching and cooking. You can learn Functional Programming and Clojure from him at PurelyFunctional.tv and get inspired by The PurelyFunctional.tv Newsletter. If you visit him in New Orleans, you can meet his wife and daughter. He'll even make you some gumbo if you tell him you're coming.


%20,g_south_east,x_10,y_10,b_rgb:e7e5e5,o_75,r_15/w_400/canyons.jpg "Photo with photographer name as text overlay")