Quantcast
Channel: Cloudinary Blog
Viewing all 601 articles
Browse latest View live

Automatically Crop Videos Without Losing Focus

$
0
0

Content-aware cropping for video

Delivering videos according to the aspect ratios defined by social media for multiple devices and platforms is a growing challenge. The continuously rising volume of vertical videos and the corresponding increase in video traffic on mobile devices (now up to 57% of online videos watched) have only exacerbated the situation, with no letup in sight.

Reality is, smartphone users hold their phone vertically while scrolling or browsing online content, including videos that are not optimized for mobile devices. It simply doesn’t occur to those users to switch to horizontal mode for an enhanced view, or it doesn't feel worth their effort. This means that providers of online content must make sure their videos accommodate all viewing devices, ideally through automation.

Cloudinary, which for years has been performing automated cropping of images for size economy and compliance with aspect ratios, can now do the same for videos, adding to its already powerful video solution. Impressively, Cloudinary’s content-aware cropping capability identifies the must-keep sections by analyzing videos through advanced AI and machine-learning techniques, churning out intelligently downsized videos in any aspect ratio. It’s as simple as setting the crop mode to fill and the gravity to auto.

Ruby:
cl_video_tag("ship", :width=>300, :gravity=>"auto", :aspect_ratio=>"1:1", :crop=>"fill")
PHP:
cl_video_tag("ship", array("width"=>300, "gravity"=>"auto", "aspect_ratio"=>"1:1", "crop"=>"fill"))
Python:
CloudinaryVideo("ship").video(width=300, gravity="auto", aspect_ratio="1:1", crop="fill")
Node.js:
cloudinary.video("ship", {width: 300, gravity: "auto", aspect_ratio: "1:1", crop: "fill"})
Java:
cloudinary.url().transformation(new Transformation().width(300).gravity("auto").aspectRatio("1:1").crop("fill")).videoTag("ship");
JS:
cloudinary.videoTag('ship', {width: 300, gravity: "auto", aspectRatio: "1:1", crop: "fill"}).toHtml();
jQuery:
$.cloudinary.video("ship", {width: 300, gravity: "auto", aspect_ratio: "1:1", crop: "fill"})
React:
<Video publicId="ship" >
  <Transformation width="300" gravity="auto" aspectRatio="1:1" crop="fill" />
</Video>
Angular:
<cl-video public-id="ship" >
  <cl-transformation width="300" gravity="auto" aspect-ratio="1:1" crop="fill">
  </cl-transformation>
</cl-video>
.Net:
cloudinary.Api.UrlVideoUp.Transform(new Transformation().Width(300).Gravity("auto").AspectRatio("1:1").Crop("fill")).BuildVideoTag("ship")
Android:
MediaManager.get().url().transformation(new Transformation().width(300).gravity("auto").aspectRatio("1:1").crop("fill")).resourceType("video").generate("ship.mp4");
iOS:
cloudinary.createUrl().setResourceType("video").setTransformation(CLDTransformation().setWidth(300).setGravity("auto").setAspectRatio("1:1").setCrop("fill")).generate("ship.mp4")

Rotate or Move On: The Challenge with Video on Mobile

Nearly half of all smartphone users watch short-form videos or live posts at least once a week. Because most people hold their phones vertically for comfort, yet videos are best viewed horizontally, many folks shy away from the trouble of rotating their phone and waiting for the video to update. The solution? Have videos play with the correct aspect ratio, eliminating the rotation step and avoiding accidental dropping of the phone.

Additionally, given the monumental role of social media in video consumption, you must deliver videos on those platforms across all devices. The chart below showing the various aspect ratios required for optimally delivering videos for Facebook and Instagram, clearly demonstrates the challenge, especially if large quantities of videos are involved.

Aspect Ratios for Video

Introducing Automatic Content-Aware Cropping

You can now automate all your video cropping with Cloundinary’s automatic content-aware cropping functionality. No more time consuming manual editing. Cloudinary has developed a complex deep-learning algorithm that analyzes frames from the video and identifies where the most interesting areas are. From this analysis, a heatmap is produced and then used to crop the video intelligently.

The cropped video will now follow the most interesting area of the video throughout the duration, ensuring that your videos retain all the important features you wanted when you filmed them, while filling the screen no matter the aspect ratio.

As we mentioned above, all you need to do is set the crop mode to fill and the gravity to auto. This will begin the process of analysing the video. We recommend performing this on upload as an eager transformation to ensure the analysis is complete before delivery (or alternatively using the explict method before delivery on a video already in your account). Once that analysis has been performed on a specific video in your account, you can deliver your content-aware video in any aspect ratio you need; Landscape, Square, Facebook Vertical, Instagram Story Vertical.

Automatic Cropping Versus Default Cropping

Let’s take a look at how content-aware cropping compares with the standard center crop. Notice how the default crop only has the dog in shot for a short period of time when he passes through the center of the frame. With automatic cropping, this impressive frisbie catch stays in shot throughout the video, despite starting on one side of the frame and finishing on the other.

Click any video to see the comparison in action.

Original video
Default crop
(Center gravity)
Automatic crop

Taking it Further

We could use this new functionality to extend the existing mobile video experience and actually serve up a landscape or vertical video depending on the orientation of the device. If the user lands on your page whilst browsing in portrait orientation we can set our HTML5 video source to our vertically cropped video. If they then decide to switch to landscape then we change the source to the original landscape video. Full screen video for both orientations.

See the Pen Orientation switch demo by Cloudinary (@Cloudinary) on CodePen.


In Summary

So there you have it, Cloundinary’s powerful video solution just got even more powerful. Advanced AI and deep learning algorithms enable you to deliver your videos in the right size and aspect ratio, for every platform or device and automate the whole process. Go ahead and try it out with one of your own videos on our demo page, or you can sign up for a free account and get stuck in with the full product. Just remember to set the crop mode to fill and the gravity to auto. Check out our documentation for more info.


FTP API for Cloudinary Part 1: Real-Time Synchronization

$
0
0

Cover Image

tl;dr Diagrams and blueprints for FTPing on Cloudinary


As a robust, effective solution for managing digital media, Cloudinary offers a RESTful API for provisioning and maintenance. That API enables numerous operations, from basic ones like image uploads to advanced ones, such as creation of named transformations and AI-based search.

However, despite its versatility for programming languages and frameworks, RESTful API does not comply with File Transfer Protocol (FTP), which has been in use for 50 years. Not only are FTP clients user-friendly, they can also seamlessly upload, delete, or download files in bulk and synchronize with the file system in question, whether automated or otherwise.

We've created the 'FTP API for Cloudinary', which translates FTP API calls into Cloudinary RESTful API calls. The FTP API enables you to use standard FTP clients for managing media assets in your Cloudinary account. Using this FTP API, you can maintain work procedures that involve FTP transfers.

For example, suppose you migrate to Cloudinary and your organization is engaged with photography agencies. The agencies are used to sending their photoshoot files to you over FTP. You could take advantage of the FTP API for Cloudinary to avoid changing a smoothly working process, enabling a seamless transparent migration to Cloudinary.

This post demonstrates how to use FTP on Cloudinary through an example of real-time synchronization. A second example on bulk uploads will be the subject of part 2 of this series.

Note
The FTP API for Cloudinary is based on the Amazon Web Services’(AWS) Simple Storage Service (S3) and Python lambda. For the code in its entirety, see the blueprint in the Github repository.

The Process

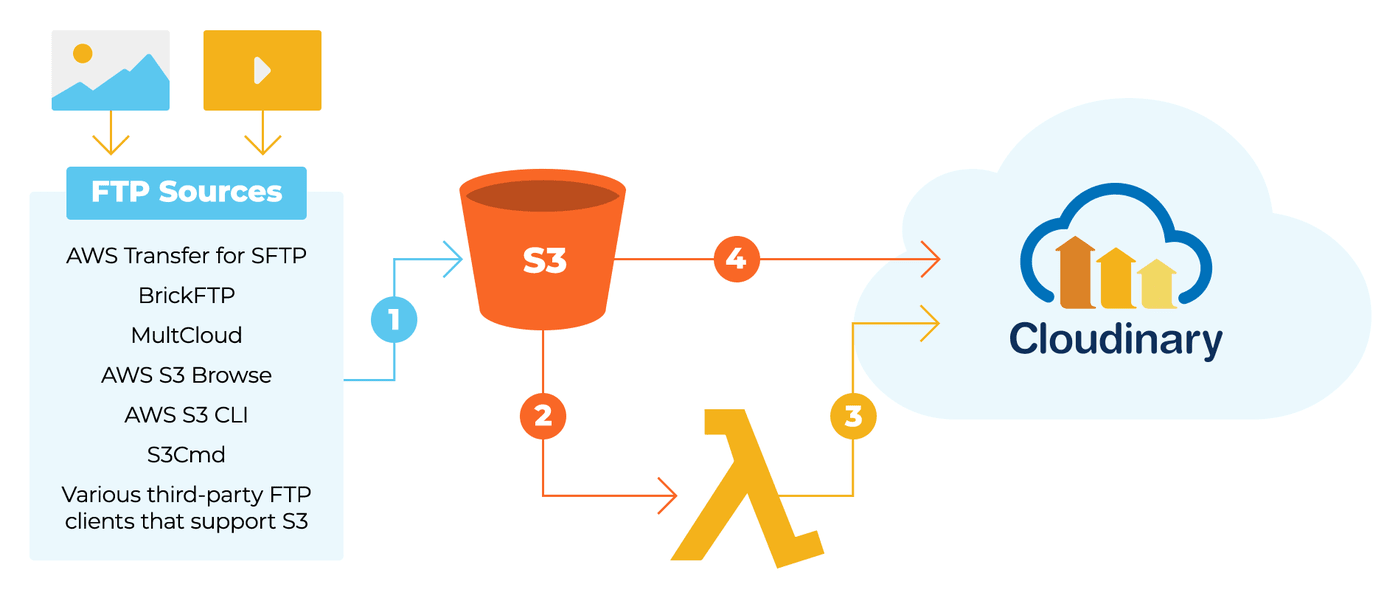
The diagram below illustrates the process of a unidirectional synchronization of files to Cloudinary in real time with the FTP API.

Diagram

Here’s the step-by-step workflow:

  1. The FTP source uploads a file to the user’s S3 bucket. Be sure to set your bucket to accept Cloudinary’s bucket GetObject requests and to send event notifications. For details, see the blueprint.
  2. S3 notifications are sent to an AWS Lambda.
  3. The AWS lambda function sends an API Upload request to Cloudinary.
  4. Cloudinary uploads the file from the user’s S3 bucket.

This process has the following advantages over Cloudinary automated uploads because—

  • Your assets get automatically synchronized to your Cloudinary account without them needing to be accessed by a user (whereas Cloudinary auto-upload is triggered by an end-user request).
  • If any eager transformation was defined on those uploaded assets, then your user will not have to wait for it.
  • Cloudinary’s powerful search engine is on, geared up to deliver complete results set to your search criteria.
  • Newer versions of the same object are synchronized.
  • Deleted and renamed objects are synchronized.
  • The upload date is preserved.
  • Optionally, you can set up synchronization of metadata and customize permissions and access control for the uploaded objects.

Conclusion

Cloudinary's native API deftly mimics FTP tasks, making this FTP API for Cloudinary possible. As a result, FTP users can continue enjoying the simple and smooth experience typical of classic FTP operations. At the same time, you and your organization can enjoy all the media management benefits of Cloudinary, with every FTP'd file automatically synchronizing with your Cloudinary account. Do try it out! And stay tuned for part 2, in which you’ll learn how to upload files in bulk to Cloudinary with FTP.

Green Screen Queen: Dynamic Video Transparency Fit For Royalty

$
0
0

Automatic video transparency via green screen effects

If you were reading your social media or news feeds on or around June 11 this year, no doubt you came across your fair share of posts about Queen Elizabeth and her outfit-color faux pas. For her 90th birthday, she chose a solid neon green suit, and it didn't take long for Photoshop fanatics to suggest alternative designs for the Queen's green-screen threads.

Replacing her green suit with the famous blue or white dress is just one of many examples:

Queen in blue and white dress via green screen effect

From: boredpanda.com

Cloudinary is loved by developers for, among other things, its huge collections of on-the-fly programmatic image and video transformation options. Automatically generating an image that replaced the Queen's greens with an alternative design using Cloudinary image transformations would be no challenge.

But we wanted a challenge. So in honor of the Queen, Cloudinary now supports its make_transparent parameter also for video!

Given that in video, the color you want to make transparent is usually a moving target, this involves a more sophisticated algorithm for us, but it's still just one on-the-fly transformation away for you.

For example, look what you get if you place the Queen's Coach Ride video as an overlay over a nice animated hearts video, and then apply the new dynamic video transparency parameter (make_transparent) to the Queen's green (hex color #87ff66) suit. You guessed it… A Queen of Hearts!

Here's what the URL for this video looks like, or click your favorite language to see how you would generate the URL in your web or mobile app using one of our many SDKs:

Ruby:
cl_video_tag("docs/animated_hearts", :transformation=>[
  {:width=>800, :crop=>"scale"},
  {:duration=>"15", :start_offset=>"12"},
  {:overlay=>"video:docs:green_screen_queen", :effect=>"make_transparent:15", :color=>"#87ff66", :flags=>"relative", :width=>1.0}
  ])
PHP:
cl_video_tag("docs/animated_hearts", array("transformation"=>array(
  array("width"=>800, "crop"=>"scale"),
  array("duration"=>"15", "start_offset"=>"12"),
  array("overlay"=>"video:docs:green_screen_queen", "effect"=>"make_transparent:15", "color"=>"#87ff66", "flags"=>"relative", "width"=>1.0)
  )))
Python:
CloudinaryVideo("docs/animated_hearts").video(transformation=[
  {'width': 800, 'crop': "scale"},
  {'duration': "15", 'start_offset': "12"},
  {'overlay': "video:docs:green_screen_queen", 'effect': "make_transparent:15", 'color': "#87ff66", 'flags': "relative", 'width': 1.0}
  ])
Node.js:
cloudinary.video("docs/animated_hearts", {transformation: [
  {width: 800, crop: "scale"},
  {duration: "15", start_offset: "12"},
  {overlay: "video:docs:green_screen_queen", effect: "make_transparent:15", color: "#87ff66", flags: "relative", width: "1.0"}
  ]})
Java:
cloudinary.url().transformation(new Transformation()
  .width(800).crop("scale").chain()
  .duration("15").startOffset("12").chain()
  .overlay(new Layer().publicId("video:docs:green_screen_queen")).effect("make_transparent:15").color("#87ff66").flags("relative").width(1.0)).videoTag("docs/animated_hearts");
JS:
cloudinary.videoTag('docs/animated_hearts', {transformation: [
  {width: 800, crop: "scale"},
  {duration: "15", startOffset: "12"},
  {overlay: new cloudinary.Layer().publicId("video:docs:green_screen_queen"), effect: "make_transparent:15", color: "#87ff66", flags: "relative", width: "1.0"}
  ]}).toHtml();
jQuery:
$.cloudinary.video("docs/animated_hearts", {transformation: [
  {width: 800, crop: "scale"},
  {duration: "15", start_offset: "12"},
  {overlay: new cloudinary.Layer().publicId("video:docs:green_screen_queen"), effect: "make_transparent:15", color: "#87ff66", flags: "relative", width: "1.0"}
  ]})
React:
<Video publicId="docs/animated_hearts" >
  <Transformation width="800" crop="scale" />
  <Transformation duration="15" startOffset="12" />
  <Transformation overlay="video:docs:green_screen_queen" effect="make_transparent:15" color="#87ff66" flags="relative" width="1.0" />
</Video>
Angular:
<cl-video public-id="docs/animated_hearts" >
  <cl-transformation width="800" crop="scale">
  </cl-transformation>
  <cl-transformation duration="15" start-offset="12">
  </cl-transformation>
  <cl-transformation overlay="video:docs:green_screen_queen" effect="make_transparent:15" color="#87ff66" flags="relative" width="1.0">
  </cl-transformation>
</cl-video>
.Net:
cloudinary.Api.UrlVideoUp.Transform(new Transformation()
  .Width(800).Crop("scale").Chain()
  .Duration("15").StartOffset("12").Chain()
  .Overlay(new Layer().PublicId("video:docs:green_screen_queen")).Effect("make_transparent:15").Color("#87ff66").Flags("relative").Width(1.0)).BuildVideoTag("docs/animated_hearts")
Android:
MediaManager.get().url().transformation(new Transformation()
  .width(800).crop("scale").chain()
  .duration("15").startOffset("12").chain()
  .overlay(new Layer().publicId("video:docs:green_screen_queen")).effect("make_transparent:15").color("#87ff66").flags("relative").width(1.0)).resourceType("video").generate("docs/animated_hearts.mp4");
iOS:
cloudinary.createUrl().setResourceType("video").setTransformation(CLDTransformation()
  .setWidth(800).setCrop("scale").chain()
  .setDuration("15").setStartOffset("12").chain()
  .setOverlay("video:docs:green_screen_queen").setEffect("make_transparent:15").setColor("#87ff66").setFlags("relative").setWidth(1.0)).generate("docs/animated_hearts.mp4")

Seeing through the URL

In case you haven't played with Cloudinary transformation URLs before, here's a quick walk through (or 'see through', if you will):

  • https://res.cloudinary.com/demo/video/upload...
    The first part of the URL defines your Cloudinary account and how/where the video to deliver is stored in your account.
  • .../w_800/du_15,so_12...
    The next two components are transformations that scale the video down to a width of 800 pixels and shorten the overall video duration to 15 seconds.
  • .../l_video:docs:green_screen_queen,...
    Now the fun part. The /l_ component ( overlay in SDKs) adds the green_screen_queen video (from the /docs folder) as a layer over the base animated_hearts video.
    • ...e_make_transparent:15,co_rgb:87ff66,...
      The make\_transparent parameter is applied to the overlay video with a tolerance of 15 to allow for minor color variations, and specifies that the transparency should be applied to the hex color 87ff66 (the particular shade of green that the Queen chose to wear).
    • ...fl_relative,w_1.0...
      Additionally, the overlayed video is width is scaled to 1.0 (100%) relative to the width of the base video so that the top layer exactly covers the base video.
  • .../docs/animated_hearts.mp4
    Finally, we specify the base video: animated_hearts.mp4 (also from the /docs folder). In this case, the base video will actually be hiding behind the identically-sized queen video layer, and will show through only where the top video layer is transparent.

Seconds after you deliver this URL for the first time, your video is generated and the specified green color is transparent throughout the duration, regardless of where that color appears or moves within your video.

It's Not Easy Being Green

"Green screen" transparency for both image and video isn't a new concept of-course, but usually it requires manually applying the transparency in video editing software. Additionally, most of these video editors can only achieve video transparency for a specific and very solid shade of green or in some cases, maybe a specific royal blue color. But that specific green (or blue) requirement can be limiting.

In contrast, Cloudinary's make_transparent feature, isn't picky at all. Specify any hex color, along with an optional tolerance level, and go. For example, all we have to do is change the color code accompanying the make_transparent parameter to a light-red shade (#ff4d4b) in the URL we used above, and now it's the footmens' previously light-red uniforms who are getting the love:

It's time to get serious

No doubt that redesigning clothes using video transparency can be entertaining, but there are more practical uses for the make_transparent video transformation.

For example, what if you want to deliver a video tutorial or product demo with a talking head? No special green-screen studio is necessary. Just find any solid colored wall or hang a sheet in a color that's not too similar to the speaker's face color or clothing, and then use make_transparent to remove the video background.

Here's a video we created in our turquoise-painted meeting room:

Ruby:
cl_video_tag("docs/talking_head_travel")
PHP:
cl_video_tag("docs/talking_head_travel")
Python:
CloudinaryVideo("docs/talking_head_travel").video()
Node.js:
cloudinary.video("docs/talking_head_travel")
Java:
cloudinary.url().videoTag("docs/talking_head_travel");
JS:
cloudinary.videoTag('docs/talking_head_travel').toHtml();
jQuery:
$.cloudinary.video("docs/talking_head_travel")
React:
<Video publicId="docs/talking_head_travel" >

</Video>
Angular:
<cl-video public-id="docs/talking_head_travel" >

</cl-video>
.Net:
cloudinary.Api.UrlVideoUp.BuildVideoTag("docs/talking_head_travel")
Android:
MediaManager.get().url().resourceType("video").generate("docs/talking_head_travel.mp4");
iOS:
cloudinary.createUrl().setResourceType("video").generate("docs/talking_head_travel.mp4")

Now we just overlay this talking_head video on top of the video he's supposed to be talking about, set the transparency color to match the paint color, and we can send our narrator anywhere we want. How about a quick trip to Africa?

Ruby:
cl_video_tag("elephants", :transformation=>[
  {:start_offset=>"8"},
  {:overlay=>"video:docs:talking_head_travel", :effect=>"make_transparent:18", :color=>"#5ec2c4", :width=>1.0, :flags=>"relative"},
  {:duration=>"10"}
  ])
PHP:
cl_video_tag("elephants", array("transformation"=>array(
  array("start_offset"=>"8"),
  array("overlay"=>"video:docs:talking_head_travel", "effect"=>"make_transparent:18", "color"=>"#5ec2c4", "width"=>1.0, "flags"=>"relative"),
  array("duration"=>"10")
  )))
Python:
CloudinaryVideo("elephants").video(transformation=[
  {'start_offset': "8"},
  {'overlay': "video:docs:talking_head_travel", 'effect': "make_transparent:18", 'color': "#5ec2c4", 'width': 1.0, 'flags': "relative"},
  {'duration': "10"}
  ])
Node.js:
cloudinary.video("elephants", {transformation: [
  {start_offset: "8"},
  {overlay: "video:docs:talking_head_travel", effect: "make_transparent:18", color: "#5ec2c4", width: "1.0", flags: "relative"},
  {duration: "10"}
  ]})
Java:
cloudinary.url().transformation(new Transformation()
  .startOffset("8").chain()
  .overlay(new Layer().publicId("video:docs:talking_head_travel")).effect("make_transparent:18").color("#5ec2c4").width(1.0).flags("relative").chain()
  .duration("10")).videoTag("elephants");
JS:
cloudinary.videoTag('elephants', {transformation: [
  {startOffset: "8"},
  {overlay: new cloudinary.Layer().publicId("video:docs:talking_head_travel"), effect: "make_transparent:18", color: "#5ec2c4", width: "1.0", flags: "relative"},
  {duration: "10"}
  ]}).toHtml();
jQuery:
$.cloudinary.video("elephants", {transformation: [
  {start_offset: "8"},
  {overlay: new cloudinary.Layer().publicId("video:docs:talking_head_travel"), effect: "make_transparent:18", color: "#5ec2c4", width: "1.0", flags: "relative"},
  {duration: "10"}
  ]})
React:
<Video publicId="elephants" >
  <Transformation startOffset="8" />
  <Transformation overlay="video:docs:talking_head_travel" effect="make_transparent:18" color="#5ec2c4" width="1.0" flags="relative" />
  <Transformation duration="10" />
</Video>
Angular:
<cl-video public-id="elephants" >
  <cl-transformation start-offset="8">
  </cl-transformation>
  <cl-transformation overlay="video:docs:talking_head_travel" effect="make_transparent:18" color="#5ec2c4" width="1.0" flags="relative">
  </cl-transformation>
  <cl-transformation duration="10">
  </cl-transformation>
</cl-video>
.Net:
cloudinary.Api.UrlVideoUp.Transform(new Transformation()
  .StartOffset("8").Chain()
  .Overlay(new Layer().PublicId("video:docs:talking_head_travel")).Effect("make_transparent:18").Color("#5ec2c4").Width(1.0).Flags("relative").Chain()
  .Duration("10")).BuildVideoTag("elephants")
Android:
MediaManager.get().url().transformation(new Transformation()
  .startOffset("8").chain()
  .overlay(new Layer().publicId("video:docs:talking_head_travel")).effect("make_transparent:18").color("#5ec2c4").width(1.0).flags("relative").chain()
  .duration("10")).resourceType("video").generate("elephants.mp4");
iOS:
cloudinary.createUrl().setResourceType("video").setTransformation(CLDTransformation()
  .setStartOffset("8").chain()
  .setOverlay("video:docs:talking_head_travel").setEffect("make_transparent:18").setColor("#5ec2c4").setWidth(1.0).setFlags("relative").chain()
  .setDuration("10")).generate("elephants.mp4")

We can also choose what size we'd like our overlay speaker to be, either relative to the base (background) video or as a fixed pixel size, and where we'd like to place him. Here, we didn't want to make our speaker look too big relative to the entire galaxy, so we made him a bit smaller (40% of the base video width), and moved the transparent video overlay to the bottom right of the base video:

Ruby:
cl_video_tag("galaxy_spin", :transformation=>[
  {:start_offset=>"8"},
  {:overlay=>"video:docs:talking_head_travel", :effect=>"make_transparent:18", :color=>"#5ec2c4", :width=>0.4, :flags=>"relative", :gravity=>"south_east"},
  {:duration=>"10"}
  ])
PHP:
cl_video_tag("galaxy_spin", array("transformation"=>array(
  array("start_offset"=>"8"),
  array("overlay"=>"video:docs:talking_head_travel", "effect"=>"make_transparent:18", "color"=>"#5ec2c4", "width"=>0.4, "flags"=>"relative", "gravity"=>"south_east"),
  array("duration"=>"10")
  )))
Python:
CloudinaryVideo("galaxy_spin").video(transformation=[
  {'start_offset': "8"},
  {'overlay': "video:docs:talking_head_travel", 'effect': "make_transparent:18", 'color': "#5ec2c4", 'width': 0.4, 'flags': "relative", 'gravity': "south_east"},
  {'duration': "10"}
  ])
Node.js:
cloudinary.video("galaxy_spin", {transformation: [
  {start_offset: "8"},
  {overlay: "video:docs:talking_head_travel", effect: "make_transparent:18", color: "#5ec2c4", width: "0.4", flags: "relative", gravity: "south_east"},
  {duration: "10"}
  ]})
Java:
cloudinary.url().transformation(new Transformation()
  .startOffset("8").chain()
  .overlay(new Layer().publicId("video:docs:talking_head_travel")).effect("make_transparent:18").color("#5ec2c4").width(0.4).flags("relative").gravity("south_east").chain()
  .duration("10")).videoTag("galaxy_spin");
JS:
cloudinary.videoTag('galaxy_spin', {transformation: [
  {startOffset: "8"},
  {overlay: new cloudinary.Layer().publicId("video:docs:talking_head_travel"), effect: "make_transparent:18", color: "#5ec2c4", width: "0.4", flags: "relative", gravity: "south_east"},
  {duration: "10"}
  ]}).toHtml();
jQuery:
$.cloudinary.video("galaxy_spin", {transformation: [
  {start_offset: "8"},
  {overlay: new cloudinary.Layer().publicId("video:docs:talking_head_travel"), effect: "make_transparent:18", color: "#5ec2c4", width: "0.4", flags: "relative", gravity: "south_east"},
  {duration: "10"}
  ]})
React:
<Video publicId="galaxy_spin" >
  <Transformation startOffset="8" />
  <Transformation overlay="video:docs:talking_head_travel" effect="make_transparent:18" color="#5ec2c4" width="0.4" flags="relative" gravity="south_east" />
  <Transformation duration="10" />
</Video>
Angular:
<cl-video public-id="galaxy_spin" >
  <cl-transformation start-offset="8">
  </cl-transformation>
  <cl-transformation overlay="video:docs:talking_head_travel" effect="make_transparent:18" color="#5ec2c4" width="0.4" flags="relative" gravity="south_east">
  </cl-transformation>
  <cl-transformation duration="10">
  </cl-transformation>
</cl-video>
.Net:
cloudinary.Api.UrlVideoUp.Transform(new Transformation()
  .StartOffset("8").Chain()
  .Overlay(new Layer().PublicId("video:docs:talking_head_travel")).Effect("make_transparent:18").Color("#5ec2c4").Width(0.4).Flags("relative").Gravity("south_east").Chain()
  .Duration("10")).BuildVideoTag("galaxy_spin")
Android:
MediaManager.get().url().transformation(new Transformation()
  .startOffset("8").chain()
  .overlay(new Layer().publicId("video:docs:talking_head_travel")).effect("make_transparent:18").color("#5ec2c4").width(0.4).flags("relative").gravity("south_east").chain()
  .duration("10")).resourceType("video").generate("galaxy_spin.mp4");
iOS:
cloudinary.createUrl().setResourceType("video").setTransformation(CLDTransformation()
  .setStartOffset("8").chain()
  .setOverlay("video:docs:talking_head_travel").setEffect("make_transparent:18").setColor("#5ec2c4").setWidth(0.4).setFlags("relative").setGravity("south_east").chain()
  .setDuration("10")).generate("galaxy_spin.mp4")

We can even take advantage of other Cloudinary video transformations. For example, in this transformation URL, we added the fade out effect to the last two seconds of the overlay video, as the narrator presumably travels to his next surprise location...

Note the use of the layer_apply flag so that two different effects (make_transparent and fade) can be applied in separate components to the same overlay:

Ruby:
cl_video_tag("venice_waters", :transformation=>[
  {:effect=>"accelerate:-50"},
  {:overlay=>"video:docs:talking_head_travel", :effect=>"make_transparent:15", :color=>"#5ec2c4", :width=>0.7, :flags=>"relative"},
  {:effect=>"fade:-2000"},
  {:gravity=>"south", :flags=>"layer_apply"},
  {:duration=>"10"}
  ])
PHP:
cl_video_tag("venice_waters", array("transformation"=>array(
  array("effect"=>"accelerate:-50"),
  array("overlay"=>"video:docs:talking_head_travel", "effect"=>"make_transparent:15", "color"=>"#5ec2c4", "width"=>0.7, "flags"=>"relative"),
  array("effect"=>"fade:-2000"),
  array("gravity"=>"south", "flags"=>"layer_apply"),
  array("duration"=>"10")
  )))
Python:
CloudinaryVideo("venice_waters").video(transformation=[
  {'effect': "accelerate:-50"},
  {'overlay': "video:docs:talking_head_travel", 'effect': "make_transparent:15", 'color': "#5ec2c4", 'width': 0.7, 'flags': "relative"},
  {'effect': "fade:-2000"},
  {'gravity': "south", 'flags': "layer_apply"},
  {'duration': "10"}
  ])
Node.js:
cloudinary.video("venice_waters", {transformation: [
  {effect: "accelerate:-50"},
  {overlay: "video:docs:talking_head_travel", effect: "make_transparent:15", color: "#5ec2c4", width: "0.7", flags: "relative"},
  {effect: "fade:-2000"},
  {gravity: "south", flags: "layer_apply"},
  {duration: "10"}
  ]})
Java:
cloudinary.url().transformation(new Transformation()
  .effect("accelerate:-50").chain()
  .overlay(new Layer().publicId("video:docs:talking_head_travel")).effect("make_transparent:15").color("#5ec2c4").width(0.7).flags("relative").chain()
  .effect("fade:-2000").chain()
  .gravity("south").flags("layer_apply").chain()
  .duration("10")).videoTag("venice_waters");
JS:
cloudinary.videoTag('venice_waters', {transformation: [
  {effect: "accelerate:-50"},
  {overlay: new cloudinary.Layer().publicId("video:docs:talking_head_travel"), effect: "make_transparent:15", color: "#5ec2c4", width: "0.7", flags: "relative"},
  {effect: "fade:-2000"},
  {gravity: "south", flags: "layer_apply"},
  {duration: "10"}
  ]}).toHtml();
jQuery:
$.cloudinary.video("venice_waters", {transformation: [
  {effect: "accelerate:-50"},
  {overlay: new cloudinary.Layer().publicId("video:docs:talking_head_travel"), effect: "make_transparent:15", color: "#5ec2c4", width: "0.7", flags: "relative"},
  {effect: "fade:-2000"},
  {gravity: "south", flags: "layer_apply"},
  {duration: "10"}
  ]})
React:
<Video publicId="venice_waters" >
  <Transformation effect="accelerate:-50" />
  <Transformation overlay="video:docs:talking_head_travel" effect="make_transparent:15" color="#5ec2c4" width="0.7" flags="relative" />
  <Transformation effect="fade:-2000" />
  <Transformation gravity="south" flags="layer_apply" />
  <Transformation duration="10" />
</Video>
Angular:
<cl-video public-id="venice_waters" >
  <cl-transformation effect="accelerate:-50">
  </cl-transformation>
  <cl-transformation overlay="video:docs:talking_head_travel" effect="make_transparent:15" color="#5ec2c4" width="0.7" flags="relative">
  </cl-transformation>
  <cl-transformation effect="fade:-2000">
  </cl-transformation>
  <cl-transformation gravity="south" flags="layer_apply">
  </cl-transformation>
  <cl-transformation duration="10">
  </cl-transformation>
</cl-video>
.Net:
cloudinary.Api.UrlVideoUp.Transform(new Transformation()
  .Effect("accelerate:-50").Chain()
  .Overlay(new Layer().PublicId("video:docs:talking_head_travel")).Effect("make_transparent:15").Color("#5ec2c4").Width(0.7).Flags("relative").Chain()
  .Effect("fade:-2000").Chain()
  .Gravity("south").Flags("layer_apply").Chain()
  .Duration("10")).BuildVideoTag("venice_waters")
Android:
MediaManager.get().url().transformation(new Transformation()
  .effect("accelerate:-50").chain()
  .overlay(new Layer().publicId("video:docs:talking_head_travel")).effect("make_transparent:15").color("#5ec2c4").width(0.7).flags("relative").chain()
  .effect("fade:-2000").chain()
  .gravity("south").flags("layer_apply").chain()
  .duration("10")).resourceType("video").generate("venice_waters.mp4");
iOS:
cloudinary.createUrl().setResourceType("video").setTransformation(CLDTransformation()
  .setEffect("accelerate:-50").chain()
  .setOverlay("video:docs:talking_head_travel").setEffect("make_transparent:15").setColor("#5ec2c4").setWidth(0.7).setFlags("relative").chain()
  .setEffect("fade:-2000").chain()
  .setGravity("south").setFlags("layer_apply").chain()
  .setDuration("10")).generate("venice_waters.mp4")

Need Video Transparency? We've Got it Covered!

Whether you want to post a Killer Queen video outfit in seconds, or you need to remove a solid background from a talking head video or live product demo, Cloudinary's green screen transparency effect makes it quick and easy. For more details on this and other effects you can apply to your Cloudinary videos, see the video effects documentation in the Video Transformations Guide.

Once you've got your cool video transparency effect ready to go, you can easily embed it in your web or mobile site using the Cloudinary video player, which offers responsive video display for any device, built-in adaptive bitmap streaming, customizable color themes, floating player support, and more.

This dynamic video transparency feature is too much fun not to try it yourself. If you haven't used Cloudinary before, register for a free account, upload some videos, and share your creations in the comments. We can't wait to see what you come up with!

Video Manipulations and Delivery for Angular Video Apps

$
0
0

Angular Video

On social media, videos posted by users constitute a significant amount of the content appeal on those platforms. From upload to manipulation to delivery, a smooth, efficient, and effective pipeline for the posting process is mandatory to ensure consistent user sessions and their steadily increasing volume. However, building such an infrastructure is a complex, labor-intensive, and problem-prone undertaking.

Enter Cloudinary, whose capabilities impressively form such an infrastructure. This article shows you how to manipulate, transform, and deliver videos in Angular apps with Cloudinary’s robust drop-in components.

Installing the Angular SDK

To manipulate and transform videos while on Cloudinary, leverage the parameters in its Angular video component.

First, install the Cloudinary SDK for your Angular version. Type this NPM command:

npm install cloudinary-core @cloudinary/angular-5.x --save

Afterwards, import from the SDK the <cl-video> component, which places in your app an HTML 5 video player. That player plays videos—whether in webm, ogv, or mp4 format—without a glitch on all major web browsers.

Note
AngularJS 1.x developers: You can obtain the <cl-video> component by typing this Bower command line:
bower install cloudinary_ng#1.x --save

You can now transform and manipulate videos with no need for a dedicated server. Read on for the specific tasks and their related procedures.

Transcoding Video Formats

The format parameter takes one of these three values: webm, ogv, and mp4.

For example, to transcode the existing format of an Angular video called cat to the webm format, code as follows:

<cl-video public-id="cat" format="webm">

</cl-video>

Concatenating Angular Videos

To concatenate multiple Angular videos by overlaying one on top of another, specify the related values for the overlay parameter for the <cl-video> and <cl-transformation> components. For example:

<cl-video public-id="footballer" >
  <cl-transformation width="400" height="250" crop="fill">
  </cl-transformation>
  <cl-transformation overlay="video:ball" flags="splice" width="300" height="200" crop="fill">
  </cl-transformation>
</cl-video>

Adjusting Video Quality

The quality parameter takes any value between 0 and 100. The lower the value, the smaller the video size. By specifying a value for quality, you set the level of quality you desire for the video size at delivery.

For example:

<cl-video public-id="drink" >
  <cl-transformation quality="60">
  </cl-transformation>
</cl-video>

Controlling the Playback Speed

While playing videos, users often accelerate or reduce the playback speed to accommodate various scenarios. For example, to watch as many course videos offered by a time-limited subscription as possible, a user might choose to skim through some of them.

To enable control of playback speed, specify a value of between -50 and 100 for the accelerate attribute in the effect parameter.

Note
That value applies to both acceleration and deceleration. For example:
<cl-video public-id="dog" >
  <cl-transformation width="300" effect="accelerate:100" crop="scale">
  </cl-transformation>
</cl-video>

Generating Video Previews With AI

AI automatically identifies the appealing excerpts of a video and generates a preview version of the duration that you specify. Code as follows:

<cl-video public-id="afcon" >
  <cl-transformation effect="preview:duration_10">
  </cl-transformation>
</cl-video>

The value 10 above denotes 10 minutes. You can specify any value between [?] and [?].

Note
This feature, currently in Beta, truly rocks! Do take a spin with it. You’ll be awed.

Adding Captions and Subtitles

To add a caption to a video, specify the caption’s font type, font size, wording, and such for the text attribute in the overlay parameter. Here is a self-explanatory code example:

<cl-video public-id="dog" >
  <cl-transformation overlay="text:arial_60:Angular%20Video" gravity="south" y="80" start-offset="2" end-offset="5">
  </cl-transformation>
</cl-video>

As soon as that video called dog starts playing, its text caption, Angular Video, is displayed.

To add subtitles to a video as an overlay, specify in the overlay parameter the font type and size that you desire along with the name of the related SRT file. For example:

<cl-video public-id="cat" >
  <cl-transformation overlay="subtitles:arial_20:sample_sub_en.srt">
  </cl-transformation>
</cl-video>

Reminder: Be sure to upload the SRT.srt file to Cloudinary first.

For other transformations you can apply to Angular videos, see the related documentation.

Browsing Other References

The following Cloudinary documentation contains many nuances that are worth a look:

You might also be interested in this three-part series I wrote in 2016 on building your own YouTube platform on Cloudinary and AngularJS.

Techniques for Image Enhancement With Cloudinary: A Primer

$
0
0

image enhancement

Indisputably, visual presentations of events, places, people, and even intangible things make deeper impressions and linger in our minds for longer than words or any other communication medium, hence the meteoric rise through the ages of transmitting ideas and promoting brands in the business sector through images. The recent discovery of the first image of a black hole has generated calls for techniques for enhancing digital images. Specifically, the clamor is for quality-oriented tweaks that would result in optimal display and increased visibility of slightly hidden yet important content.

This post shows you how to enhance images by setting intuitive and effective parameters on Cloudinary with a focus on several key aspects, including brightness, contrast, and sharpness. Also described are sophisticated enhancements you can add with Cloudinary add-on VIESUS and the simple steps for optimizing images on Cloudinary.

Image Enhancement Techniques

Adjusting the Brightness and Contrast

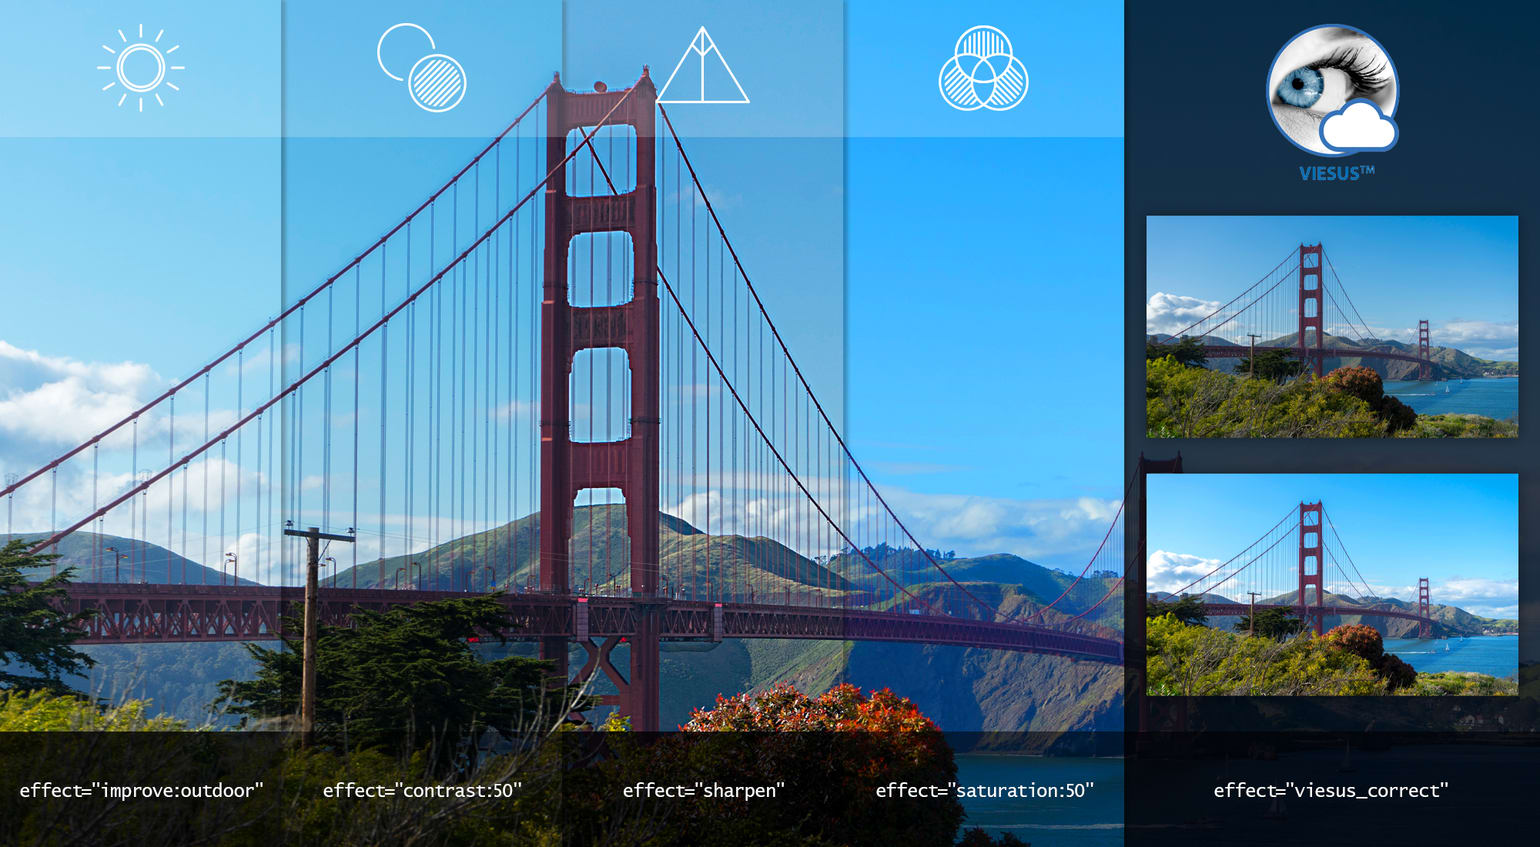
One of the image enhancement techniques you can utilize is to have Cloudinary automatically adjust the brightness and contrast of an image, set one of the following values for the effect parameter:

gamma, auto_brightness, auto_contrast, contrast, auto_color, fill_light, vibrance, and improve:outdoor.

In particular:

  • improve:outdoor enhances an image’s colors, contrast, and brightness, as in the code example below:

    <cl-image public-id="flower.jpg" >
    <cl-transformation effect="improve:outdoor">
    </cl-transformation>
    </cl-image>
  • contrast raises or reduces an image’s contrast level according to the value you specify. The default value is 0; the minimum value is -300; and the maximum value is +100.

    This code shows the syntax for a contrast value of 50:

    <cl-image public-id="wardrobe.jpg" >
    <cl-transformation effect="contrast:50">
    </cl-transformation>
    </cl-image>

Boosting the Sharpness

But of course, sharp images make a world of a difference to the audience. To sharpen an image, set the sharpen value for the effect parameter, as in this example:

<cl-image public-id="front_face.jpg" >
  <cl-transformation effect="sharpen">
  </cl-transformation>
</cl-image>

Furthermore, to specify the exact effect you desire, add one of the following values to sharpen, preceded by a colon, e.g., sharpen:blur:blur, blur_region, blur_faces, unsharp_mask, pixelate, pixelate_region, pixelate_faces, ordered_dither, noise, vignette, gradient_fade, or tilt_shift.

Set the Color Intensity

Cloudinary offers numerous color-related values for the effect parameter, including the following:

hue, red, green, blue, negate, grayscale, blackwhite, saturation, colorize, assist_colorblind, simulate_colorblind, replace_color, recolor, tint, and auto_color

Note
Try injecting your own image processing by using a custom function

As their names imply, by setting one of those effect values on an image, you can change its color intensity, correct its color imbalance, or apply colorization filters. You can also remove colors, replace them, or fix problems that pertain to colorblindness for accessibility.

This example specifies a saturation value with an intensity of 50 for an image:

<cl-image public-id="sample.jpg" >
  <cl-transformation effect="saturation:50">
  </cl-transformation>
</cl-image>

Applying Advanced Image Enhancements With Cloudinary Add-On VIESUS

With Cloudinary, you can perform numerous basic tasks geared toward beefing up your images: image cropping, resizing images without losing quality, add overlays to them, remove their background, and so forth. For more advanced tasks, tap into Cloudinary’s add-on repository for the VIESUS capabilities that automate those tasks.

All you need to do is set the effect parameter to viesus_correct, after which VIESUS would elevate the visual quality of your image to the maximum. See the examples below.

  • On the Angular Framework

    <cl-image public-id="gate.jpg" sign-url="true">
    <cl-transformation effect="viesus_correct" width="350" crop="scale">
    </cl-transformation>
    </cl-image>
  • On the Node.js Runtime Environment

    cloudinary.v2.uploader.upload("local_file.jpg", 
    { public_id: "beach", 
    eager: { effect: "viesus_correct", crop: "scale", width: 400 }}),
    function(error, result) {console.log(result, error); });

For an enlightening example, see the image below for its original version, followed by the VIESUS-enhanced version:

Ruby:
cl_image_tag("golden_gate_side.jpg", :transformation=>[
  {:gravity=>"east", :height=>0.35, :width=>0.8, :crop=>"crop"},
  {:gravity=>"north_east", :overlay=>"viesus_icon", :opacity=>40, :width=>400, :x=>10, :y=>10, :crop=>"scale"},
  {:radius=>20, :width=>600, :crop=>"scale"}
  ])
PHP:
cl_image_tag("golden_gate_side.jpg", array("transformation"=>array(
  array("gravity"=>"east", "height"=>0.35, "width"=>0.8, "crop"=>"crop"),
  array("gravity"=>"north_east", "overlay"=>"viesus_icon", "opacity"=>40, "width"=>400, "x"=>10, "y"=>10, "crop"=>"scale"),
  array("radius"=>20, "width"=>600, "crop"=>"scale")
  )))
Python:
CloudinaryImage("golden_gate_side.jpg").image(transformation=[
  {'gravity': "east", 'height': 0.35, 'width': 0.8, 'crop': "crop"},
  {'gravity': "north_east", 'overlay': "viesus_icon", 'opacity': 40, 'width': 400, 'x': 10, 'y': 10, 'crop': "scale"},
  {'radius': 20, 'width': 600, 'crop': "scale"}
  ])
Node.js:
cloudinary.image("golden_gate_side.jpg", {transformation: [
  {gravity: "east", height: "0.35", width: "0.8", crop: "crop"},
  {gravity: "north_east", overlay: "viesus_icon", opacity: 40, width: 400, x: 10, y: 10, crop: "scale"},
  {radius: 20, width: 600, crop: "scale"}
  ]})
Java:
cloudinary.url().transformation(new Transformation()
  .gravity("east").height(0.35).width(0.8).crop("crop").chain()
  .gravity("north_east").overlay(new Layer().publicId("viesus_icon")).opacity(40).width(400).x(10).y(10).crop("scale").chain()
  .radius(20).width(600).crop("scale")).imageTag("golden_gate_side.jpg");
JS:
cloudinary.imageTag('golden_gate_side.jpg', {transformation: [
  {gravity: "east", height: "0.35", width: "0.8", crop: "crop"},
  {gravity: "north_east", overlay: new cloudinary.Layer().publicId("viesus_icon"), opacity: 40, width: 400, x: 10, y: 10, crop: "scale"},
  {radius: 20, width: 600, crop: "scale"}
  ]}).toHtml();
jQuery:
$.cloudinary.image("golden_gate_side.jpg", {transformation: [
  {gravity: "east", height: "0.35", width: "0.8", crop: "crop"},
  {gravity: "north_east", overlay: new cloudinary.Layer().publicId("viesus_icon"), opacity: 40, width: 400, x: 10, y: 10, crop: "scale"},
  {radius: 20, width: 600, crop: "scale"}
  ]})
React:
<Image publicId="golden_gate_side.jpg" >
  <Transformation gravity="east" height="0.35" width="0.8" crop="crop" />
  <Transformation gravity="north_east" overlay="viesus_icon" opacity="40" width="400" x="10" y="10" crop="scale" />
  <Transformation radius="20" width="600" crop="scale" />
</Image>
Angular:
<cl-image public-id="golden_gate_side.jpg" >
  <cl-transformation gravity="east" height="0.35" width="0.8" crop="crop">
  </cl-transformation>
  <cl-transformation gravity="north_east" overlay="viesus_icon" opacity="40" width="400" x="10" y="10" crop="scale">
  </cl-transformation>
  <cl-transformation radius="20" width="600" crop="scale">
  </cl-transformation>
</cl-image>
.Net:
cloudinary.Api.UrlImgUp.Transform(new Transformation()
  .Gravity("east").Height(0.35).Width(0.8).Crop("crop").Chain()
  .Gravity("north_east").Overlay(new Layer().PublicId("viesus_icon")).Opacity(40).Width(400).X(10).Y(10).Crop("scale").Chain()
  .Radius(20).Width(600).Crop("scale")).BuildImageTag("golden_gate_side.jpg")
Android:
MediaManager.get().url().transformation(new Transformation()
  .gravity("east").height(0.35).width(0.8).crop("crop").chain()
  .gravity("north_east").overlay(new Layer().publicId("viesus_icon")).opacity(40).width(400).x(10).y(10).crop("scale").chain()
  .radius(20).width(600).crop("scale")).generate("golden_gate_side.jpg");
iOS:
imageView.cldSetImage(cloudinary.createUrl().setTransformation(CLDTransformation()
  .setGravity("east").setHeight(0.35).setWidth(0.8).setCrop("crop").chain()
  .setGravity("north_east").setOverlay("viesus_icon").setOpacity(40).setWidth(400).setX(10).setY(10).setCrop("scale").chain()
  .setRadius(20).setWidth(600).setCrop("scale")).generate("golden_gate_side.jpg")!, cloudinary: cloudinary)
Golden Gate

Ruby:
cl_image_tag("golden_gate_side.jpg", :sign_url=>true, :transformation=>[
  {:effect=>"viesus_correct", :gravity=>"east", :height=>0.35, :width=>0.8, :crop=>"crop"},
  {:gravity=>"north_east", :overlay=>"viesus_icon", :opacity=>40, :width=>400, :x=>10, :y=>10, :crop=>"scale"},
  {:radius=>20, :width=>600, :crop=>"scale"}
  ])
PHP:
cl_image_tag("golden_gate_side.jpg", array("sign_url"=>true, "transformation"=>array(
  array("effect"=>"viesus_correct", "gravity"=>"east", "height"=>0.35, "width"=>0.8, "crop"=>"crop"),
  array("gravity"=>"north_east", "overlay"=>"viesus_icon", "opacity"=>40, "width"=>400, "x"=>10, "y"=>10, "crop"=>"scale"),
  array("radius"=>20, "width"=>600, "crop"=>"scale")
  )))
Python:
CloudinaryImage("golden_gate_side.jpg").image(sign_url=True, transformation=[
  {'effect': "viesus_correct", 'gravity': "east", 'height': 0.35, 'width': 0.8, 'crop': "crop"},
  {'gravity': "north_east", 'overlay': "viesus_icon", 'opacity': 40, 'width': 400, 'x': 10, 'y': 10, 'crop': "scale"},
  {'radius': 20, 'width': 600, 'crop': "scale"}
  ])
Node.js:
cloudinary.image("golden_gate_side.jpg", {sign_url: true, transformation: [
  {effect: "viesus_correct", gravity: "east", height: "0.35", width: "0.8", crop: "crop"},
  {gravity: "north_east", overlay: "viesus_icon", opacity: 40, width: 400, x: 10, y: 10, crop: "scale"},
  {radius: 20, width: 600, crop: "scale"}
  ]})
Java:
cloudinary.url().transformation(new Transformation()
  .effect("viesus_correct").gravity("east").height(0.35).width(0.8).crop("crop").chain()
  .gravity("north_east").overlay(new Layer().publicId("viesus_icon")).opacity(40).width(400).x(10).y(10).crop("scale").chain()
  .radius(20).width(600).crop("scale")).signed(true).imageTag("golden_gate_side.jpg");
JS:
cloudinary.imageTag('golden_gate_side.jpg', {signUrl: true, transformation: [
  {effect: "viesus_correct", gravity: "east", height: "0.35", width: "0.8", crop: "crop"},
  {gravity: "north_east", overlay: new cloudinary.Layer().publicId("viesus_icon"), opacity: 40, width: 400, x: 10, y: 10, crop: "scale"},
  {radius: 20, width: 600, crop: "scale"}
  ]}).toHtml();
jQuery:
$.cloudinary.image("golden_gate_side.jpg", {transformation: [
  {effect: "viesus_correct", gravity: "east", height: "0.35", width: "0.8", crop: "crop"},
  {gravity: "north_east", overlay: new cloudinary.Layer().publicId("viesus_icon"), opacity: 40, width: 400, x: 10, y: 10, crop: "scale"},
  {radius: 20, width: 600, crop: "scale"}
  ]})
React:
<Image publicId="golden_gate_side.jpg" signUrl="true">
  <Transformation effect="viesus_correct" gravity="east" height="0.35" width="0.8" crop="crop" />
  <Transformation gravity="north_east" overlay="viesus_icon" opacity="40" width="400" x="10" y="10" crop="scale" />
  <Transformation radius="20" width="600" crop="scale" />
</Image>
Angular:
<cl-image public-id="golden_gate_side.jpg" sign-url="true">
  <cl-transformation effect="viesus_correct" gravity="east" height="0.35" width="0.8" crop="crop">
  </cl-transformation>
  <cl-transformation gravity="north_east" overlay="viesus_icon" opacity="40" width="400" x="10" y="10" crop="scale">
  </cl-transformation>
  <cl-transformation radius="20" width="600" crop="scale">
  </cl-transformation>
</cl-image>
.Net:
cloudinary.Api.UrlImgUp.Transform(new Transformation()
  .Effect("viesus_correct").Gravity("east").Height(0.35).Width(0.8).Crop("crop").Chain()
  .Gravity("north_east").Overlay(new Layer().PublicId("viesus_icon")).Opacity(40).Width(400).X(10).Y(10).Crop("scale").Chain()
  .Radius(20).Width(600).Crop("scale")).Signed(true).BuildImageTag("golden_gate_side.jpg")
Android:
MediaManager.get().url().transformation(new Transformation()
  .effect("viesus_correct").gravity("east").height(0.35).width(0.8).crop("crop").chain()
  .gravity("north_east").overlay(new Layer().publicId("viesus_icon")).opacity(40).width(400).x(10).y(10).crop("scale").chain()
  .radius(20).width(600).crop("scale")).signed(true).generate("golden_gate_side.jpg");
iOS:
imageView.cldSetImage(cloudinary.createUrl().setTransformation(CLDTransformation()
  .setEffect("viesus_correct").setGravity("east").setHeight(0.35).setWidth(0.8).setCrop("crop").chain()
  .setGravity("north_east").setOverlay("viesus_icon").setOpacity(40).setWidth(400).setX(10).setY(10).setCrop("scale").chain()
  .setRadius(20).setWidth(600).setCrop("scale")).generate("golden_gate_side.jpg", signUrl: true)!, cloudinary: cloudinary)
Golden Gate Enhanced

Image Optimization

Optimization techniques for images abound on Cloudinary. Setting them up for automation opens up endless possibilities for transformations.

Below are two examples.

Intelligent Content-Aware Encoding

A simply way of leveraging q_auto is to specify the value auto for an image’s quality parameter, like this:

<cl-image public-id="man.jpg" >
  <cl-transformation quality="auto">
  </cl-transformation>
</cl-image>

Afterwards, q_auto selects the optimal quality-compression level and encoding settings based on the content and format of the image, also the browser in which it is being displayed.

Alternatively, you can set a numerical value, e.g., 60, for the quality parameter, like this:

<cl-image public-id="train.jpg" >
  <cl-transformation quality="60">
  </cl-transformation>
</cl-image>

Here are the value choices for q_auto:

  • q_auto:best: This is the least-aggressive setting, which compresses files as much as possible without compromising their visual quality.
  • q_auto:good: This setting ensures an optimal balance between file size and visual quality, delivering relatively small files.
  • q_auto:eco: This setting delivers smaller files at the cost of a slightly lower visual quality, detectable only on close inspection.
  • q_auto:low: This is the most aggressive setting, which delivers the smallest files at the expense of lower visual quality.

Dynamic Format Selection

Once specified for the fetch-format parameter of your images, as in the following example, f_auto selects the best format for delivering them.

<cl-image public-id="beach_huts.jpg" >
  <cl-transformation width="600" crop="scale">
  </cl-transformation>
  <cl-transformation quality="auto" fetch-format="auto">
  </cl-transformation>
</cl-image>

For more details on image Optimization, see the related Cloudinary documentation.

Trying Things Out

Choices make for flexibility. Do try out the options described in this post and you’ll soon zero in on the ones that best meet your requirements. From then on, enhancing images would be a breeze.

File Upload With Angular Or AngularJS to Cloudinary

$
0
0

File Upload With Angular

Angular, now at version 8, is an open-source front-end framework that was developed by Google in 2016 and that has been adopted by software developers far and wide. Uploading Angular files to Cloudinary involves a two-part process:

  • The client side (the user interface) obtains the files to be uploaded through a form control or component.
  • The server side receives, processes, and stores the files.

To make all that happen, set up an HTML template and build an upload component in Angular. The sections below walk you through the procedures in detail.

Angular File Upload

Enabling Angular file uploads to Cloudinary takes two steps.

Step 1: Set Up an HTML Template

First, place an upload component in your app for your users by doing either of the following:

  • Specify, in HTML, the HTML5 file’s input type by adding the code below to the app.component.html file:

    <div>
    <form action="" method="post" enctype="multipart/form-data">
        <input type="file">
    </form>
    <label>Choose file</label>
    </div>
  • Install the Angular component ng2-file-upload with this NPM command:

    npm install ng2-file-upload --save
    • Afterwards, attach the upload component to your HTML markup by adding the related parameters to the app.component.html file:

      • For multiple file uploads
      `<input type="file" ng2FileSelect [uploader]="uploader" multiple  />`
      • For single file uploads
      `<input type="file" ng2FileSelect [uploader]="uploader" />`
      `<button [disabled]="loading" (click)="upload()" class="btn">Upload</button>`
      `_app.component.html_`

Step 2: Create a File-Upload Component in Angular

First, install the Cloudinary library that works for Angular 5, 6, and 7 with this NPM command:

npm install @cloudinary/angular-5.x --save

Now create an upload component in Angular by adding the code below to the src/app/app.component.ts file:

import { Component, OnInit, Input } from '@angular/core';
import { FileUploader, FileUploaderOptions, ParsedResponseHeaders } from 'ng2-file-upload';
import { Cloudinary } from '@cloudinary/angular-5.x';

@Component({
  selector: 'app-list',
  templateUrl: 'app.component.html'
})
export class ImageUploadComponent implements OnInit {

  @Input()
  responses: Array<any>;

  private hasBaseDropZoneOver: boolean = false;
  private uploader: FileUploader;
  private title: string;

  constructor(
    private cloudinary: Cloudinary,
    private zone: NgZone,
    private http: HttpClient
  ) {
    this.responses = [];
    this.title = '';
  }

  ngOnInit(): void {
    // Create the file uploader, wire it to upload to your account
    const uploaderOptions: FileUploaderOptions = {
      url: `https://api.cloudinary.com/v1_1/${this.cloudinary.config().cloud_name}/upload`,
      // Upload files automatically upon addition to upload queue
      autoUpload: true,
      // Use xhrTransport in favor of iframeTransport
      isHTML5: true,
      // Calculate progress independently for each uploaded file
      removeAfterUpload: true,
      // XHR request headers
      headers: [
        {
          name: 'X-Requested-With',
          value: 'XMLHttpRequest'
        }
      ]
    };

    this.uploader = new FileUploader(uploaderOptions);

    this.uploader.onBuildItemForm = (fileItem: any, form: FormData): any => {
      // Add Cloudinary unsigned upload preset to the upload form
      form.append('upload_preset', this.cloudinary.config().upload_preset);

      // Add file to upload
      form.append('file', fileItem);

      // Use default "withCredentials" value for CORS requests
      fileItem.withCredentials = false;
      return { fileItem, form };
    };


  fileOverBase(e: any): void {
    this.hasBaseDropZoneOver = e;
  }
}
_upload.component.ts_

Note
Replace the variable cloud_ name in the code above with your account’s cloud name as displayed in your Cloudinary Dashboard.

The ImageUpload component in the code processes the uploaded files through the ng2-file-upload component, subsequently uploading them to Cloudinary.

Remarkably, such a setup eliminates the tedious chore of developing a back-end API to receive files from the front-end and to validate and process them before storing them in Cloudinary. As soon as a user has uploaded a file, Cloudinary seamlessly handles the remaining tasks that culminate in the file being stored in the Media Library.

For the complete code of the entire process, see this comprehensive GitHub repository.

Uploading AngularJS Files

For app developers who are on AngularJS, follow the steps below to facilitate uploads of Angular JS files.

First, install the Cloudinary AngularJS SDK and the ng-file-upload library with this NPM command:

bower install ng-file-upload cloudinary_ng --save

Next, define CloudinaryProvider in your app’s configuration file with this code:

yourApp.config(['cloudinaryProvider', function (cloudinaryProvider) {
  cloudinaryProvider
      .set("cloud_name", "good")
      .set("secure", true)
      .set("upload_preset", "my_preset");
}]);

Note
Replace the variable cloud_ name with your account’s cloud name as displayed in your Cloudinary Dashboard.

Finally, attach an uploadFiles function in your app to the controller $scope with, for example, this code:

$scope.uploadFiles = function(files){
  $scope.files = files;
  angular.forEach(files, function(file){
    if (file && !file.$error) {
      file.upload = $upload.upload({
        url: "https://api.cloudinary.com/v1_1/" + cloudinary.config().cloud_name + "/upload",
        data: {
          upload_preset: cloudinary.config().upload_preset,
          context: 'image=' + $scope.title,
          file: file
        }
      }).progress(function (e) {
        file.progress = Math.round((e.loaded * 100.0) / e.total);
        file.status = "Uploading... " + file.progress + "%";
      }).success(function (data, status, headers, config) {
        $rootScope.list = $rootScope.list || [];
        data.context = {custom: {image: $scope.title}};
        file.result = data;
        $rootScope.photos.push(data);
      }).error(function (data, status, headers, config) {
        file.result = data;
      });
    }
  });
};

The $upload.upload function uploads all the files straight to Cloudinary.

Manipulate and Deliver Uploaded Angular Or AngularJS Files

Cloudinary’s Angular SDK contains several out-of-the-box components that enable you to manipulate, optimize, and deliver images in the best format. Add those components to your Angular app.

Afterwards, specify the attributes and values that you desire for the parameters for the <cl-image> component, for example:

<cl-image public-id="dog" angle="20" format="jpg">
    <cl-transformation height="150" width="150" crop="fill" effect="sepia"></cl-transformation>
    <cl-transformation overlay="text:arial_20:Angular" color="#EECCAA" gravity="south" y="20"></cl-transformation>
</cl-image>

In the above code, the value of public-id (dog) is the name of the image stored in Cloudinary.

To manipulate and transform images as you desire, simply embed the <cl-transformation> component within <cl-image>. For details of the many options available, see the related Cloudinary documentation. You’ll be amazed at the wealth of choices at your fingertips and the marvelous effects the manipulation and transformation tasks produce. Do give it a whirl!

Observations From the Digital Food and Beverage Conference 2019

$
0
0

Digital Food and Beverage

Approximately 250 attendees, mostly from the food-and-beverage sector, attended the Digital Food & Beverage 2019 conference in Austin, Texas on July 15-17. Brands abounded among the participating companies, including Kraft Heinz, Brown-Forman, Coca-Cola, Anheuser-Busch InBev, PespiCo, and Nature’s Bakery. Besides representing Cloudinary at the booth, my three teammates—Alexa, Dave, and Roseann—and I joined numerous interesting meetings and demos, sharing many enlightening conversations with the sponsors, speakers, and attendees.

Most of the sessions at the conference focused on brands, their portfolios, and the related omnichannel eCommerce strategies, which are primarily executed through digital channels: Amazon, Walmart, Walmart Grocery, Krogers, Target, Instacart. Direct to consumer (DTC) sales through eCommerce are much rarer for food and beverages than other industries, such as apparel.

Because of the importance of digital-channel sales, companies devote a significant amount of resources to promote their products through visuals, a key phrase in their parlance being how to capture a share of the “digital shelf”.

Noteworthy Trends and Directions

Well worth a recap are a few trends and directions I picked up from the conference.

The Importance of Cogent Visual Storytelling

An outstanding talk by OneSpace CEO Stephanie Leffler touched on ways on how to make merchandise on eCommerce product pages eye-catching. “Images are the new bullets,” she asserted, adding that—

  • Visuals must summarize product attributes much faster than text.
  • Companies must learn and follow their digital channels’ layout and imagery requirements.

Cloudinary’s robust capabilities in storing, manipulating, optimizing, and delivering digital media can do wonders for the second must-do above.

Direct to Store Or Direct to Consumers

Beer industry brands such as Anheuser Busch sell beer through bottlers to stores, not directly to consumers through eCommerce. However, wine vendors, such as Mondavi, Gallo, and Constellation Brands, can legally sell to both. Cloudinary would be a tremendous help for the direct-to-consumer (DTC) marketing effort.

Social-Media Platforms

Both Bazaar Voice and Infuenster were conference sponsors for social-media platforms with user-generated content (UGC). A top priority for those two companies is to establish an authentic connection and, ultimately, a community with the social-media audience. Toward that end, UGC images and videos are an important medium, optimizing which being a Cloudinary specialty.

The slides below from some of the sessions deftly summarize the benefits of social media-based communities for eCommerce.

“Engaging Engaging Customers Customer Feedback Customer Feedback “Customer Customer Journey

Trendy and Traditional Technologies

Coca-Cola’s group director of digital platforms Ellen Duncan talked about the importance of creating coherent physical and digital messages—“phygitals,” as she called them. Augmented reality (AR) is now heavily trending at Coca-Cola. Perhaps we could look forward to an AR- enhanced polar-bear commercial this holiday season?

Also, artificial intelligence (AI), a key buzz word in these days, is being leveraged in the most creative ways. A case in point is the creation of an AI-powered “guacamologist” for the Avocados From Mexico site spearheaded by the company’s head of digital marketing.

Note, however, that many companies are still using traditional, effective tools for measuring brand awareness, such as survey instruments, commonly called brand trackers. Relatedly, the panel for Buzzfeed, which owns Tasty, emphasized at the conference that top-down recipe videos and lifestyle farm-to- fork and wellness videos are extremely popular. In fact, Tasty recently partnered with McCormick in promoting through videos the latter’s spices, which became the #1 bestseller on Amazon’s Prime Day on July 15. Impressive!

Observations From My Demos

Cloudinary Demo

Altogether, I did over a dozen detailed demos at our booth by uploading to Cloudinary’s Media Library images from brand representatives who dropped by and then showcasing how to manipulate those images with upload transformations, AI tagging, and preset transformations for automated delivery to digital channels. Those capabilities impressed the crowd more than the ones that optimize images and that reduce page load-times. Why? Because brands care much more about their eCommerce product catalog reaching their digital channels in ship shape and in compliance with those channels’ requirements—Amazon’s specs differ from Walmart’s, for example—than their own sites.

My demo featured an eight-minute recipe video I’d downloaded from Martha Stewart’s site. The awesome effects of applying on-the-fly, deep-learning g_auto to automatically create vertical-optimized videos and various aspect ratios for Instagram and Facebook, or even a circle-thumbnail crop, always elicited a wow, as did content-aware cropping, subject and object, and background removal. Above all, most of the audience loved the magic and usefulness of AI-powered auto-tagging.

Below are snapshots from my demo environment:

“Online Online Store Demo “MyStyle AI for Vertical Video “Customer Content-Aware Cropping Video

For the visitors who already had an existing digital asset management (DAM) system in place, I showed them our dynamic capabilities that automatically create visual media for multiple channels, in particular Cloudinary’s APIs and their integrations, also the feature-rich Media Library. All those tools promise to intelligently complement existing DAM, product-information management (PIM), customer-relationship management (CRM), and ecommerce-cloud strategies. The appreciation from the attentive audience was very discernible.

Stray Thoughts

Finally, a few stray thoughts vis-a-vis Austin: The BBQ is good but perhaps too hyped? So many other impressive cuisines and restaurants are there, including farm-to-fork at Swift’s Attic, fried chicken and amazing wines at Max’s Wine Dive, and new-world tapas at Emmer & Rye. Also—dare I say it?—Armadillo racing is simply weird and, when done indoors in a convention, not all that cool perhaps? Gospel Brunch is a thing in Austin, and definitely something to experience during your stay. And yeah, Sixth Street is dubbed Dirty Sixth for good reason.

Not least: Great job, my dynamite teammates, Alexa, Dave, and Roseann!

Team booth

Top 10 Tips for Making Cloudinary Work Well for You

$
0
0

Top Ten Tips

Typically, with Cloudinary, you want to do two complementary things for a remarkable user experience: save bandwidth and load your site as fast as possible because the smaller the sizes of the resources, the faster your site loads. And it’s been proven time and again that the longer your site takes to load, the smaller the number of visitors who will return. No matter whether you’re a developer or content creator, you will find Cloudinary’s tools that optimize digital media (aka digital assets) simple, intuitive, and effective.

Below are 10 tips for using Cloudinary that are sure to reduce page-loading times and make your audience happy.

Tip 1: Generate Eager Transformations for Assets Before the Latter Are Requested for Access.

Whenever a transformation is requested for the first time, Cloudinary generates it on the fly. Compared to subsequent pre-generated and cached requests, that initial request always takes longer to fulfill. Plus, loading times depend on other factors, such as the original file size, the requested dimensions, and the applied effects. In light of all that, why not generate eager transformations ahead of time? Do that in either of these two ways:

  • In the Media Library with upload presets. Here, you specify the desired eager transformations in the upload call. A good practice is to turn on Eager Async to have the transformations occur in the background instead of as part of the upload call itself.

Eager Transformation
  • In the upload API. Here, you generate eager transformations with the upload method and, in the case of pre-existing resources, the explicit method. See this example:
Ruby:
Cloudinary::Uploader.upload("sample.jpg",
  :eager => [
    {:width => 400, :height => 300, :crop => :pad}, 
    {:width => 260, :height => 200, :crop => :crop, :gravity => :north}])
PHP:
\Cloudinary\Uploader::upload("sample.jpg", array( 
  "eager" => array(
    array("width" => 400, "height" => 300, "crop" => "pad"),
    array("width" => 260, "height" => 200, "crop" => "crop", "gravity" => "north"))));
Python:
cloudinary.uploader.upload("sample.jpg", 
  eager = [
    {"width": 400, "height": 300, "crop": "pad"},
    {"width": 260, "height": 200, "crop": "crop", "gravity": "north"}])
Node.js:
cloudinary.v2.uploader.upload("sample.jpg", 
  { eager: [
    { width: 400, height: 300, crop: "pad" }, 
    { width: 260, height: 200, crop: "crop", gravity: "north"} ]}, 
  function(error, result) {console.log(result, error); });
Java:
cloudinary.uploader().upload("sample.jpg", 
  ObjectUtils.asMap(
    "eager", Arrays.asList(
      new Transformation().width(400).height(300).crop("pad"),
      new Transformation().width(260).height(200).crop("crop").gravity("north"))));

|net
var uploadParams = new ImageUploadParams(){
  File = new FileDescription(@"sample.jpg"),
  EagerTransforms = new List<Transformation>(){
   new Transformation().Width(400).Height(300).Crop("pad"),
   new Transformation().Width(260).Height(200).Crop("crop").Gravity("north")}};
var uploadResult = cloudinary.Upload(uploadParams);

Tip 2: Deliver Assets at the Desired Size.

At times, developers load original images on to a page and then resize on the client side with CSS. You want to avoid this because not only would you increase the page-loading time by loading larger assets, but you’d also waste your and your users’ bandwidth. Besides, you might lose the images’ main focus with CSS resizing.

Instead, generate using Cloudinary img or video tags in HTML with the desired dimensions and then embed the transformed images or videos in your site with a simple call to the cl_image_tag or cl_video_tag methods.

For example, calling

cl_image_tag(“sample.jpg”, :width=>300, :height=>100, :crop=>”scale”)

results in this HTML code

<img src=”https://res.cloudinary.com/demo/image/upload/w_300,h_100,c_scale/sample.jpg”>
Ruby:
cl_image_tag("sample.jpg", :width=>300, :height=>100, :crop=>"scale")
PHP:
cl_image_tag("sample.jpg", array("width"=>300, "height"=>100, "crop"=>"scale"))
Python:
CloudinaryImage("sample.jpg").image(width=300, height=100, crop="scale")
Node.js:
cloudinary.image("sample.jpg", {width: 300, height: 100, crop: "scale"})
Java:
cloudinary.url().transformation(new Transformation().width(300).height(100).crop("scale")).imageTag("sample.jpg");
JS:
cloudinary.imageTag('sample.jpg', {width: 300, height: 100, crop: "scale"}).toHtml();
jQuery:
$.cloudinary.image("sample.jpg", {width: 300, height: 100, crop: "scale"})
React:
<Image publicId="sample.jpg" >
  <Transformation width="300" height="100" crop="scale" />
</Image>

|vuejs
<cld-image publicId="sample.jpg" >
  <cld-transformation width="300" height="100" crop="scale" />
</cld-image>
Angular:
<cl-image public-id="sample.jpg" >
  <cl-transformation width="300" height="100" crop="scale">
  </cl-transformation>
</cl-image>

|net
cloudinary.Api.UrlImgUp.Transform(new Transformation().Width(300).Height(100).Crop("scale")).BuildImageTag("sample.jpg")
Android:
MediaManager.get().url().transformation(new Transformation().width(300).height(100).crop("scale")).generate("sample.jpg");

|ios
imageView.cldSetImage(cloudinary.createUrl().setTransformation(CLDTransformation().setWidth(300).setHeight(100).setCrop("scale")).generate("sample.jpg")!, cloudinary: cloudinary)

Tip 3: Apply f_auto to Automatically Deliver Images in the Optimal Format.

The requirements for optimal display of images vary, depending on the browser. For example, you could potentially deliver a further compressed image by delivering the WebP version instead of a JPG when rendering it on Chrome. Fulfilling that requirement is a breeze with Cloudinary, which detects what browser is requesting the image, automatically converting the image to the optimal format or delivering it as-is if no format optimizations are required.

For example, to apply f_auto to your image, it’s this simple:

Ruby:
cl_image_tag("sample.jpg", :width=>500, :fetch_format=>:auto, :crop=>"scale")
PHP:
cl_image_tag("sample.jpg", array("width"=>500, "fetch_format"=>"auto", "crop"=>"scale"))
Python:
CloudinaryImage("sample.jpg").image(width=500, fetch_format="auto", crop="scale")
Node.js:
cloudinary.image("sample.jpg", {width: 500, fetch_format: "auto", crop: "scale"})
Java:
cloudinary.url().transformation(new Transformation().width(500).fetchFormat("auto").crop("scale")).imageTag("sample.jpg");
JS:
cloudinary.imageTag('sample.jpg', {width: 500, fetchFormat: "auto", crop: "scale"}).toHtml();
jQuery:
$.cloudinary.image("sample.jpg", {width: 500, fetch_format: "auto", crop: "scale"})
React:
<Image publicId="sample.jpg" >
  <Transformation width="500" fetchFormat="auto" crop="scale" />
</Image>
Angular:
<cl-image public-id="sample.jpg" >
  <cl-transformation width="500" fetch-format="auto" crop="scale">
  </cl-transformation>
</cl-image>
.Net:
cloudinary.Api.UrlImgUp.Transform(new Transformation().Width(500).FetchFormat("auto").Crop("scale")).BuildImageTag("sample.jpg")
Android:
MediaManager.get().url().transformation(new Transformation().width(500).fetchFormat("auto").crop("scale")).generate("sample.jpg");
iOS:
imageView.cldSetImage(cloudinary.createUrl().setTransformation(CLDTransformation().setWidth(500).setFetchFormat("auto").setCrop("scale")).generate("sample.jpg")!, cloudinary: cloudinary)

Tip 4: Apply q_auto to Automatically Deliver Images at the Optimal File Size and Visual Quality.

With q_auto applied to your images, Cloudinary automatically analyzes them, ultimately delivering a version with the optimal quality and file compression level as well as encoding settings—with no detectable changes in visible quality.

Here’s an example of an image URL with q_auto applied:

Ruby:
cl_image_tag("sofa_cat.jpg", :quality=>"auto")
PHP:
cl_image_tag("sofa_cat.jpg", array("quality"=>"auto"))
Python:
CloudinaryImage("sofa_cat.jpg").image(quality="auto")
Node.js:
cloudinary.image("sofa_cat.jpg", {quality: "auto"})
Java:
cloudinary.url().transformation(new Transformation().quality("auto")).imageTag("sofa_cat.jpg");
JS:
cloudinary.imageTag('sofa_cat.jpg', {quality: "auto"}).toHtml();
jQuery:
$.cloudinary.image("sofa_cat.jpg", {quality: "auto"})
React:
<Image publicId="sofa_cat.jpg" >
  <Transformation quality="auto" />
</Image>
Angular:
<cl-image public-id="sofa_cat.jpg" >
  <cl-transformation quality="auto">
  </cl-transformation>
</cl-image>
.Net:
cloudinary.Api.UrlImgUp.Transform(new Transformation().Quality("auto")).BuildImageTag("sofa_cat.jpg")
Android:
MediaManager.get().url().transformation(new Transformation().quality("auto")).generate("sofa_cat.jpg");
iOS:
imageView.cldSetImage(cloudinary.createUrl().setTransformation(CLDTransformation().setQuality("auto")).generate("sofa_cat.jpg")!, cloudinary: cloudinary)
Original Original - 1.49 MB Original q_auto - 929.63 KB

Tip 5: Apply Transformations to Images for Optimization.

When applying any transformations to your images, Cloudinary further optimizes them by performing the pertinent tasks, such as metadata stripping and more. No manual effort is required.

You can specify auto for the format and quality transformations, in which case Cloudinary applies the optimum algorithms. Alternatively, specify a quality level; the default is 80. The user interface can’t be more straightforward:.

Default Image Quality

Tip 6: Crop Images by Leveraging Cloudinary’s AI-Based Smart-Cropping Capability.

With Cloudinary’s smart-cropping capability, available with the Object-Aware Cropping add-on, you can pick from a list of supported categories and objects what to focus on in your image, optionally applying transformations afterwards. You can specify an object (such as handbag, cake, motorbike) or an object category (such as electronic, appliance, sports) to set as the focal point of the image.

Here you can see the difference between our g_auto:classic and new g_auto:bicycle:

Original Original Original g_auto:classic Original g_auto:bicycle

Tip 7: Generate Low Quality Image Placeholders for Lazy Loading of Images.

Viewing high-quality images often requires longer page loading times, which can cause users to shy away from. To alleviate that scenario, when lazy-loading images, save bandwidth and loading time by using Cloudinary to generate Low Quality Image Placeholders (LQIP). This way you won’t load your high-quality images unless they’re coming into the viewport.

Below are two examples:

A low-quality, blurry image, about 1 KB in size. The original size is 486.91 KB.

Ruby:
cl_image_tag("string_1.jpg", :transformation=>[
  {:width=>640, :crop=>"scale"},
  {:effect=>"blur:1000", :quality=>1},
  {:effect=>"grayscale"}
  ])
PHP:
cl_image_tag("string_1.jpg", array("transformation"=>array(
  array("width"=>640, "crop"=>"scale"),
  array("effect"=>"blur:1000", "quality"=>1),
  array("effect"=>"grayscale")
  )))
Python:
CloudinaryImage("string_1.jpg").image(transformation=[
  {'width': 640, 'crop': "scale"},
  {'effect': "blur:1000", 'quality': 1},
  {'effect': "grayscale"}
  ])
Node.js:
cloudinary.image("string_1.jpg", {transformation: [
  {width: 640, crop: "scale"},
  {effect: "blur:1000", quality: 1},
  {effect: "grayscale"}
  ]})
Java:
cloudinary.url().transformation(new Transformation()
  .width(640).crop("scale").chain()
  .effect("blur:1000").quality(1).chain()
  .effect("grayscale")).imageTag("string_1.jpg");
JS:
cloudinary.imageTag('string_1.jpg', {transformation: [
  {width: 640, crop: "scale"},
  {effect: "blur:1000", quality: 1},
  {effect: "grayscale"}
  ]}).toHtml();
jQuery:
$.cloudinary.image("string_1.jpg", {transformation: [
  {width: 640, crop: "scale"},
  {effect: "blur:1000", quality: 1},
  {effect: "grayscale"}
  ]})
React:
<Image publicId="string_1.jpg" >
  <Transformation width="640" crop="scale" />
  <Transformation effect="blur:1000" quality="1" />
  <Transformation effect="grayscale" />
</Image>
Angular:
<cl-image public-id="string_1.jpg" >
  <cl-transformation width="640" crop="scale">
  </cl-transformation>
  <cl-transformation effect="blur:1000" quality="1">
  </cl-transformation>
  <cl-transformation effect="grayscale">
  </cl-transformation>
</cl-image>
.Net:
cloudinary.Api.UrlImgUp.Transform(new Transformation()
  .Width(640).Crop("scale").Chain()
  .Effect("blur:1000").Quality(1).Chain()
  .Effect("grayscale")).BuildImageTag("string_1.jpg")
Android:
MediaManager.get().url().transformation(new Transformation()
  .width(640).crop("scale").chain()
  .effect("blur:1000").quality(1).chain()
  .effect("grayscale")).generate("string_1.jpg");
iOS:
imageView.cldSetImage(cloudinary.createUrl().setTransformation(CLDTransformation()
  .setWidth(640).setCrop("scale").chain()
  .setEffect("blur:1000").setQuality(1).chain()
  .setEffect("grayscale")).generate("string_1.jpg")!, cloudinary: cloudinary)
LQIP

An SVG placeholder using our e_vectorize feature, about 1 KB in size. The original size is 397.33 KB.

Ruby:
cl_image_tag("docs/lion.svg", :effect=>"vectorize:colors:2:detail:0.02:paths:0")
PHP:
cl_image_tag("docs/lion.svg", array("effect"=>"vectorize:colors:2:detail:0.02:paths:0"))
Python:
CloudinaryImage("docs/lion.svg").image(effect="vectorize:colors:2:detail:0.02:paths:0")
Node.js:
cloudinary.image("docs/lion.svg", {effect: "vectorize:colors:2:detail:0.02:paths:0"})
Java:
cloudinary.url().transformation(new Transformation().effect("vectorize:colors:2:detail:0.02:paths:0")).imageTag("docs/lion.svg");
JS:
cloudinary.imageTag('docs/lion.svg', {effect: "vectorize:colors:2:detail:0.02:paths:0"}).toHtml();
jQuery:
$.cloudinary.image("docs/lion.svg", {effect: "vectorize:colors:2:detail:0.02:paths:0"})
React:
<Image publicId="docs/lion.svg" >
  <Transformation effect="vectorize:colors:2:detail:0.02:paths:0" />
</Image>
Angular:
<cl-image public-id="docs/lion.svg" >
  <cl-transformation effect="vectorize:colors:2:detail:0.02:paths:0">
  </cl-transformation>
</cl-image>
.Net:
cloudinary.Api.UrlImgUp.Transform(new Transformation().Effect("vectorize:colors:2:detail:0.02:paths:0")).BuildImageTag("docs/lion.svg")
Android:
MediaManager.get().url().transformation(new Transformation().effect("vectorize:colors:2:detail:0.02:paths:0")).generate("docs/lion.svg");
iOS:
imageView.cldSetImage(cloudinary.createUrl().setTransformation(CLDTransformation().setEffect("vectorize:colors:2:detail:0.02:paths:0")).generate("docs/lion.svg")!, cloudinary: cloudinary)
LQIP

Tip 8: Utilize SEO-Friendly URLs As Support and a Potential Boost for Page Ranking.

To make it easier for search engines to index and rank your site, ensure that your image URLs having meaningful public IDs. An example being the following image which uses the public ID “basketball_shot” to give an accurate depiction of what the image is, thus making it easier to index. You can also shorten the path of the image by deleting the default image/upload portion of the URL as so:

Ruby:
cl_image_tag("basketball_shot.jpg", :use_root_path=>true)
PHP:
cl_image_tag("basketball_shot.jpg", array("use_root_path"=>true))
Python:
CloudinaryImage("basketball_shot.jpg").image(use_root_path=True)
Node.js:
cloudinary.image("basketball_shot.jpg", {use_root_path: true})
Java:
cloudinary.url().useRootPath(true).imageTag("basketball_shot.jpg");
JS:
cloudinary.imageTag('basketball_shot.jpg', {useRootPath: true}).toHtml();
jQuery:
$.cloudinary.image("basketball_shot.jpg", {use_root_path: true})
React:
<Image publicId="basketball_shot.jpg" useRootPath="true">

</Image>
Angular:
<cl-image public-id="basketball_shot.jpg" use-root-path="true">

</cl-image>
.Net:
cloudinary.Api.UrlImgUp.UseRootPath(true).BuildImageTag("basketball_shot.jpg")
Android:
MediaManager.get().url().useRootPath(true).generate("basketball_shot.jpg");
iOS:
imageView.cldSetImage(cloudinary.createUrl().setUseRootPath( true).generate("basketball_shot.jpg")!, cloudinary: cloudinary)

Alternatively, if you use non-descriptive public IDs, replace image/upload with images to utilize Cloudinary’s dynamic SEO suffixes that allow for multiple descriptions. In the examples below, both images have the public ID “ltepu4mm0qzw6lkfxt1m” but are still able to describe the image in two different languages allowing for further indexing:

Image with a dynamic SEO suffix

Ruby:
cl_image_tag("ltepu4mm0qzw6lkfxt1m.jpg", :url_suffix=>"basketball-game-in-college")
PHP:
cl_image_tag("ltepu4mm0qzw6lkfxt1m.jpg", array("url_suffix"=>"basketball-game-in-college"))
Python:
CloudinaryImage("ltepu4mm0qzw6lkfxt1m.jpg").image(url_suffix="basketball-game-in-college")
Node.js:
cloudinary.image("ltepu4mm0qzw6lkfxt1m.jpg", {url_suffix: "basketball-game-in-college"})
Java:
cloudinary.url().suffix("basketball-game-in-college").imageTag("ltepu4mm0qzw6lkfxt1m.jpg");
JS:
cloudinary.imageTag('ltepu4mm0qzw6lkfxt1m.jpg', {urlSuffix: "basketball-game-in-college"}).toHtml();
jQuery:
$.cloudinary.image("ltepu4mm0qzw6lkfxt1m.jpg", {url_suffix: "basketball-game-in-college"})
React:
<Image publicId="ltepu4mm0qzw6lkfxt1m.jpg" urlSuffix="basketball-game-in-college">

</Image>
Angular:
<cl-image public-id="ltepu4mm0qzw6lkfxt1m.jpg" url-suffix="basketball-game-in-college">

</cl-image>
.Net:
cloudinary.Api.UrlImgUp.Suffix("basketball-game-in-college").BuildImageTag("ltepu4mm0qzw6lkfxt1m.jpg")
Android:
MediaManager.get().url().suffix("basketball-game-in-college").generate("ltepu4mm0qzw6lkfxt1m.jpg");
iOS:
imageView.cldSetImage(cloudinary.createUrl().setSuffix( "basketball-game-in-college").generate("ltepu4mm0qzw6lkfxt1m.jpg")!, cloudinary: cloudinary)
Image with a dynamic SEO suffix

Image with a dynamic SEO suffix in Spanish

Ruby:
cl_image_tag("ltepu4mm0qzw6lkfxt1m.jpg", :url_suffix=>"baloncesto-juego-en-universidad")
PHP:
cl_image_tag("ltepu4mm0qzw6lkfxt1m.jpg", array("url_suffix"=>"baloncesto-juego-en-universidad"))
Python:
CloudinaryImage("ltepu4mm0qzw6lkfxt1m.jpg").image(url_suffix="baloncesto-juego-en-universidad")
Node.js:
cloudinary.image("ltepu4mm0qzw6lkfxt1m.jpg", {url_suffix: "baloncesto-juego-en-universidad"})
Java:
cloudinary.url().suffix("baloncesto-juego-en-universidad").imageTag("ltepu4mm0qzw6lkfxt1m.jpg");
JS:
cloudinary.imageTag('ltepu4mm0qzw6lkfxt1m.jpg', {urlSuffix: "baloncesto-juego-en-universidad"}).toHtml();
jQuery:
$.cloudinary.image("ltepu4mm0qzw6lkfxt1m.jpg", {url_suffix: "baloncesto-juego-en-universidad"})
React:
<Image publicId="ltepu4mm0qzw6lkfxt1m.jpg" urlSuffix="baloncesto-juego-en-universidad">

</Image>
Angular:
<cl-image public-id="ltepu4mm0qzw6lkfxt1m.jpg" url-suffix="baloncesto-juego-en-universidad">

</cl-image>
.Net:
cloudinary.Api.UrlImgUp.Suffix("baloncesto-juego-en-universidad").BuildImageTag("ltepu4mm0qzw6lkfxt1m.jpg")
Android:
MediaManager.get().url().suffix("baloncesto-juego-en-universidad").generate("ltepu4mm0qzw6lkfxt1m.jpg");
iOS:
imageView.cldSetImage(cloudinary.createUrl().setSuffix( "baloncesto-juego-en-universidad").generate("ltepu4mm0qzw6lkfxt1m.jpg")!, cloudinary: cloudinary)

Furthermore, if you’d like your images to be delivered under your company’s domain, you can set up a CNAME, such as cdn.example.com. Please note that CNAMEs are available on the Advanced plan and up.

Tip 9: Adopt Adaptive Bitrate Streaming to Automate Adjustment of Video Quality in Real Time.

Cloudinary’s Adaptive Bitrate Streaming (ABS) capability adjusts video quality in real time to deliver the best-possible quality for the current viewing device and network connection. You can then—

  • Eliminate buffering time.
  • Save bandwidth by displaying a lower-resolution video to keep the audience engaged if the network connection is too weak to display the high-resolution version.

As an example, the following code eagerly and asynchronously generates the video “big_buck_bunny.mp4” in HLS format, one of the two supported adaptive streaming formats, using the “full_hd” streaming profile.

Ruby:
Cloudinary::Uploader.upload("big_buck_bunny.mp4", :resource_type => :video, 
          :eager => [{:streaming_profile => "full_hd", :format => "m3u8"}], 
          :eager_async => true,
          :eager_notification_url => "https://mysite.example.com/notify_endpoint",
          :public_id => "bb_bunny")
PHP:
\Cloudinary\Uploader::upload("big_buck_bunny.mp4", array(
            "resource_type" => "video", 
            "eager" => array("streaming_profile" => "full_hd", "format" => "m3u8"),
            "eager_async" => true,
            "eager_notification_url" => "https://mysite.example.com/notify_endpoint"
            "public_id" => "bb_bunny"
            );
Python:
cloudinary.uploader.upload("big_buck_bunny.mp4", resource_type = "video",
            eager = [
              {"streaming_profile": "full_hd", "format": "m3u8"}]
            eager_async = true,
            eager_notification_url = "https://mysite.example.com/notify_endpoint")
            public_id = "bb_bunny")
Node.js:
var up_options = 
   {resource_type: "video", 
    eager: [
      { streaming_profile: "full_hd", format: "m3u8" }],                                   
    eager_async: true,
    eager_notification_url: "https://mysite.example.com/notify_endpoint",
    public_id: "bb_bunny"};
cloudinary.v2.uploader.upload("big_buck_bunny.mp4", up_options, function(result) {console.log(result); };
Java:
cloudinary.uploader().upload("big_buck_bunny.mp4", 
        ObjectUtils.asMap("resource_type", "video",
        "eager", Arrays.asList(
              new Transformation().streamingProfile("full_hd").format("m3u8"),
            "eager_async", true,
            "eager_notification_url", "https://mysite.example.com/notify_endpoint"
            "public_id", "bb_bunny"));

Note that you want to deliver the video using the corresponding file format, such as .m3u8 (HLS) here, and include the streaming profile (sp_) and other transformations exactly matching what you generated in your eager transformation. You also want to make sure that you’re playing the video in a video player which supports HLS, such as the Cloudinary Video Player, as not all browsers inherently support it.

Tip 10: Set up Cloudinary Breakpoints for the Appropriate Image Size and Resolution According to the Viewing Device.

By using Cloudinary’s breakpoints you can utilize responsive viewing by generating a defined number of images to match the image width and DPR of each device requesting your images. The closest sized image will then be delivered to each device based on the viewing width detected for that device. You can do this by defining the number of steps in bytes to take per image, the maximum and minimum widths for your images, and the maximum number of images to be generated, as in this example:

Ruby:
Cloudinary::Uploader.upload("dog.jpg",
            :responsive_breakpoints => 
            {:create_derived => true, :bytes_step => 20000, 
             :min_width => 200, :max_width => 1000,
             :max_images => 20},
             :public_id => "dog")
PHP:
\Cloudinary\Uploader::upload("dog.jpg", array( 
            "responsive_breakpoints" => array(
              array("create_derived" => "true", "bytes_step" => 20000,
                  "min_width" => 200, "max_width" => 1000,
                  "max_images" => 20)), 
              "public_id" => "dog"));
Python:
cloudinary.uploader.upload("dog.jpg", 
            responsive_breakpoints = [
              {"create_derived": "true", "bytes_step": 20000,
                  "min_width": 200,
                  "max_width": 1000, "max_images": 20}],
            public_id = "dog")
Node.js:
cloudinary.v2.uploader.upload("dog.jpg", 
        { responsive_breakpoints: [{
          create_derived: true, bytes_step: 20000,
          min_width: 200, max_width: 1000,
          max_images: 20}], public_id: "dog"}, 
        function(error, result) {console.log(result); });
Java:
cloudinary.uploader().upload("dog.jpg", 
        ObjectUtils.asMap(
        "responsive_breakpoints", 
          new ResponsiveBreakpoint().createDerived("true").bytesStep(20000).minWidth(200).maxWidth(1000).maxImages(20), 
        "public_id", "dog"));

This code generates at most 20 images starting at the minimum width of 200, increasing the size by the specified 20000 bytes per image with the max width of the largest image being no larger than the specified 1000 max width.

Additionally, Cloudinary’s responsive breakpoint generator creates an HTML5 img, which you can copy paste into your code to easily embed in your site. The srcset attribute of the img tag is set to list the image versions and width values according to the selected breakpoints. See this example of the generated img tag matching the calculated images:

Original aspect ratio

Cloudinary delivers as advertised. Do familiarize yourself with the above tips; you’ll marvel at the impressive results.

Additional Resources


Avoiding Pitfalls While Strategizing Promotion of Technology Adoption From the Outside In

$
0
0

DevRel

Part 1 of this series describes the importance of engendering support from external developers to ensure success of innovative technologies. Part 2 delineates what energizes and inspires developers. Here in part 3, I’ll elaborate on two common mistakes that technology enterprises make when planning strategies for winning over outside developers along with suggestions on how to get prepared.

Eschewing the Major Pitfalls

With no exception, understanding of an idea precedes having it resonate with the target audience. Specifically, to convince someone to use something new, you must first demonstrate that either it would work well with the other components of the process in question or the benefits are so remarkable that they are well worth the disruption and climb of the learning curve.

Close the Language Gap

George Bernard Shaw once said, “The single biggest problem in communication is the illusion that it has taken place.” All too often, as engineers work long and hard to build products and services, the background and nuances are transparent and well understood only internally among the team members, not by the outside world. That’s no surprise because, over time, organizations tend to gravitate toward creating their own unique lingo and jargon, complete with code names.

Before releasing a new technology, be sure to invest the time and expertise to produce a clear, well-organized, and well-formatted presentation of the related background and other important aspects, articulated in intuitive and simple language. That is, communicate with verbiage that promises to be well understood by the target audience who’ll adopt the new technology.

Ditch the Cool Factor

Right off the bat, the folks you’d like to rally are interested in what issues your new technology is addressing for them, not how cool it is. Often analogous to fluff, coolness is easily forgettable, let alone superseded sooner or later by the next cool thing.

The next question your audience would ask is how well the technology interacts with other software components. Forging a mental connection with your potential developer champions is paramount and you usually have only a narrow window of time in which to do so.

Understanding the Practical Side of Feature Marketing

New technologies and products need validation, which requires concrete examples and demos that showcase benefits to which developers can relate and which could trigger a desire to dig deeper into the nuances. Take as an example optical character recognition (OCR), which extracts text through an examination of an image. Two use cases would immediately strike a chord:

  • Vision-impaired people stand to benefit, especially if OCR is integrated with a text-to-speech conversion capability.

  • When applied to traffic cameras, OCR can read license plates, which can then be compared against a database of stolen vehicles for alerts in case of matches.

So, the first and foremost task for promoting innovative technologies is to put together use cases for specific types of audience, such as companies whose attention and support you would like to attract. Once they like and care about what you’re spearheading, adoption is the next logical step.

In particular, build a use case that cogently and clearly manifests that—

  • Your technology is integral to the food chain, seamlessly fitting in there and well integrated with other well-established components. The more you can ease the pain and challenges of integration, the more likely developers would want to try out your technology.

A good tip would be to band together with the early adopters in an extensive research effort to find out if other technologies work well with yours and to conduct tests in various environments. Closely monitor the progress and document the results.
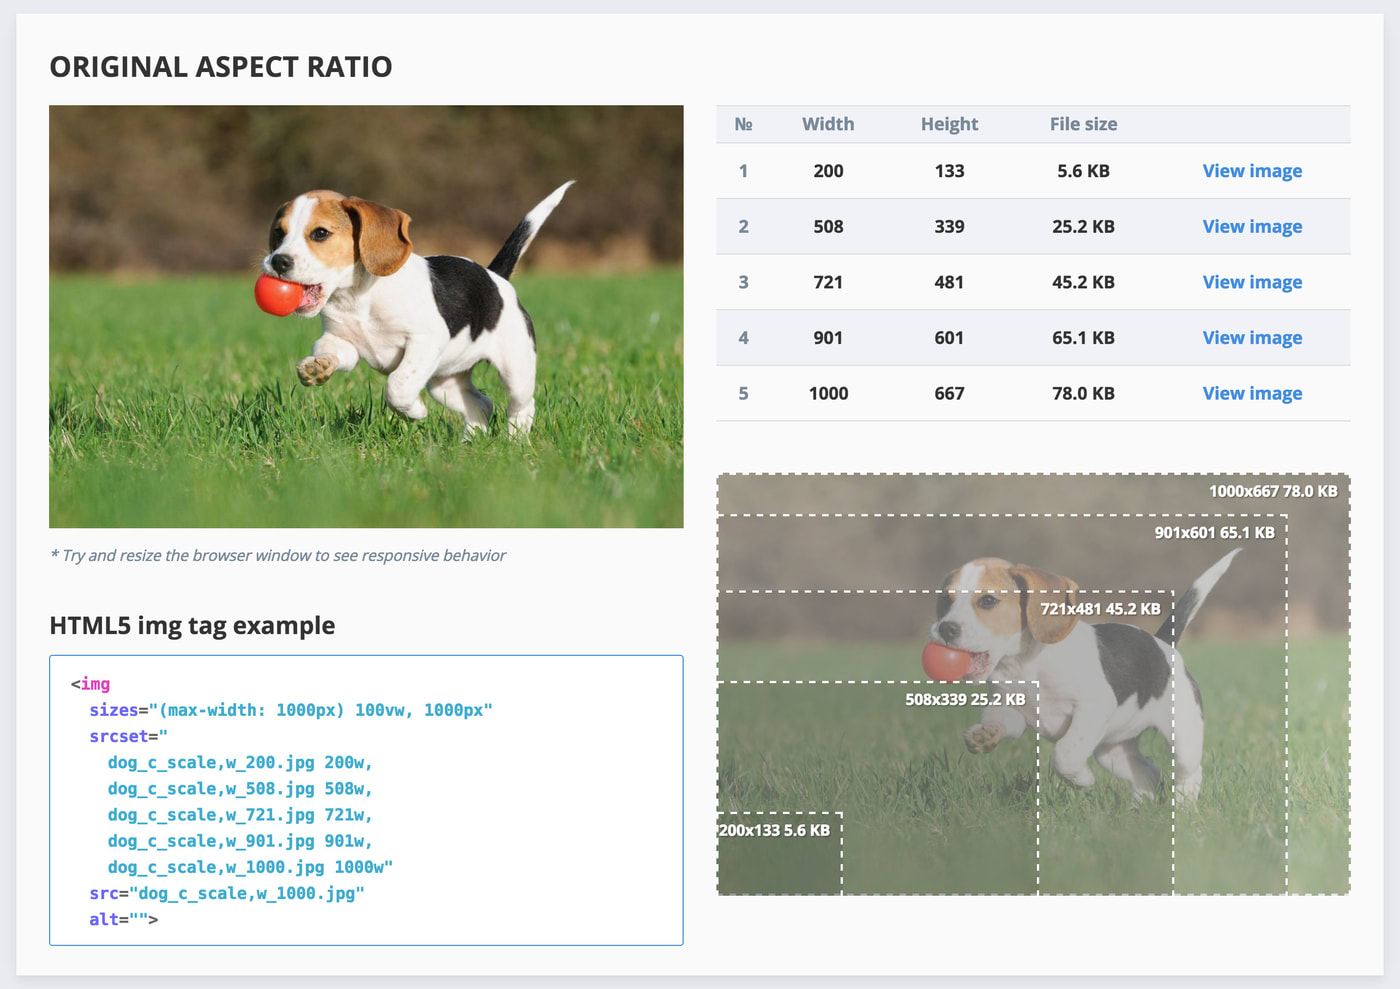
In all cases, be vigilant, congenial, responsive, and proactive. Recognize and reward your collaborators, who might end up being long-time champions for your products and services.

  • Your technology stands out as an exceptional solution for at least one of the important problems. In their day-to-day work, developers typically use a host of products and services: APIs, IDEs, frameworks, platforms. Does your technology stack well against those tools, warranting interest and a prudent evaluation? The answer had better be a resounding yes.

Absent those assurances, you’d be working in isolation, an all-too-common recipe for failure.

Moving On

Once the groundwork described above is in place, you can start recruiting advocates, some of whom might even become mentors for your own developers in the long run. In the next post, I’ll recommend ways to do that and to incentivize your champions. The sky's the limit for the technology arena, promising stupendous tools, gratifying monetary rewards, and long-lasting camaraderie.

Automate Your Media Assets’ Workflow With Machine Learning

$
0
0

Automate Your Workflow with Machine Learning

Automating the organization of your website’s media assets (images and videos) saves time and money, boosting the usefulness and lengthening the life span of those assets. Cloudinary’s artificial intelligence (AI) driven automatic tagging, transcription, and moderation capabilities ably and efficiently handle that automation for you—at scale.
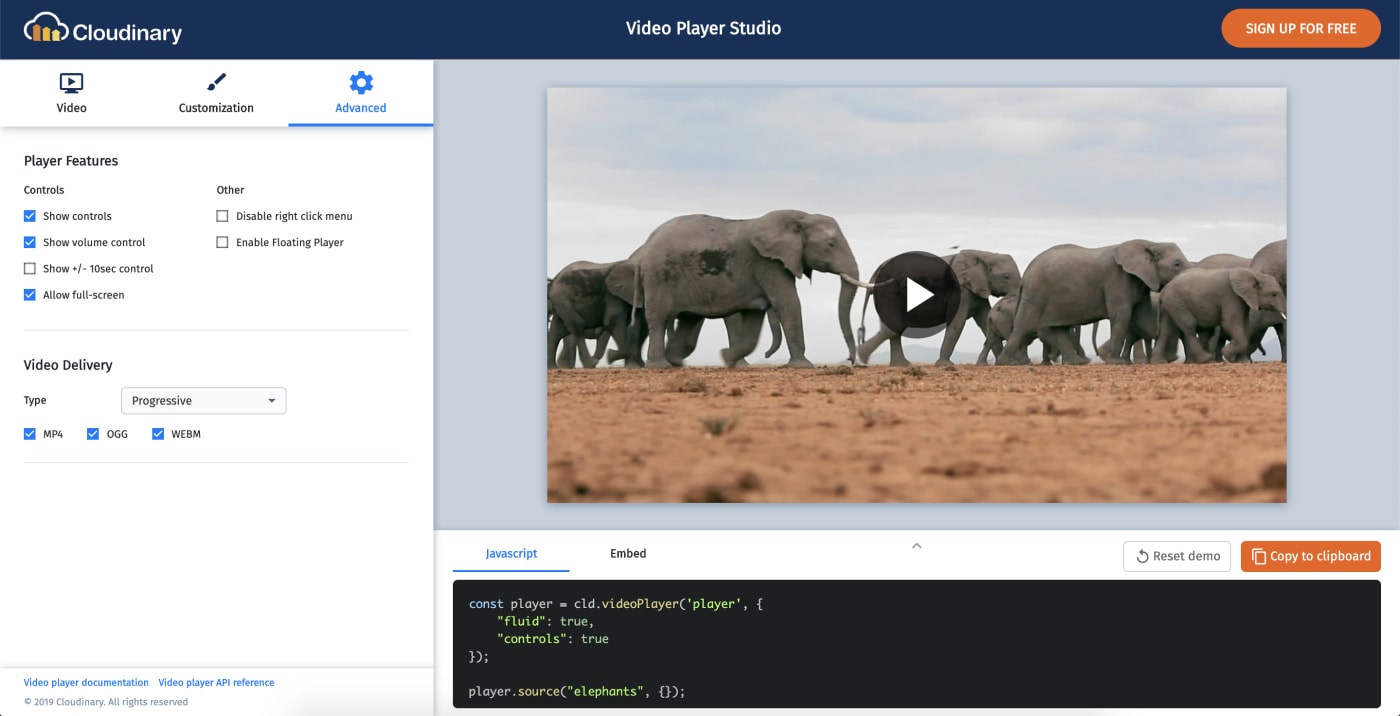
A Typical Enterprise Scenario and the Related Challenges

Picture this: you are the CEO of a large international company in the travel sector, on par with Expedia, Trivago, Priceline, Airbnb, and such. On your content-creation team are many contributors of dynamite media assets. Some of those assets are generated internally by your creative team; the others, externally by partners and site visitors who leave reviews on their vacation spots. Your worldwide audiences speak many different languages. And, as a key promotional strategy, your marketing team regularly spotlights interviews of and contributions from customers and partners online.

That scenario brings forth numerous content-related issues, three of which stand out as being the most challenging:

  • Organization. The sheer volume of content that pours in around the clock calls for timely and expert reviews, let alone meticulous organization that complies with your site template and design.
  • Localization. Translating the related text to accommodate your multinational audience is paramount. Also, ensuring accuracy of the translation is a tough nut to crack.
  • Moderation of reviews. As your company grows, manual reviews of all incoming content becomes labor-intensive and impracticable. How do you moderate it all?

AI and machine learning can perform these three tasks to help automate the day-to-day workflow of your media assets and solve the above challenges:

  1. Auto-tag media assets for ready retrieval and reuse.
  2. Localize the assets’ content.
  3. Deliver an engaging, well-moderated experience to your audience.

The Solutions

For each of the three problems, supplement your workflow tasks with AI, eliminating at least part of the manual load.

For Problem #1: Organization

Content that is logically and seamlessly organized means that it’s at your fingertips, eminently searchable and reusable. To make that happen, tag the content.

By taking advantage of Cloudinary’s auto-tagging add-on solutions, such as Amazon Rekognition or Google Vision for images; and Microsoft Azure or Google Automatic Video Tagging for videos, you can generate AI-driven analyses as reference for tagging and organizing your content. Subsequently, search and retrieval of content according to the tags is a breeze. Furthermore, you can redirect your audience to similar content and suggest that your marketing team retrieve and spotlight content with, for example, the keyword “fun” or “beach.” The horizon opened up by meticulous organization as a result of intelligent tagging is endless.

For Problem #2: Localization

Localization is a paramount issue, solving which would ensure that your digital media is usable by a worldwide audience.

Cloudinary’s video transcription tools automatically transcribe videos and place them in your Media Library on Cloudinary. Afterwards, you can edit the transcriptions for accuracy, translate them, and save them back into the Media Library, ready for use.

Plus, you can add subtitles to localize your media for your various global audiences, further customizing them to fit your brand and website.

It also makes sense to capitalize on the usefulness of tags for localization. You can translate tags by means of the Google Translation add-on in conjunction with any of the auto-tagging mechanisms to localize search and make available the search results to your global teams. The process is simple, intuitive, and fast.

For Problem #3: Moderation

Before tackling moderation, first identify your goal for the task.

Typically, you would want to eliminate adult content, which you can easily do with Cloudinary’s moderation tools. You should also moderate for high visual quality and on-brand assets so that your site is appealing, crisp, and free of superfluous content.

To accomplish that, you have two choices:

  • Authorize Cloudinary to perform advanced analysis on your image uploads and programmatically filter out duplicate or low-quality content.
  • Adopt the premium image-analysis feature in Cloudinary’s Digital Asset Management system for a seamless extraction of that content.

Conclusion

Auto-tagging media assets goes a long way in helping you manage them, opening many doors for you. For the two questions below, you can then answer the first one in detail and the second one with a resounding yes:

  • What rich-media content do you have on hand?
  • Can you reuse that content?

With those answers, you can—

  • Easily pull digital media you already have and post them as stand-ins.
  • Effortlessly locate media from your collection by searching with a few keywords.
  • Recommend similar pages of importance to customers or enhance the search capabilities of your site through your tags.

Recall also how AI can generate transcription files and translated tags, ushering in a multitude of benefits:

  • Studies have shown that people are accessing media from mobile phones more often than from desktops, hence frequently watching videos on mute. That means you must deliver the same value for your videos regardless of the playing device.
  • With all that AI output, you can localize content, beef up your site’s accessibility, and expand outreach.
  • To better support customers, you can enhance search capabilities by capitalizing on multilingual tags.

Finally, remember that moderating for a meaningful, outstanding user experience means more than filtering out adult content. You can also do the following:

  • Leverage blurriness, grayscale, or illustration detection to achieve brand integrity.
  • Delete duplicate images for a well-organized, orderly, intuitive, and easy-to-manage system.
  • Further hone the images you retain, such as those of multiple faces, by grouping them according to family, predominant colors, and other significant criteria.

AI and machine learning are all about pruning repetitive or manual tasks. Do take advantage of those technologies and the related tools, in particular those from Cloudinary, to make well-founded decisions and optimize workflows, freeing up your teams to focus on the true business drivers.

Responsive Images and Their Creation for WordPress

$
0
0

Responsive images in WordPress

With the advent of technology and the attendant fast-growing demand for feature-rich computing devices (laptops, smartphones, iPads), their manufacturers are rising to the occasion by producing high-resolution machines with screens of various sizes and device-pixel ratios. Thus was born the impetus behind the need for and creation of responsive images, which automatically optimize their online display according to the size and resolution of the device screen, ensuring sharpness and crispness—a delightful user experience.

Definition of Responsive Images

You as a website developer must be familiar with the code below or something similar, which causes an image to display correctly on the user’s browser.

img {
  width: 100%;
  height: auto;
}

I’ve used the above code myself in production numerous times, figuring that posting responsive images simply means displaying sharp, high-resolution images according to the size of the display device’s screen.

Reality is, given that websites are accessed from all over the world, the above code is starkly inadequate because it takes into consideration none of the important factors on which responsiveness hinge, namely, the display device’s processing power, data bandwidth, and Internet speed. One of the most aggravating things websites can do is drain the user device’s data while loading and displaying media. Furthermore, websites must also cater to a sizable segment of the user market that is still accessing the web on low-end devices with deficient processing power. Those devices are bound to run into delays and performance problems when accessing websites with large, high-resolution images.

Truly responsive images must play to the device’s strength—and they do.

The Magic Behind Responsive Images

Displaying an image online is a two-step process:

  1. The application server loads and sends the image to the client (the browser).
  2. The browser determines the image size to download and the image dimensions to display on the browser according to, respectively, the values you set in the sizes and srcset attributes.

Here’s the typical code for displaying nonresponsive images:

<img src="image/ballon.jpeg" alt="A fantastic balloon" class="hero__showcase__image">

Making an image truly responsive and displaying it takes more work on your part. You list several image versions with their resolutions along with breakpoints under srcset and their minimum widths under sizes. For example:

<img src="image/balloon.jpeg"
    srcset="image/balloon-tiny.jpeg 150w,
            image/balloon-small.jpeg 300w,
            image/balloon-medium.jpeg 600w,
            image/balloon-large.jpeg 1000w,
            image/balloon-extra-large.jpeg 1200w,
            image/balloon-extra-extra-large.jpeg 1500w,
            image/balloon-super-large.jpeg 2000w"
    sizes="(min-width: 80rem) 50rem,
           (min-width: 50rem) 38rem,
           (min-width: 45rem) calc(100vw - 10rem),
           100vw"
    alt="A fantastic balloon">

Such a setup instructs the device’s browser to, based on its own width, download and display the image with the following properties:

  • The most optimal width (the w- value) among the ones listed under srcset.
  • The most optimal size (the min-width value) among the ones listed under sizes.

For an excellent guide on how to make online images responsive, see this June 2017 article by Christian Nwamba.

Generation of Responsive Images on WordPress

A built-in capability from the popular, open-source WorldPress platform for websites automates the process of making images responsive. Here’s what happens on an image upload to WordPress:

  1. The WordPress media library generates several versions of the image, complete with their own resolutions based on the image’s default settings and sizes, to make it responsive.
  2. WordPress adds the srcset and sizes attributes along with the appropriate values to all the <img> tags in the website’s source code.

However, a WordPress shortcoming is that it cannot compute the appropriate number of breakpoints and all the device screens the website aims to cater for. You must add code to the functions.php source file yourself to capture all the image sizes for your WordPress codebase. Here’s what to do:

Add to the filter wp_calculate_image_sizes() a function called make_responsive_image_sizes, with which you can tweak the sizes attribute for images. For example :

function make_responsive_image_sizes($sizes, $size) {

  $width = $size[0];

  if ( $width > 600 ) {
      return '(min-width: 768px) 322px, (min-width: 576px) 255px, calc( (100vw - 30px) / 2)';
  } else {
      return $sizes;
  }

}

add_filter('wp_calculate_image_sizes', 'make_responsive_image_sizes', 10 , 2);

Here, the $width variable ensures that, if an image is not large enough, the browser displays it according to the default WordPress size, absent which the default in your specifications.

Furthermore, in WordPress 4.4 and above:

  • The helper function wp_get_attachment_image_srcset() generates the values for the srcset attribute.
  • The wp_get_attachment_image_srcset() function accepts an image’s IDand size as parameters, like this:
$img_srcset = wp_get_attachment_image_srcset( $image_id, 'large’' );
<img srcset="<?php echo wp_get_attachment_image_srcset($attachment_id, 'large' ); ?>"
        sizes="(min-width: 60rem) 60rem, 100vw">

<img srcset="<?php echo wp_get_attachment_image_srcset( $attachment_id, 'large-cropped' ); ?>"
        sizes="100vw">

The above code works like a champ. Rest assured that your images’ srcset values would generate appropriately sized visuals for display on large screens.

Generation of Responsive Images With Cloudinary’s WordPress Plugin

With Cloudinary, you can effectively perform management tasks, including uploads, storage, administration, manipulation, and delivery, for images and videos, end to end. Relative to the theme of this post, especially useful is Cloudinary’s WordPress plugin for easy upload, optimization, and transformation of images. To learn how to install, activate, and connect that plugin to Cloudinary, see this article.

Conclusion

Setting up responsive images for your site on WordPress is an absolute must-do. For a deep perspective on responsive images and the benefits of leveraging Cloudinary for building websites, read Eric Portis’s article on srcset and sizes. With the web becoming more and more visually oriented, it pays to master the techniques for creating responsive images as a critical component of your site.


Further Reading on Responsive Images

Easily Customize and Embed your Video Player

$
0
0

Cloudinary Video Player Studio

Steve Forbes, editor of Forbes Magazine, once said, “Your brand is the single most-important investment you can make in your business”. That bold statement is spot on, especially with respect to digital media. Furthermore, consistency in brand experience is crucial for building trust with users.

For videos, the many useful capabilities on Cloudinary’s Dynamic Video Platform, such as overlays and custom video transitions, ensure that you stay on brand. But how to do that when playing videos on your site? Play them with the latest version of Cloudinary’s video player, whose multiple customizable features enable you to tailor it to match your brands color scheme and imagery, enhancing the user experience by leaps and bounds.

But, that’s not all, we are launching Cloudinary Video Player Studio, complete with a simple, intuitive UI through which you can easily design and customize video players by toggling features or selecting colors, with the auto-generated output conveniently displayed alongside. When your design is a wrap, simply copy and paste the output to embed it into your site – and you’re good to go. No coding necessary. Be sure to try out Cloudinary Video Player Studio and unlock all the great features of the Cloudinary Video Player while maintaining that all important brand.

Tailoring your video experience

Let’s take a look at how easy it is to match your video player to your brand or add different functionality depending on your use case. First up, the visual appearance. If you just want to keep it simple, you can choose Cloudinary’s predefined dark or light skin themes. These two themes provide a sleek look that can work well with most site designs. Of course, if you really want to tailor it to your brand, you’ll want to use your own color scheme and logo. Lets take the Cloudinary brand as an example and show you how easy it can be done.

The player allows you to configure three colors: base, accent and text. The two colors we will use for the base and accent (alongside a simple white white for the text) are the Cloudinary light blue and orange that you see in our logo:

#0071BA

#DB8226

We’ve also swapped the original Cloudinary logo for a slightly different one and updated the link to take you to the video player documentation.

Floating some ideas

Configuring and customizing your video player to suit your users and all the different video use cases you have is a great way to increase engagement. Did you notice how the video above starts playing automatically and if you scroll down a little further it appears as a floating player in the bottom corner? Great for an article or blog post like this as you can keep watching as you scroll the rest of the page.

If you’re more interested in short product videos to show off all your wares, you’d be more likely to want to strip out the controls, play the video automatically on load and make it repeat. Once again, Cloudinary’s video player can do this super easily.

How about a playing a longer video? Maybe a webinar or a lecture you want to post? You’re probably going to want to help your users jump forwards and back by a few seconds and give them the full set of controls to ease their viewing experience. You could even add subtitles and allow your users to toggle them on or off:

You can customize all this functionality by setting a handful of parameters in the JavaScript, but it's so much easier to just select the options you want using Cloudinary Video Player Studio.

Step into the Studio and Build Your Player

Now that you know you can customize your player and add some nice functionality, let’s take a look at how simple this is using the new Cloudinary Video Player Studio.

Start with the video

The video tab is step one. Simply enter your Cloudinary cloud name and the Public ID of the video you want to play in the player. The preview on the right will update so you can take a peek at how it’ll all look once you’re done.

Tip
You can find your cloud name in the Cloudinary Console and use the Media Library to find the Public IDs of your videos.

Here you can also customize the poster image that shows before the video plays, the title and subtitle that is displayed with the video or add in some captions/subtitles.

Video tab

Customize it the visual way

The customization tab is all about tweaking the visual appearance of the player and ensuring it matches that all important brand. This is where you can set your three colors for the player (or pick a skin theme), choose whether you want a fixed size for your player or one that is responsive, as well as updating the font and logo.

Customization tab

Advance your video player customizations

The final tab is where you’ll find some of the more advanced customizations, including whether to show the player controls, add in the jump back and forward buttons and whether to trigger a floating player when it’s scrolled out of view.

Advanced tab

Time for embed

Cloudinary Video Player Studio makes it really easy to embed the video player in your website. Just copy the iframe code from the embed tab and paste into your web page source file at the location you want it to display. If you’ve selected a responsive player, it’ll even adjust the size perfectly for all the different screen sizes. If you’re used to using the JavaScript then you can copy that instead, have a look at the documentation for more on how to embed using JavaScript.

Here's an example of how your embed iframe code might look:

<iframe
  src="https://player.cloudinary.com/embed/?cloud_name=demo&public_id=elephants&fluid=true&controls=true&colors%5Bbase%5D=%230071ba&colors%5Baccent%5D=%23db8226"
  width="640"
  height="480"
  allow="autoplay; fullscreen; encrypted-media; picture-in-picture"
  allowfullscreen
  frameborder="0"
></iframe>

Get Designing

There you have it. The Cloudinary Video Player offers loads of customization options for fitting your video player to your brand and all your video use-cases; all with super-simple and super-quick UI configuration options using the Cloudinary Video Player Studio.

Go ahead, start designing your video player to suit your needs. Give your users the best video experience and keep your branding consistent throughout your media delivery.

Compress Images for Web and Boost Performance on Your Site

$
0
0

Compressing Online Images

Slow-loading web content and problematic media displays that involve seemingly interminable scrolling tick off users to no end. Compressing online images is, without question, a critical task for spearheading customer retention for websites. Keep in mind that small images can still look sharp. This article shows you how to achieve that by mastering the techniques of compressing images for the web.

Image-Compression Techniques

To compress images and, consequently, reduce their sizes, you apply a transformation technique that removes the image parts with a negligible or low visual effect on the display quality. Image compression can be lossless or lossy.

Lossless Compression

Lossless compression of images results in no loss of pixel data, significantly reducing their sizes with no quality compromise in the display. The examples below demonstrate lossless image-compression in play.

Here’s the original, uncompressed picture with a size of 2.58 MB:

Ruby:
cl_image_tag("eden_group.jpg")
PHP:
cl_image_tag("eden_group.jpg")
Python:
CloudinaryImage("eden_group.jpg").image()
Node.js:
cloudinary.image("eden_group.jpg")
Java:
cloudinary.url().imageTag("eden_group.jpg");
JS:
cloudinary.imageTag('eden_group.jpg').toHtml();
jQuery:
$.cloudinary.image("eden_group.jpg")
React:
<Image publicId="eden_group.jpg" >

</Image>
Angular:
<cl-image public-id="eden_group.jpg" >

</cl-image>
.Net:
cloudinary.Api.UrlImgUp.BuildImageTag("eden_group.jpg")
Android:
MediaManager.get().url().generate("eden_group.jpg");
iOS:
imageView.cldSetImage(cloudinary.createUrl().generate("eden_group.jpg")!, cloudinary: cloudinary)
Eden friends

Here’s the compressed version with a size of 918 KB:

Ruby:
cl_image_tag("eden_group.jpg", :quality=>"auto")
PHP:
cl_image_tag("eden_group.jpg", array("quality"=>"auto"))
Python:
CloudinaryImage("eden_group.jpg").image(quality="auto")
Node.js:
cloudinary.image("eden_group.jpg", {quality: "auto"})
Java:
cloudinary.url().transformation(new Transformation().quality("auto")).imageTag("eden_group.jpg");
JS:
cloudinary.imageTag('eden_group.jpg', {quality: "auto"}).toHtml();
jQuery:
$.cloudinary.image("eden_group.jpg", {quality: "auto"})
React:
<Image publicId="eden_group.jpg" >
  <Transformation quality="auto" />
</Image>
Angular:
<cl-image public-id="eden_group.jpg" >
  <cl-transformation quality="auto">
  </cl-transformation>
</cl-image>
.Net:
cloudinary.Api.UrlImgUp.Transform(new Transformation().Quality("auto")).BuildImageTag("eden_group.jpg")
Android:
MediaManager.get().url().transformation(new Transformation().quality("auto")).generate("eden_group.jpg");
iOS:
imageView.cldSetImage(cloudinary.createUrl().setTransformation(CLDTransformation().setQuality("auto")).generate("eden_group.jpg")!, cloudinary: cloudinary)
Eden friends

The two pictures look the same even though the second one has undergone compression that reduced its size by almost 2 MB.

Lossy Compression

As its name implies, lossy compression causes loss of pixel data. That’s a result of the removal of certain image parts.

Lossless Compression Versus Lossy Compression

Before deciding which compression technique to adopt for your images, familiarize yourself with the results that the two techniques produce.

Lossless Compression

Applying lossless compression to images generates the following:

  • A lossless attribute for images that are of the GIF, BMP, RAW, or PNG file type.
  • An outstanding display.
  • Possibly less reduction in file size than that engendered through lossy compression.

Lossy Compression

Applying lossy compression to images generates the following:

  • A lossy attribute for images that are of the JPEG or GIF file type.
  • A greatly reduced file size.
  • Irreversible images: once you go lossy, you’re beyond the point of no return.
  • Possible degradation of image quality in case of application of extreme parameters.

Benefits of Image Compression

Compressing online images yields remarkable benefits.

Fast Page-Loading Speed

Large media files can hamper page-loading speed, hence potentially a huge bottleneck for content access. Compressing those files before or immediately after upload significantly improves user experience for websites.

Cloudinary, a stellar software-as-a-service (SaaS) platform for storing, managing, transforming, and delivering digital media, offers a free, eye-opening tool for analyzing a site’s loading experience. Have a whirl!

Faster Backups

Regular periodic backups are key for data integrity. As a matter of course, backing up smaller image files takes less time and less resources.

Lower Bandwidth

Loading smaller files takes less bandwidth on the audience’s part, ensuring satisfaction and appreciation.

Less Storage Space

Even though data-storage options abound in the face of technology advances, be vigilant about economizing storage space at all times. Why? Because data racks up pretty fast over time, especially if your site contains media-heavy user-generated content.

Whether you’re leveraging third-party cloud storage or hosting it yourself, it’s a good practice to compress media files before storing them. Space optimization is paramount..

Optimized Search

How does image compression benefit SEO? The answer is simple: speed is an ever-present criterion for ranking websites at search giants like Google.

The faster a webpage loads, the higher it ranks. Well-compressed images make your website load fast, which in turn raises the probability of a higher ranking on search matches.

Image-Compression Tools

The following articles I wrote in 2017 contain recommendations for image-compression tools for three development environments:

  • For PHP, Imagick works well. Built-in functions in PHP also compressing images. See the details in this article.
  • For WordPress, this article suggests several tools, from Imagify to Optimuss, with many amazing options.
  • For Ruby, read my take in this article.
  • For Python Image Optimization and Manipulation, read more here

Image Compression With One Line of Code With Cloudinary

In addition, while uploading images to Cloudinary, you can efficiently automate image compression by adding —one line of code to the URL that contains the quality parameter according to the syntax q_, followed by the quality level on a scale of 0–100. For example::

Ruby:
cl_image_tag("dog.jpg", :quality=>50)
PHP:
cl_image_tag("dog.jpg", array("quality"=>50))
Python:
CloudinaryImage("dog.jpg").image(quality=50)
Node.js:
cloudinary.image("dog.jpg", {quality: 50})
Java:
cloudinary.url().transformation(new Transformation().quality(50)).imageTag("dog.jpg");
JS:
cloudinary.imageTag('dog.jpg', {quality: 50}).toHtml();
jQuery:
$.cloudinary.image("dog.jpg", {quality: 50})
React:
<Image publicId="dog.jpg" >
  <Transformation quality="50" />
</Image>
Angular:
<cl-image public-id="dog.jpg" >
  <cl-transformation quality="50">
  </cl-transformation>
</cl-image>
.Net:
cloudinary.Api.UrlImgUp.Transform(new Transformation().Quality(50)).BuildImageTag("dog.jpg")
Android:
MediaManager.get().url().transformation(new Transformation().quality(50)).generate("dog.jpg");
iOS:
imageView.cldSetImage(cloudinary.createUrl().setTransformation(CLDTransformation().setQuality(50)).generate("dog.jpg")!, cloudinary: cloudinary)
sample

The higher the image quality, the larger the file size.

This recent post tells you the details. Do check it out.

Tip: To apply lossy compression to animated GIFs, follow the procedure described in this [post]](https://cloudinary.com/blog/lossycompressionforoptimizinganimated_gifs).

Conclusion

Compressing images goes a long way toward making the web run faster. And the procedure involved is a breeze. Let’s swear off sending uncompressed images to our audience!


Further Reading on Image Optimization

Open Hack Week: Building for the Future

$
0
0

Open-Hack-Week

Between July 29 and August 3, the Google Developer Student Community of the University of Lagos, Nigeria participated in a week-long hackathon called Open Hack Week (OHW). Sponsored by Cloudinary, Interswitch, the Ogundipe Foundation, and other notable organizations, OHW comprised 14 teams, five developers each. After six days of brainstorming and coding, the teams successfully built the minimum viable products (MVPs) for their projects, which they subsequently presented to all the attendees.

My Role

OHW’s main goal was to foster the programming skills of the team members by assigning them projects, some of which initiated in-house by the sponsors and others externally by nonprofit organizations (NGOs). As a Cloudinary media developer expert, I attended OHW as a mentor and as a technology evangelist of the Cloudinary APIs and add-ons, which effectively and efficiently process digital media, in particular images and videos, for fast loading and engaging display across all devices--a huge boost for web development. My demos took place on the first day.

In addition, I spoke to the teams about the importance of building accessible platforms by incorporating practices that would ensure that their products would be readily usable by the next billion users. Even if only as an MVP to meet the requirements of the hackathon, it’s worth doing it right the first time, I emphasized.

Obinna

The Projects

The OHW teams were tasked with building tools that could be adopted as-is by the sponsors, affording the team members an opportunity to join those companies at a future date in development or management roles for those tools. Following are five of the assignments:

  • Build a shop-wise product that’s ready for direct sales to retail customers with no middleman involvement.
  • Develop a tool that transacts peer-to-peer currency transfers across Africa, bypassing the local- currency-to-dollar-to-local-currency conversion loop.
  • Design a human-resources tool that tracks employee profiles, performance, remuneration, and other activities from start of employment till exit. The tool would serve as an important management resource for performance analyses, employee appraisals, and business overviews.
  • Create a certification generator for an online learning platform like Udemy.
  • Build a project-management tool, slated for the Engineering team at Interswitch Group, that monitors the furtherance of assignments against deadlines, ranking the progress by means of a leaderboard.

Gratifyingly, representatives from some of the company sponsors were present to answer questions, volunteer insight, and participate in code reviews. Their support was invaluable and much appreciated.

participants

Image Processing With Cloudinary

Although not all the projects required media resources, a few teams enthusiastically leveraged Cloudinary’s manipulation capabilities for images and overlays to generate certificates of participation for the event. In addition--

  • Team 11 built a website for the Ogundipe Foundation, storing and transforming all the related images with Cloudinary.
  • Team 14 designed a version of their certification app with Cloudinary’s image-overlay capability.

Panel Discussion

At a panel session on the last day of OHW, the participants, many of whom the who’s who in the Nigerian tech ecosystem, chimed in on the future of information technology in Africa and encouraged the developer student community to keep building useful apps. Their comments were inspiring and well received.

panel

Summary

OHW was an outstanding forum for learning interesting code concepts and best practices in building apps, also for sharing experiences in software development. The sponsors have high hopes that the student attendees will capitalize on the knowledge and experience they gained as they forge forward with their studies and, later on, their careers.

Vue.js Tutorial: Images Optimization for Web Apps

$
0
0

Launched in 2014 as an open-source JavaScript framework for building user interfaces for web apps, Vue.js has become a tool of choice for many developers. Currently, Vue.js is the most starred front-end JavaScript framework on GitHub with over 145,000 stars.

Optimizing images that reside in Vue.js apps with the Cloudinary Vue SDK is a cinch. This article explains why and describes the steps.

Background

The smaller an image, the faster the browser can download it for display. Optimizing images means delivering them in the smallest-possible size without losing visual quality, leading to bandwidth savings and faster loading of websites.

That image optimization is mandatory for all websites is a case that can easily be made. That’s because faster image loading on websites invariably lifts audience conversion rates. In fact, studies have shown that half the online visitors expect a website to load within two seconds.

Cloudinary the Media Full-Stack Platform

With Cloudinary, you can effectively and efficiently optimize digital media—regardless of the programming language in which you code—because Cloudinary automatically performs most of the related tasks by default. Besides, the platform’s delivery process through integrated content delivery networks (CDNs) ensures prompt transmission to both desktop and mobile audiences.

After uploading images to Cloudinary, you can leverage its major capabilities, as described in the subsections below. For details on other Cloudinary options for optimizing images, read the documentation section Image Transformations.

Automatic Quality Adjustment and Encoding

Adding the q_auto parameter to an image’s URL enables Cloudinary to select the optimal quality-compression level and encoding settings according to the image content, format, and viewing browser. The result is, gratifyingly, a smaller image that still retains its original visual quality. See this example:

Ruby:
cl_image_tag("woman.jpg", :quality=>"auto")
PHP:
cl_image_tag("woman.jpg", array("quality"=>"auto"))
Python:
CloudinaryImage("woman.jpg").image(quality="auto")
Node.js:
cloudinary.image("woman.jpg", {quality: "auto"})
Java:
cloudinary.url().transformation(new Transformation().quality("auto")).imageTag("woman.jpg");
JS:
cloudinary.imageTag('woman.jpg', {quality: "auto"}).toHtml();
jQuery:
$.cloudinary.image("woman.jpg", {quality: "auto"})
React:
<Image publicId="woman.jpg" >
  <Transformation quality="auto" />
</Image>
Angular:
<cl-image public-id="woman.jpg" >
  <cl-transformation quality="auto">
  </cl-transformation>
</cl-image>
.Net:
cloudinary.Api.UrlImgUp.Transform(new Transformation().Quality("auto")).BuildImageTag("woman.jpg")
Android:
MediaManager.get().url().transformation(new Transformation().quality("auto")).generate("woman.jpg");
iOS:
imageView.cldSetImage(cloudinary.createUrl().setTransformation(CLDTransformation().setQuality("auto")).generate("woman.jpg")!, cloudinary: cloudinary)
https://res.cloudinary.com/demo/image/upload/q_auto/woman.jpg

To further adjust the visual quality, edit q_auto to read q_auto:best, q_auto:low, q_auto:good, or q_auto:eco.

Automatic Formatting

Adding the f_auto parameter to an image’s URL enables Cloudinary to analyze the image content and select the best format for delivery, such as WebP for Chrome browsers or JPEG-XR for Internet Explorer browsers. For all other browsers, Cloudinary delivers images in their original format.

Note
With f_auto and q_auto set, Cloudinary would, as a rule, pick WebP or JPEG-XR for display on Chrome or IE, respectively. However, if the quality algorithm determines that PNG-8 or PNG-24 is optimal, Cloudinary might pick either of those formats for certain images.

Resizing and Cropping

To resize an image, add either or both of these two parameters to the URL: width (w) and height (h). Cloudinary leaves the aspect ratio as is while performing resizing tasks.

Here are three examples:

Ruby:
cl_image_tag("sample.jpg", :width=>0.5, :crop=>"scale")
PHP:
cl_image_tag("sample.jpg", array("width"=>0.5, "crop"=>"scale"))
Python:
CloudinaryImage("sample.jpg").image(width=0.5, crop="scale")
Node.js:
cloudinary.image("sample.jpg", {width: "0.5", crop: "scale"})
Java:
cloudinary.url().transformation(new Transformation().width(0.5).crop("scale")).imageTag("sample.jpg");
JS:
cloudinary.imageTag('sample.jpg', {width: "0.5", crop: "scale"}).toHtml();
jQuery:
$.cloudinary.image("sample.jpg", {width: "0.5", crop: "scale"})
React:
<Image publicId="sample.jpg" >
  <Transformation width="0.5" crop="scale" />
</Image>
Angular:
<cl-image public-id="sample.jpg" >
  <cl-transformation width="0.5" crop="scale">
  </cl-transformation>
</cl-image>
.Net:
cloudinary.Api.UrlImgUp.Transform(new Transformation().Width(0.5).Crop("scale")).BuildImageTag("sample.jpg")
Android:
MediaManager.get().url().transformation(new Transformation().width(0.5).crop("scale")).generate("sample.jpg");
iOS:
imageView.cldSetImage(cloudinary.createUrl().setTransformation(CLDTransformation().setWidth(0.5).setCrop("scale")).generate("sample.jpg")!, cloudinary: cloudinary)
https://res.cloudinary.com/demo/image/upload/w_0.5/sample.jpg
Ruby:
cl_image_tag("sample.jpg", :height=>200, :crop=>"scale")
PHP:
cl_image_tag("sample.jpg", array("height"=>200, "crop"=>"scale"))
Python:
CloudinaryImage("sample.jpg").image(height=200, crop="scale")
Node.js:
cloudinary.image("sample.jpg", {height: 200, crop: "scale"})
Java:
cloudinary.url().transformation(new Transformation().height(200).crop("scale")).imageTag("sample.jpg");
JS:
cloudinary.imageTag('sample.jpg', {height: 200, crop: "scale"}).toHtml();
jQuery:
$.cloudinary.image("sample.jpg", {height: 200, crop: "scale"})
React:
<Image publicId="sample.jpg" >
  <Transformation height="200" crop="scale" />
</Image>
Angular:
<cl-image public-id="sample.jpg" >
  <cl-transformation height="200" crop="scale">
  </cl-transformation>
</cl-image>
.Net:
cloudinary.Api.UrlImgUp.Transform(new Transformation().Height(200).Crop("scale")).BuildImageTag("sample.jpg")
Android:
MediaManager.get().url().transformation(new Transformation().height(200).crop("scale")).generate("sample.jpg");
iOS:
imageView.cldSetImage(cloudinary.createUrl().setTransformation(CLDTransformation().setHeight(200).setCrop("scale")).generate("sample.jpg")!, cloudinary: cloudinary)
https://res.cloudinary.com/demo/image/upload/h_200/sample.jpg
Ruby:
cl_image_tag("sample.jpg", :width=>200, :height=>100, :crop=>"scale")
PHP:
cl_image_tag("sample.jpg", array("width"=>200, "height"=>100, "crop"=>"scale"))
Python:
CloudinaryImage("sample.jpg").image(width=200, height=100, crop="scale")
Node.js:
cloudinary.image("sample.jpg", {width: 200, height: 100, crop: "scale"})
Java:
cloudinary.url().transformation(new Transformation().width(200).height(100).crop("scale")).imageTag("sample.jpg");
JS:
cloudinary.imageTag('sample.jpg', {width: 200, height: 100, crop: "scale"}).toHtml();
jQuery:
$.cloudinary.image("sample.jpg", {width: 200, height: 100, crop: "scale"})
React:
<Image publicId="sample.jpg" >
  <Transformation width="200" height="100" crop="scale" />
</Image>
Angular:
<cl-image public-id="sample.jpg" >
  <cl-transformation width="200" height="100" crop="scale">
  </cl-transformation>
</cl-image>
.Net:
cloudinary.Api.UrlImgUp.Transform(new Transformation().Width(200).Height(100).Crop("scale")).BuildImageTag("sample.jpg")
Android:
MediaManager.get().url().transformation(new Transformation().width(200).height(100).crop("scale")).generate("sample.jpg");
iOS:
imageView.cldSetImage(cloudinary.createUrl().setTransformation(CLDTransformation().setWidth(200).setHeight(100).setCrop("scale")).generate("sample.jpg")!, cloudinary: cloudinary)
https://res.cloudinary.com/demo/image/upload/w_200,h_100/sample.jpg

To have Cloudinary crop an image, add the crop (c) parameter to the URL and specify one of these modes: scale, fit, mfit, fill, lfill, limit, pad, lpad, mpad, crop, thumb, imagga_crop, or imagga_scale.

Vue.js Tutorial: Image Optimization in Web Apps

This section describes how to optimize images in Vue.js apps with the Cloudinary SDK.

Automatic Quality and Encoding

You can edit the quality level of images in Vue.js apps with JavaScript code, for example:

<cld-image publicId="cave.jpg" ><cld-transformation quality="50" /></cld-image>

Here, under quality, 50 is your choice of quality level on a 0-100 scale. The lower the level, the smaller the image size. The higher the level, the larger the size and the better the quality.

But why do it manually like that? Instead, automate that compression task by taking advantage of Cloudinary with this code:

<cld-image publicId="prosper.jpg" >
  <cld-transformation quality="auto" />
</cld-image>

Adding the quality=”auto” parameter is the best way to significantly reduce image size through automation.

To further narrow the size or to ensure higher-than-average quality, replace auto with auto:best , auto:good, auto:eco, or auto:low, for example:

<cld-image publicId="prosper.jpg" >
  <cld-transformation quality="auto:low" />
</cld-image>

Automatic Formatting

Adding the fetchFormat=”auto” parameter is the best way to ensure that Cloudinary delivers your images in the optimum format to the viewing browser in question. See this code example:

<cld-image publicId="prosper.jpg" >
  <cld-transformation width="500" fetchFormat="auto" crop="scale" />
</cld-image>

Vue.js

Image Resizing and Cropping

By adding the relevant parameters to the <cld-image> and <cld-transformation> Vue.js components, you can resize and crop images, for example:

<cld-image publicId="family_bench.jpg" >
  <cld-transformation width="150" height="150" gravity="faces" crop="fill" />
</cld-image>

The fill cropping method generates an image size of 150 x 150 pixels while retaining the original aspect ratio.

To change the size, assign new values to the width and height parameters. Note this neat Cloudinary capability: if you set only width or height, Cloudinary automatically updates the other parameter to maintain the aspect ratio. An example:

<cld-image publicId="prosper.jpg" >
  <cld-transformation width="0.5" crop="scale" />
</cld-image>

Here, despite the width adjustment with the 0.5 value, the aspect ratio remains intact.

Another example:

<cld-image publicId="prosper.jpg" >
  <cld-transformation width="200" height="100" crop="scale" />
</cld-image>

Here, too, the aspect ratio stays the same notwithstanding the resizing to a width of 200 and a height of 100 pixels.

Conclusion

This Vue.js tutorial for Image optimization is paramount for the performance of web apps. Do mount the effort to properly optimize and cache their images. For an excellent insight and suggestions on how to optimize JPEG images without compromising quality, read this Cloudinary article.


Further Reading on Image Optimization


Vue.js Tutorial: Image Optimization for Web Apps

$
0
0

Vue.js Tutorial

Launched in 2014 as an open-source JavaScript framework for building user interfaces for web apps, Vue.js has become a tool of choice for many developers. Currently, Vue.js is the most starred front-end JavaScript framework on GitHub with over 145,000 stars.

Optimizing images that reside in Vue.js apps with the Cloudinary Vue SDK is a cinch. This article explains why and describes the steps.

Background

The smaller an image, the faster the browser can download it for display. Optimizing images means delivering them in the smallest-possible size without losing visual quality, leading to bandwidth savings and faster loading of websites.

That image optimization is mandatory for all websites is a case that can easily be made. That’s because faster image loading on websites invariably lifts audience conversion rates. In fact, studies have shown that half the online visitors expect a website to load within two seconds.

Cloudinary the Media Full-Stack Platform

With Cloudinary, you can effectively and efficiently optimize digital media—regardless of the programming language in which you code—because Cloudinary automatically performs most of the related tasks by default. Besides, the platform’s delivery process through integrated content delivery networks (CDNs) ensures prompt transmission to both desktop and mobile audiences.

After uploading images to Cloudinary, you can leverage its major capabilities, as described in the subsections below. For details on other Cloudinary options for optimizing images, read the documentation section Image Transformations.

Automatic Quality Adjustment and Encoding

Adding the q_auto parameter to an image’s URL enables Cloudinary to select the optimal quality-compression level and encoding settings according to the image content, format, and viewing browser. The result is, gratifyingly, a smaller image that still retains its original visual quality. See this example:

Ruby:
cl_image_tag("woman.jpg", :quality=>"auto")
PHP:
cl_image_tag("woman.jpg", array("quality"=>"auto"))
Python:
CloudinaryImage("woman.jpg").image(quality="auto")
Node.js:
cloudinary.image("woman.jpg", {quality: "auto"})
Java:
cloudinary.url().transformation(new Transformation().quality("auto")).imageTag("woman.jpg");
JS:
cloudinary.imageTag('woman.jpg', {quality: "auto"}).toHtml();
jQuery:
$.cloudinary.image("woman.jpg", {quality: "auto"})
React:
<Image publicId="woman.jpg" >
  <Transformation quality="auto" />
</Image>
Angular:
<cl-image public-id="woman.jpg" >
  <cl-transformation quality="auto">
  </cl-transformation>
</cl-image>
.Net:
cloudinary.Api.UrlImgUp.Transform(new Transformation().Quality("auto")).BuildImageTag("woman.jpg")
Android:
MediaManager.get().url().transformation(new Transformation().quality("auto")).generate("woman.jpg");
iOS:
imageView.cldSetImage(cloudinary.createUrl().setTransformation(CLDTransformation().setQuality("auto")).generate("woman.jpg")!, cloudinary: cloudinary)
woman

To further adjust the visual quality, edit q_auto to read q_auto:best, q_auto:low, q_auto:good, or q_auto:eco.

Automatic Formatting

Adding the f_auto parameter to an image’s URL enables Cloudinary to analyze the image content and select the best format for delivery, such as WebP for Chrome browsers or JPEG-XR for Internet Explorer browsers. For all other browsers, Cloudinary delivers images in their original format.

Note
With f_auto and q_auto set, Cloudinary would, as a rule, pick WebP or JPEG-XR for display on Chrome or IE, respectively. However, if the quality algorithm determines that PNG-8 or PNG-24 is optimal, Cloudinary might pick either of those formats for certain images.

Resizing and Cropping

To resize an image, add either or both of these two parameters to the URL: width (w) and height (h). Cloudinary leaves the aspect ratio as is while performing resizing tasks.

Here are three examples:

Ruby:
cl_image_tag("sample.jpg", :width=>0.5, :crop=>"scale")
PHP:
cl_image_tag("sample.jpg", array("width"=>0.5, "crop"=>"scale"))
Python:
CloudinaryImage("sample.jpg").image(width=0.5, crop="scale")
Node.js:
cloudinary.image("sample.jpg", {width: "0.5", crop: "scale"})
Java:
cloudinary.url().transformation(new Transformation().width(0.5).crop("scale")).imageTag("sample.jpg");
JS:
cloudinary.imageTag('sample.jpg', {width: "0.5", crop: "scale"}).toHtml();
jQuery:
$.cloudinary.image("sample.jpg", {width: "0.5", crop: "scale"})
React:
<Image publicId="sample.jpg" >
  <Transformation width="0.5" crop="scale" />
</Image>
Angular:
<cl-image public-id="sample.jpg" >
  <cl-transformation width="0.5" crop="scale">
  </cl-transformation>
</cl-image>
.Net:
cloudinary.Api.UrlImgUp.Transform(new Transformation().Width(0.5).Crop("scale")).BuildImageTag("sample.jpg")
Android:
MediaManager.get().url().transformation(new Transformation().width(0.5).crop("scale")).generate("sample.jpg");
iOS:
imageView.cldSetImage(cloudinary.createUrl().setTransformation(CLDTransformation().setWidth(0.5).setCrop("scale")).generate("sample.jpg")!, cloudinary: cloudinary)
sample
Ruby:
cl_image_tag("sample.jpg", :height=>200, :crop=>"scale")
PHP:
cl_image_tag("sample.jpg", array("height"=>200, "crop"=>"scale"))
Python:
CloudinaryImage("sample.jpg").image(height=200, crop="scale")
Node.js:
cloudinary.image("sample.jpg", {height: 200, crop: "scale"})
Java:
cloudinary.url().transformation(new Transformation().height(200).crop("scale")).imageTag("sample.jpg");
JS:
cloudinary.imageTag('sample.jpg', {height: 200, crop: "scale"}).toHtml();
jQuery:
$.cloudinary.image("sample.jpg", {height: 200, crop: "scale"})
React:
<Image publicId="sample.jpg" >
  <Transformation height="200" crop="scale" />
</Image>
Angular:
<cl-image public-id="sample.jpg" >
  <cl-transformation height="200" crop="scale">
  </cl-transformation>
</cl-image>
.Net:
cloudinary.Api.UrlImgUp.Transform(new Transformation().Height(200).Crop("scale")).BuildImageTag("sample.jpg")
Android:
MediaManager.get().url().transformation(new Transformation().height(200).crop("scale")).generate("sample.jpg");
iOS:
imageView.cldSetImage(cloudinary.createUrl().setTransformation(CLDTransformation().setHeight(200).setCrop("scale")).generate("sample.jpg")!, cloudinary: cloudinary)
sample
Ruby:
cl_image_tag("sample.jpg", :width=>200, :height=>100, :crop=>"scale")
PHP:
cl_image_tag("sample.jpg", array("width"=>200, "height"=>100, "crop"=>"scale"))
Python:
CloudinaryImage("sample.jpg").image(width=200, height=100, crop="scale")
Node.js:
cloudinary.image("sample.jpg", {width: 200, height: 100, crop: "scale"})
Java:
cloudinary.url().transformation(new Transformation().width(200).height(100).crop("scale")).imageTag("sample.jpg");
JS:
cloudinary.imageTag('sample.jpg', {width: 200, height: 100, crop: "scale"}).toHtml();
jQuery:
$.cloudinary.image("sample.jpg", {width: 200, height: 100, crop: "scale"})
React:
<Image publicId="sample.jpg" >
  <Transformation width="200" height="100" crop="scale" />
</Image>
Angular:
<cl-image public-id="sample.jpg" >
  <cl-transformation width="200" height="100" crop="scale">
  </cl-transformation>
</cl-image>
.Net:
cloudinary.Api.UrlImgUp.Transform(new Transformation().Width(200).Height(100).Crop("scale")).BuildImageTag("sample.jpg")
Android:
MediaManager.get().url().transformation(new Transformation().width(200).height(100).crop("scale")).generate("sample.jpg");
iOS:
imageView.cldSetImage(cloudinary.createUrl().setTransformation(CLDTransformation().setWidth(200).setHeight(100).setCrop("scale")).generate("sample.jpg")!, cloudinary: cloudinary)
sample

To have Cloudinary crop an image, add the crop (c) parameter to the URL and specify one of these modes: scale, fit, mfit, fill, lfill, limit, pad, lpad, mpad, crop, thumb, imagga_crop, or imagga_scale.

Vue.js Tutorial: Image Optimization in Web Apps

This section describes how to optimize images in Vue.js apps with the Cloudinary SDK.

Automatic Quality and Encoding

You can edit the quality level of images in Vue.js apps with JavaScript code, for example:

<cld-image publicId="cave.jpg" ><cld-transformation quality="50" /></cld-image>

Here, under quality, 50 is your choice of quality level on a 0-100 scale. The lower the level, the smaller the image size. The higher the level, the larger the size and the better the quality.

But why do it manually like that? Instead, automate that compression task by taking advantage of Cloudinary with this code:

<cld-image publicId="prosper.jpg" >
  <cld-transformation quality="auto" />
</cld-image>

Adding the quality=”auto” parameter is the best way to significantly reduce image size through automation.

To further narrow the size or to ensure higher-than-average quality, replace auto with auto:best , auto:good, auto:eco, or auto:low, for example:

<cld-image publicId="prosper.jpg" >
  <cld-transformation quality="auto:low" />
</cld-image>

Automatic Formatting

Adding the fetchFormat=”auto” parameter is the best way to ensure that Cloudinary delivers your images in the optimum format to the viewing browser in question. See this code example:

<cld-image publicId="prosper.jpg" >
  <cld-transformation width="500" fetchFormat="auto" crop="scale" />
</cld-image>

Vue.js

Image Resizing and Cropping

By adding the relevant parameters to the <cld-image> and <cld-transformation> Vue.js components, you can resize and crop images, for example:

<cld-image publicId="family_bench.jpg" >
  <cld-transformation width="150" height="150" gravity="faces" crop="fill" />
</cld-image>

The fill cropping method generates an image size of 150 x 150 pixels while retaining the original aspect ratio.

To change the size, assign new values to the width and height parameters. Note this neat Cloudinary capability: if you set only width or height, Cloudinary automatically updates the other parameter to maintain the aspect ratio. An example:

<cld-image publicId="prosper.jpg" >
  <cld-transformation width="0.5" crop="scale" />
</cld-image>

Here, despite the width adjustment with the 0.5 value, the aspect ratio remains intact.

Another example:

<cld-image publicId="prosper.jpg" >
  <cld-transformation width="200" height="100" crop="scale" />
</cld-image>

Here, too, the aspect ratio stays the same notwithstanding the resizing to a width of 200 and a height of 100 pixels.

Conclusion

This Vue.js tutorial for Image optimization is paramount for the performance of web apps. Do mount the effort to properly optimize and cache their images. For an excellent insight and suggestions on how to optimize JPEG images without compromising quality, read this Cloudinary article.


Further Reading on Image Optimization

Rotating Or Removing Image Backgrounds With Cloudinary

$
0
0

Rotating Or Removing Image Backgrounds

As a rule, user interfaces, whether for mobile or desktop apps, encompass a significant amount of visual media (images and videos), necessitating close collaboration among designers and front-end developers. The process for building UIs entails a designer-to-developer handoff, at which the designer transfers to the developer blueprints produced with such tools as Photoshop, InVision, and Sketch. The developer then implements the blueprints with Cascading Style Sheets (CSS).

Rotating image backgrounds is a common task. An excellent tutorial written by Craig Buckler in July 2018 describes how to do that with CSS. With Cloudinary, you can transform images in many ways—without using CSS or involving the designer. For example:

  • Remove image backgrounds.
  • Rotate images.
  • Place an image over another.
  • Make the image background transparent so that it blends with a background color.

This article steps you through the procedures. Overall, Cloudinary shines as an end-to-end solution for visual media: it effectively processes their uploads and on-the-fly manipulations, automates optimizations, and delivers images and videos responsively across all devices.

Rotating Images Programmatically

Remarkably, you can manipulate and transform images on Cloudinary by simply adding parameters to their URLs.

To rotate an image, such as this one— :

Logo

—upload it to Coudinary and then add to its URL the angle parameter with the number of degrees by which to rotate the image clockwise. An example is a_60, where 60 denotes a 60-degree rotation. The URL then reads—

Ruby:
cl_image_tag("180_yacaar.png", :angle=>60)
PHP:
cl_image_tag("180_yacaar.png", array("angle"=>60))
Python:
CloudinaryImage("180_yacaar.png").image(angle=60)
Node.js:
cloudinary.image("180_yacaar.png", {angle: 60})
Java:
cloudinary.url().transformation(new Transformation().angle(60)).imageTag("180_yacaar.png");
JS:
cloudinary.imageTag('180_yacaar.png', {angle: 60}).toHtml();
jQuery:
$.cloudinary.image("180_yacaar.png", {angle: 60})
React:
<Image publicId="180_yacaar.png" >
  <Transformation angle="60" />
</Image>
Angular:
<cl-image public-id="180_yacaar.png" >
  <cl-transformation angle="60">
  </cl-transformation>
</cl-image>
.Net:
cloudinary.Api.UrlImgUp.Transform(new Transformation().Angle(60)).BuildImageTag("180_yacaar.png")
Android:
MediaManager.get().url().transformation(new Transformation().angle(60)).generate("180_yacaar.png");
iOS:
imageView.cldSetImage(cloudinary.createUrl().setTransformation(CLDTransformation().setAngle(60)).generate("180_yacaar.png")!, cloudinary: cloudinary)
Logo

Programmatically, you can rotate images with only one codeline in Ruby, PHP, Python, Node.js, Java, JavaScript, JQuery, React, Angular, .Net, Android, and iOs.

Note
A positive value for the angle parameter rotates the image clockwise; a negative value rotates it counterclockwise.

Enhancing Rotated Image Programmatically

Cloudinary offers dozens of transformation effects for images. For example, for a shadow effect to the preceding rotated image, add a shadow-transformation parameter (e_shadow) before the angle parameter (a_60) in the URL, like this:

Ruby:
cl_image_tag("180_yacaar.png", :transformation=>[
  {:effect=>"shadow:40"},
  {:angle=>60}
  ])
PHP:
cl_image_tag("180_yacaar.png", array("transformation"=>array(
  array("effect"=>"shadow:40"),
  array("angle"=>60)
  )))
Python:
CloudinaryImage("180_yacaar.png").image(transformation=[
  {'effect': "shadow:40"},
  {'angle': 60}
  ])
Node.js:
cloudinary.image("180_yacaar.png", {transformation: [
  {effect: "shadow:40"},
  {angle: 60}
  ]})
Java:
cloudinary.url().transformation(new Transformation()
  .effect("shadow:40").chain()
  .angle(60)).imageTag("180_yacaar.png");
JS:
cloudinary.imageTag('180_yacaar.png', {transformation: [
  {effect: "shadow:40"},
  {angle: 60}
  ]}).toHtml();
jQuery:
$.cloudinary.image("180_yacaar.png", {transformation: [
  {effect: "shadow:40"},
  {angle: 60}
  ]})
React:
<Image publicId="180_yacaar.png" >
  <Transformation effect="shadow:40" />
  <Transformation angle="60" />
</Image>
Angular:
<cl-image public-id="180_yacaar.png" >
  <cl-transformation effect="shadow:40">
  </cl-transformation>
  <cl-transformation angle="60">
  </cl-transformation>
</cl-image>
.Net:
cloudinary.Api.UrlImgUp.Transform(new Transformation()
  .Effect("shadow:40").Chain()
  .Angle(60)).BuildImageTag("180_yacaar.png")
Android:
MediaManager.get().url().transformation(new Transformation()
  .effect("shadow:40").chain()
  .angle(60)).generate("180_yacaar.png");
iOS:
imageView.cldSetImage(cloudinary.createUrl().setTransformation(CLDTransformation()
  .setEffect("shadow:40").chain()
  .setAngle(60)).generate("180_yacaar.png")!, cloudinary: cloudinary)
Logo

Also, you can customize the x and y shadow offsets and change the shadow’s color (co) by specifying the values you desire in the parameters, for example:

Ruby:
cl_image_tag("180_yacaar.png", :transformation=>[
  {:effect=>"shadow:40", :x=>15, :y=>15, :color=>"yellow"},
  {:angle=>60}
  ])
PHP:
cl_image_tag("180_yacaar.png", array("transformation"=>array(
  array("effect"=>"shadow:40", "x"=>15, "y"=>15, "color"=>"yellow"),
  array("angle"=>60)
  )))
Python:
CloudinaryImage("180_yacaar.png").image(transformation=[
  {'effect': "shadow:40", 'x': 15, 'y': 15, 'color': "yellow"},
  {'angle': 60}
  ])
Node.js:
cloudinary.image("180_yacaar.png", {transformation: [
  {effect: "shadow:40", x: 15, y: 15, color: "yellow"},
  {angle: 60}
  ]})
Java:
cloudinary.url().transformation(new Transformation()
  .effect("shadow:40").x(15).y(15).color("yellow").chain()
  .angle(60)).imageTag("180_yacaar.png");
JS:
cloudinary.imageTag('180_yacaar.png', {transformation: [
  {effect: "shadow:40", x: 15, y: 15, color: "yellow"},
  {angle: 60}
  ]}).toHtml();
jQuery:
$.cloudinary.image("180_yacaar.png", {transformation: [
  {effect: "shadow:40", x: 15, y: 15, color: "yellow"},
  {angle: 60}
  ]})
React:
<Image publicId="180_yacaar.png" >
  <Transformation effect="shadow:40" x="15" y="15" color="yellow" />
  <Transformation angle="60" />
</Image>
Angular:
<cl-image public-id="180_yacaar.png" >
  <cl-transformation effect="shadow:40" x="15" y="15" color="yellow">
  </cl-transformation>
  <cl-transformation angle="60">
  </cl-transformation>
</cl-image>
.Net:
cloudinary.Api.UrlImgUp.Transform(new Transformation()
  .Effect("shadow:40").X(15).Y(15).Color("yellow").Chain()
  .Angle(60)).BuildImageTag("180_yacaar.png")
Android:
MediaManager.get().url().transformation(new Transformation()
  .effect("shadow:40").x(15).y(15).color("yellow").chain()
  .angle(60)).generate("180_yacaar.png");
iOS:
imageView.cldSetImage(cloudinary.createUrl().setTransformation(CLDTransformation()
  .setEffect("shadow:40").setX(15).setY(15).setColor("yellow").chain()
  .setAngle(60)).generate("180_yacaar.png")!, cloudinary: cloudinary)
Logo

Placing an Image Over Another

For a displacement effect, place one image over another by adding the e_displace parameter to the URL, as in this example:

Ruby:
cl_image_tag("glass.jpg", :transformation=>[
  {:overlay=>"sample", :width=>182, :height=>198},
  {:height=>2.0, :width=>1.0, :crop=>"pad"},
  {:overlay=>"radial_ipdlli", :effect=>"displace", :y=>-8},
  {:effect=>"trim"},
  {:flags=>"layer_apply", :x=>-26, :y=>28}
  ])
PHP:
cl_image_tag("glass.jpg", array("transformation"=>array(
  array("overlay"=>"sample", "width"=>182, "height"=>198),
  array("height"=>2.0, "width"=>1.0, "crop"=>"pad"),
  array("overlay"=>"radial_ipdlli", "effect"=>"displace", "y"=>-8),
  array("effect"=>"trim"),
  array("flags"=>"layer_apply", "x"=>-26, "y"=>28)
  )))
Python:
CloudinaryImage("glass.jpg").image(transformation=[
  {'overlay': "sample", 'width': 182, 'height': 198},
  {'height': 2.0, 'width': 1.0, 'crop': "pad"},
  {'overlay': "radial_ipdlli", 'effect': "displace", 'y': -8},
  {'effect': "trim"},
  {'flags': "layer_apply", 'x': -26, 'y': 28}
  ])
Node.js:
cloudinary.image("glass.jpg", {transformation: [
  {overlay: "sample", width: 182, height: 198},
  {height: "2.0", width: "1.0", crop: "pad"},
  {overlay: "radial_ipdlli", effect: "displace", y: -8},
  {effect: "trim"},
  {flags: "layer_apply", x: -26, y: 28}
  ]})
Java:
cloudinary.url().transformation(new Transformation()
  .overlay(new Layer().publicId("sample")).width(182).height(198).chain()
  .height(2.0).width(1.0).crop("pad").chain()
  .overlay(new Layer().publicId("radial_ipdlli")).effect("displace").y(-8).chain()
  .effect("trim").chain()
  .flags("layer_apply").x(-26).y(28)).imageTag("glass.jpg");
JS:
cloudinary.imageTag('glass.jpg', {transformation: [
  {overlay: new cloudinary.Layer().publicId("sample"), width: 182, height: 198},
  {height: "2.0", width: "1.0", crop: "pad"},
  {overlay: new cloudinary.Layer().publicId("radial_ipdlli"), effect: "displace", y: -8},
  {effect: "trim"},
  {flags: "layer_apply", x: -26, y: 28}
  ]}).toHtml();
jQuery:
$.cloudinary.image("glass.jpg", {transformation: [
  {overlay: new cloudinary.Layer().publicId("sample"), width: 182, height: 198},
  {height: "2.0", width: "1.0", crop: "pad"},
  {overlay: new cloudinary.Layer().publicId("radial_ipdlli"), effect: "displace", y: -8},
  {effect: "trim"},
  {flags: "layer_apply", x: -26, y: 28}
  ]})
React:
<Image publicId="glass.jpg" >
  <Transformation overlay="sample" width="182" height="198" />
  <Transformation height="2.0" width="1.0" crop="pad" />
  <Transformation overlay="radial_ipdlli" effect="displace" y="-8" />
  <Transformation effect="trim" />
  <Transformation flags="layer_apply" x="-26" y="28" />
</Image>
Angular:
<cl-image public-id="glass.jpg" >
  <cl-transformation overlay="sample" width="182" height="198">
  </cl-transformation>
  <cl-transformation height="2.0" width="1.0" crop="pad">
  </cl-transformation>
  <cl-transformation overlay="radial_ipdlli" effect="displace" y="-8">
  </cl-transformation>
  <cl-transformation effect="trim">
  </cl-transformation>
  <cl-transformation flags="layer_apply" x="-26" y="28">
  </cl-transformation>
</cl-image>
.Net:
cloudinary.Api.UrlImgUp.Transform(new Transformation()
  .Overlay(new Layer().PublicId("sample")).Width(182).Height(198).Chain()
  .Height(2.0).Width(1.0).Crop("pad").Chain()
  .Overlay(new Layer().PublicId("radial_ipdlli")).Effect("displace").Y(-8).Chain()
  .Effect("trim").Chain()
  .Flags("layer_apply").X(-26).Y(28)).BuildImageTag("glass.jpg")
Android:
MediaManager.get().url().transformation(new Transformation()
  .overlay(new Layer().publicId("sample")).width(182).height(198).chain()
  .height(2.0).width(1.0).crop("pad").chain()
  .overlay(new Layer().publicId("radial_ipdlli")).effect("displace").y(-8).chain()
  .effect("trim").chain()
  .flags("layer_apply").x(-26).y(28)).generate("glass.jpg");
iOS:
imageView.cldSetImage(cloudinary.createUrl().setTransformation(CLDTransformation()
  .setOverlay("sample").setWidth(182).setHeight(198).chain()
  .setHeight(2.0).setWidth(1.0).setCrop("pad").chain()
  .setOverlay("radial_ipdlli").setEffect("displace").setY(-8).chain()
  .setEffect("trim").chain()
  .setFlags("layer_apply").setX(-26).setY(28)).generate("glass.jpg")!, cloudinary: cloudinary)
Mug

For details, see Cloudinary’s demo of product personalization on Codepen.

Removing Image Backgrounds

To remove the background of an image, e.g., a photo, first activate the AI Removal Background add-on on your Cloudinary Dashboard.

You can then remove an image’s background with the following code:

Ruby:
Cloudinary::Uploader.upload("baseball.jpg",
  :public_id => "baseball_no_bg",
  :background_removal => 'cloudinary_ai',
  :notification_url => "https://mysite.example.com/hooks")
PHP:
\Cloudinary\Uploader::upload("baseball.jpg", 
  array(
    "public_id" => "baseball_no_bg",
    "background_removal" => "cloudinary_ai",
    "notification_url" => "https://mysite.example.com/hooks"));
Python:
cloudinary.uploader.upload("baseball.jpg",
  public_id = "baseball_no_bg",
  background_removal = "cloudinary_ai",
  notification_url = "https://mysite.example.com/hooks")
Node.js:
cloudinary.v2.uploader.upload("baseball.jpg", 
  { public_id: "baseball_no_bg",
    background_removal: "cloudinary_ai",
    notification_url: "https://mysite.example.com/hooks" }),
  function(error, result){console.log(result);});
Java:
cloudinary.uploader().upload("baseball.jpg", 
  ObjectUtils.asMap(
    "public_id", "baseball_no_bg",
    "background_removal", "cloudinary_ai",
    "notification_url", "https://mysite.example.com/hooks"));
.Net:
var uploadParams = new ImageUploadParams(){
  File = new FileDescription(@"baseball.jpg"),
  PublicId = "baseball_no_bg",
  BackgroundRemoval = "cloudinary_ai",
  NotificationUrl = "https://mysite.example.com/hooks"};
var uploadResult = cloudinary.Upload(uploadParams);

In the code above, notification_url is the endpoint that receives a POST request when background removal is complete. Here’s an example:

{
    "info_kind": "cloudinary_ai",
    "info_status": "complete",
    "public_id": "bg",
    "uploaded_at": "2019-02-25T17:33:45Z",
    "version": 1551104931,
    "url": "http://res.cloudinary.com/demo/image/upload/v1551104931/bg.png",
    "secure_url": "https://res.cloudinary.com/demo/image/upload/v1551104931/bg.png",
    "etag": "6567d798ca4087468dc7d23bcb8a45ec",
    "notification_type": "info"
}

As a comparison, see—

These:

Become These!

Baseball player - original

baseball player - no background

Optimizing Rotated Images

By default, regardless of the programming language, Cloudinary automatically performs certain optimizations on all transformed images. For an enhanced user experience, before delivering them to users, further optimize your visual media by adding a couple of parameters to their URLs.

Automatic Quality and Encoding

The **q_auto** parameter directs Cloudinary to select the optimal quality-compression level and encoding settings according to the image content and format, also the viewing browser. The resultant image, reduced in size to save bandwidth, is of excellent visual quality. See this example URL:

Ruby:
cl_image_tag("180_yacaar.png", :transformation=>[
  {:effect=>"shadow:40", :quality=>"auto"},
  {:angle=>60}
  ])
PHP:
cl_image_tag("180_yacaar.png", array("transformation"=>array(
  array("effect"=>"shadow:40", "quality"=>"auto"),
  array("angle"=>60)
  )))
Python:
CloudinaryImage("180_yacaar.png").image(transformation=[
  {'effect': "shadow:40", 'quality': "auto"},
  {'angle': 60}
  ])
Node.js:
cloudinary.image("180_yacaar.png", {transformation: [
  {effect: "shadow:40", quality: "auto"},
  {angle: 60}
  ]})
Java:
cloudinary.url().transformation(new Transformation()
  .effect("shadow:40").quality("auto").chain()
  .angle(60)).imageTag("180_yacaar.png");
JS:
cloudinary.imageTag('180_yacaar.png', {transformation: [
  {effect: "shadow:40", quality: "auto"},
  {angle: 60}
  ]}).toHtml();
jQuery:
$.cloudinary.image("180_yacaar.png", {transformation: [
  {effect: "shadow:40", quality: "auto"},
  {angle: 60}
  ]})
React:
<Image publicId="180_yacaar.png" >
  <Transformation effect="shadow:40" quality="auto" />
  <Transformation angle="60" />
</Image>
Angular:
<cl-image public-id="180_yacaar.png" >
  <cl-transformation effect="shadow:40" quality="auto">
  </cl-transformation>
  <cl-transformation angle="60">
  </cl-transformation>
</cl-image>
.Net:
cloudinary.Api.UrlImgUp.Transform(new Transformation()
  .Effect("shadow:40").Quality("auto").Chain()
  .Angle(60)).BuildImageTag("180_yacaar.png")
Android:
MediaManager.get().url().transformation(new Transformation()
  .effect("shadow:40").quality("auto").chain()
  .angle(60)).generate("180_yacaar.png");
iOS:
imageView.cldSetImage(cloudinary.createUrl().setTransformation(CLDTransformation()
  .setEffect("shadow:40").setQuality("auto").chain()
  .setAngle(60)).generate("180_yacaar.png")!, cloudinary: cloudinary)
Logo

Automatic Formatting

The **f_auto** parameter directs Cloudinary to analyze the image content and then select the best delivery format. For example, Cloudinary delivers WebP images to Chrome browsers, JPEG-XR images to Internet Explorer browsers, and retain the original format for all other browsers. However, regardless of the browser, if the quality algorithm determines that the optimal format for certain images is PNG-8 or PNG-24, Cloudinary delivers them according to that deduction.

Ruby:
cl_image_tag("180_yacaar.png", :transformation=>[
  {:effect=>"shadow:40"},
  {:angle=>60}
  ])
PHP:
cl_image_tag("180_yacaar.png", array("transformation"=>array(
  array("effect"=>"shadow:40"),
  array("angle"=>60)
  )))
Python:
CloudinaryImage("180_yacaar.png").image(transformation=[
  {'effect': "shadow:40"},
  {'angle': 60}
  ])
Node.js:
cloudinary.image("180_yacaar.png", {transformation: [
  {effect: "shadow:40"},
  {angle: 60}
  ]})
Java:
cloudinary.url().transformation(new Transformation()
  .effect("shadow:40").chain()
  .angle(60)).imageTag("180_yacaar.png");
JS:
cloudinary.imageTag('180_yacaar.png', {transformation: [
  {effect: "shadow:40"},
  {angle: 60}
  ]}).toHtml();
jQuery:
$.cloudinary.image("180_yacaar.png", {transformation: [
  {effect: "shadow:40"},
  {angle: 60}
  ]})
React:
<Image publicId="180_yacaar.png" >
  <Transformation effect="shadow:40" />
  <Transformation angle="60" />
</Image>
Angular:
<cl-image public-id="180_yacaar.png" >
  <cl-transformation effect="shadow:40">
  </cl-transformation>
  <cl-transformation angle="60">
  </cl-transformation>
</cl-image>
.Net:
cloudinary.Api.UrlImgUp.Transform(new Transformation()
  .Effect("shadow:40").Chain()
  .Angle(60)).BuildImageTag("180_yacaar.png")
Android:
MediaManager.get().url().transformation(new Transformation()
  .effect("shadow:40").chain()
  .angle(60)).generate("180_yacaar.png");
iOS:
imageView.cldSetImage(cloudinary.createUrl().setTransformation(CLDTransformation()
  .setEffect("shadow:40").chain()
  .setAngle(60)).generate("180_yacaar.png")!, cloudinary: cloudinary)
Logo

Summing Up

It’s a cakewalk to rotate or remove image backgrounds with Cloudinary. For more details, check out the related Cloudinary documentation and this article, which also describes how to perform other image transformations on Cloudinary.

Three Tips for Faster, Easier Video Delivery

$
0
0

three video tips

Videos make websites more engaging and lively, promising audience “stickiness” and return visits. However, research studies show that slow startup or playback stalls of videos often leads to visitor loss. In fact, Akamai found that after a two-second delay, each additional second of stalling could cost you a 6-percent depletion of audience.

Not surprisingly, the major factor that accounts for poor video performance on the web is file size because video files probably take up the most bandwidth on your website. For slow network connections, videos might play back faster than they can be downloaded, causing stalls. By optimizing videos for both file size and quality, you reduce the to-be-downloaded content for the same user experience, delivering faster playback with fewer stalls.

This post shows you how to leverage Cloudinary to reduce video file size yet still retain a high quality with only three simple tips. That is, you set Cloudinary parameters to resize the video dimensions, optimize the compression, and add codec settings for the optimum video format.

Resizing Video Dimensions

Oftentimes, raw videos are of a larger file size than is required for an ideal user experience. Even though many mobile devices can record videos in a 4K resolution, very few devices can actually replay 4K videos with that resolution. Resizing videos to 1080p, 720p, or even less pixels saves millions of pixels per frame, concurrently generating gratifyingly smaller files.

Take a 30 seconds long, 1280 pixels wide, and 720 pixels high video that weighs in at 25 MB. Resizing it to 960x540 produces a 10.7 MB video that’s 60-percent smaller. Plus, the video would start playing four times faster!

Resizing videos requires reencoding, which Cloudinary automatically handles once you’ve added a width (w) parameter to the video URL. For example, resizing this video with the w_960 parameter on Cloudinary—

Ruby:
cl_video_tag("rbsp_launch_720p_gz9zfm", :end_offset=>"30")
PHP:
cl_video_tag("rbsp_launch_720p_gz9zfm", array("end_offset"=>"30"))
Python:
CloudinaryVideo("rbsp_launch_720p_gz9zfm").video(end_offset="30")
Node.js:
cloudinary.video("rbsp_launch_720p_gz9zfm", {end_offset: "30"})
Java:
cloudinary.url().transformation(new Transformation().endOffset("30")).videoTag("rbsp_launch_720p_gz9zfm");
JS:
cloudinary.videoTag('rbsp_launch_720p_gz9zfm', {endOffset: "30"}).toHtml();
jQuery:
$.cloudinary.video("rbsp_launch_720p_gz9zfm", {end_offset: "30"})
React:
<Video publicId="rbsp_launch_720p_gz9zfm" >
  <Transformation endOffset="30" />
</Video>
Angular:
<cl-video public-id="rbsp_launch_720p_gz9zfm" >
  <cl-transformation end-offset="30">
  </cl-transformation>
</cl-video>
.Net:
cloudinary.Api.UrlVideoUp.Transform(new Transformation().EndOffset("30")).BuildVideoTag("rbsp_launch_720p_gz9zfm")
Android:
MediaManager.get().url().transformation(new Transformation().endOffset("30")).resourceType("video").generate("rbsp_launch_720p_gz9zfm.mp4");
iOS:
cloudinary.createUrl().setResourceType("video").setTransformation(CLDTransformation().setEndOffset("30")).generate("rbsp_launch_720p_gz9zfm.mp4")

—generated this resized version, which loads and starts playing much faster:

Ruby:
cl_video_tag("rbsp_launch_720p_gz9zfm", :end_offset=>"30", :width=>960, :crop=>"scale")
PHP:
cl_video_tag("rbsp_launch_720p_gz9zfm", array("end_offset"=>"30", "width"=>960, "crop"=>"scale"))
Python:
CloudinaryVideo("rbsp_launch_720p_gz9zfm").video(end_offset="30", width=960, crop="scale")
Node.js:
cloudinary.video("rbsp_launch_720p_gz9zfm", {end_offset: "30", width: 960, crop: "scale"})
Java:
cloudinary.url().transformation(new Transformation().endOffset("30").width(960).crop("scale")).videoTag("rbsp_launch_720p_gz9zfm");
JS:
cloudinary.videoTag('rbsp_launch_720p_gz9zfm', {endOffset: "30", width: 960, crop: "scale"}).toHtml();
jQuery:
$.cloudinary.video("rbsp_launch_720p_gz9zfm", {end_offset: "30", width: 960, crop: "scale"})
React:
<Video publicId="rbsp_launch_720p_gz9zfm" >
  <Transformation endOffset="30" width="960" crop="scale" />
</Video>
Angular:
<cl-video public-id="rbsp_launch_720p_gz9zfm" >
  <cl-transformation end-offset="30" width="960" crop="scale">
  </cl-transformation>
</cl-video>
.Net:
cloudinary.Api.UrlVideoUp.Transform(new Transformation().EndOffset("30").Width(960).Crop("scale")).BuildVideoTag("rbsp_launch_720p_gz9zfm")
Android:
MediaManager.get().url().transformation(new Transformation().endOffset("30").width(960).crop("scale")).resourceType("video").generate("rbsp_launch_720p_gz9zfm.mp4");
iOS:
cloudinary.createUrl().setResourceType("video").setTransformation(CLDTransformation().setEndOffset("30").setWidth(960).setCrop("scale")).generate("rbsp_launch_720p_gz9zfm.mp4")

Optimizing Video Compression

Video quality is paramount. If compressing videos, that is, combining pixels, for faster video delivery compromises their quality, that’s a lost cause. A common solution is to compress videos with a tool that also ensures that the quality degradation after compression is imperceptible. An example is free and open-source FFmpeg, which does the job by adjusting the Constant Rate Factor with the crf parameter while encoding videos: the higher the crf value, the more the compression. By default, FFmpeg sets crf=23. In general, values up to 28 are perfectly acceptable for the web.

An impressive alternative is Cloudinary, which automatically optimizes quality while compressing videos in all transformation tasks. All you need to do is add the vc_auto parameter to the video URL. See these two examples:

Ruby:
cl_video_tag("rbsp_launch_720p_gz9zfm", :end_offset=>"30", :video_codec=>"auto")
PHP:
cl_video_tag("rbsp_launch_720p_gz9zfm", array("end_offset"=>"30", "video_codec"=>"auto"))
Python:
CloudinaryVideo("rbsp_launch_720p_gz9zfm").video(end_offset="30", video_codec="auto")
Node.js:
cloudinary.video("rbsp_launch_720p_gz9zfm", {end_offset: "30", video_codec: "auto"})
Java:
cloudinary.url().transformation(new Transformation().endOffset("30").videoCodec("auto")).videoTag("rbsp_launch_720p_gz9zfm");
JS:
cloudinary.videoTag('rbsp_launch_720p_gz9zfm', {endOffset: "30", videoCodec: "auto"}).toHtml();
jQuery:
$.cloudinary.video("rbsp_launch_720p_gz9zfm", {end_offset: "30", video_codec: "auto"})
React:
<Video publicId="rbsp_launch_720p_gz9zfm" >
  <Transformation endOffset="30" videoCodec="auto" />
</Video>
Angular:
<cl-video public-id="rbsp_launch_720p_gz9zfm" >
  <cl-transformation end-offset="30" video-codec="auto">
  </cl-transformation>
</cl-video>
.Net:
cloudinary.Api.UrlVideoUp.Transform(new Transformation().EndOffset("30").VideoCodec("auto")).BuildVideoTag("rbsp_launch_720p_gz9zfm")
Android:
MediaManager.get().url().transformation(new Transformation().endOffset("30").videoCodec("auto")).resourceType("video").generate("rbsp_launch_720p_gz9zfm.mp4");
iOS:
cloudinary.createUrl().setResourceType("video").setTransformation(CLDTransformation().setEndOffset("30").setVideoCodec("auto")).generate("rbsp_launch_720p_gz9zfm.mp4")

Ruby:
cl_video_tag("rbsp_launch_720p_gz9zfm", :end_offset=>"30", :width=>960, :video_codec=>"auto", :crop=>"scale")
PHP:
cl_video_tag("rbsp_launch_720p_gz9zfm", array("end_offset"=>"30", "width"=>960, "video_codec"=>"auto", "crop"=>"scale"))
Python:
CloudinaryVideo("rbsp_launch_720p_gz9zfm").video(end_offset="30", width=960, video_codec="auto", crop="scale")
Node.js:
cloudinary.video("rbsp_launch_720p_gz9zfm", {end_offset: "30", width: 960, video_codec: "auto", crop: "scale"})
Java:
cloudinary.url().transformation(new Transformation().endOffset("30").width(960).videoCodec("auto").crop("scale")).videoTag("rbsp_launch_720p_gz9zfm");
JS:
cloudinary.videoTag('rbsp_launch_720p_gz9zfm', {endOffset: "30", width: 960, videoCodec: "auto", crop: "scale"}).toHtml();
jQuery:
$.cloudinary.video("rbsp_launch_720p_gz9zfm", {end_offset: "30", width: 960, video_codec: "auto", crop: "scale"})
React:
<Video publicId="rbsp_launch_720p_gz9zfm" >
  <Transformation endOffset="30" width="960" videoCodec="auto" crop="scale" />
</Video>
Angular:
<cl-video public-id="rbsp_launch_720p_gz9zfm" >
  <cl-transformation end-offset="30" width="960" video-codec="auto" crop="scale">
  </cl-transformation>
</cl-video>
.Net:
cloudinary.Api.UrlVideoUp.Transform(new Transformation().EndOffset("30").Width(960).VideoCodec("auto").Crop("scale")).BuildVideoTag("rbsp_launch_720p_gz9zfm")
Android:
MediaManager.get().url().transformation(new Transformation().endOffset("30").width(960).videoCodec("auto").crop("scale")).resourceType("video").generate("rbsp_launch_720p_gz9zfm.mp4");
iOS:
cloudinary.createUrl().setResourceType("video").setTransformation(CLDTransformation().setEndOffset("30").setWidth(960).setVideoCodec("auto").setCrop("scale")).generate("rbsp_launch_720p_gz9zfm.mp4")

After transformation, the file size of the 1280-pixel-wide video drops from 25 MB to 4.1 MB, an 84-percent reduction. The 10.7-MB, 960-pixel-wide video takes up only 2.3 MB, 78.5 percent less than before. Both videos start up faster with more content in the buffer, rendering stalls during playbacks less likely.

You must be wondering: how has the video quality changed? As a rule, quality is measured with these three tests:

  • The Structural SIMilarity (SSIM) index
  • The Peak Signal-to-Noise Ratio (PSNR)
  • The Video Multimethod Assessment Fusion (VMAF) metric

The following table shows the values of the two example videos above:

Dimensions SSIM PSNR VMAF
1280x720
    0.985
    45.4
    89.6
960x540
    0.985
    45.1
    88.8

All the values fall within the acceptable limits, testifying to the fact that size reduction along with compression only minimally impacts the visual quality of the videos. Still, do test your post-compression videos to ensure that their quality meets your standards.

Identifying the Optimum Video Format

Finally, pinpoint a video format that best satisfies your requirements. The tests described in the preceding section were on H.264 MP4, an old yet popular format that works on almost all browsers. WebM with its VP8 and VP9 encodings are newer formats that deliver similar quality with smaller-sized videos. However, those two formats don’t work on certain browsers.

Reencoding videos with Cloudinary requires only changing vc_auto in the URL to vc_vp8, vc_vp9, or vc_h265. Cloudinary’s optimization capabilities for video delivery are at least 50-percent smaller in file size. Notwithstanding the negligible improvement in startup time, more video is in the buffer at startup, further reducing the probability of stalls.

Summing Up

As explained in this post, Cloudinary can, with these three simple, intuitive tips, downsize a video from 25 MB to 1.7 MB, 93% smaller, with no perceptible loss in visual quality. The time savings in downloads and startup in addition to fewer stalls during playbacks are all too obvious and significant. Do give those helpful features a try with your video delivery.


Doug Sillars Doug Sillars s a freelance mobile performance expert, having helped thousands of developers speed up their mobile apps and websites. A Google Developer Expert and the author of O’Reilly’s “High Performance Android Apps”. Doug has spoken at developer conferences in the US and Europe, and blogs regularly at  dougsillars.com. You can also find him at @dougsillars on Twitter.

Further Reading on Video Manipulation

Questing for Technology Adoption and Advocacy by External Developers: Their Trend Is Your Friend

$
0
0

Advocacy by External Developers
  • Part 1 describes the importance of engendering support from external developers to ensure success of innovative technologies.
  • Part 2 delineates what energizes and inspires developers.
  • Part 3 elaborates on two common mistakes that technology vendors make when planning strategies for winning over outside developers along with suggestions on how to get prepared.

Here in part 4, I’ll discuss the groundwork you as a technology vendor must lay before mounting efforts to win adoption and advocacy from external developers, and share my take on how to best connect with them and win their enthusiastic support for your technology.

Expound the Context

Context precedes understanding, affording mental connections to relationships and patterns.

Ask yourself: does the description of your technology readily answer the following questions?

  • What’s the environment in which the technology operates?
  • What problems, especially critical pain points, does it solve?
  • How might other related factors, if any, affect its operation?
  • What are the caveats, if any, and how do you head them off?

Given the proper context, new technologies end up manifesting their own progress, thanks to the omnipresence of affiliated forums.

Identify Development Trends

As evidenced by its history, software development forges on, one big wave after another, sustained for a period of time but sooner or later superseded by the next wave. Examples abound, such as the move to mobile computing on the heels of the smartphone debut, the popularity of visual media that fosters the richness of an increasingly pictorial web, and the ubiquity of the social web (Facebook, Instagram, WhatsApp, and other popular chat apps), which races to meet the ever-growing demand for fast, multiuser communications.

Consequently, the next development trend is your ally and friend. If your technology applies to one or more of that trend’s aspects, you are armed with the key ammunition for initiating conversations with developers whose day-to-day work is focused there. Recruiting those techies as advocates for your technology by zeroing in on their needs then becomes the next logical step.

Furthermore, your technology is slated to gain traction if it solves fundamental problems developers face in contemporary, trending concerns, such as the following:

  • Software (and function) as a service (SaaS and FaaS)
  • Scalability and performance of cloud apps
  • Enhanced capability for edge computing

So pick a theme or two from popular development trends and describe how your technology would do wonders for them. At speaking engagements, conference sessions, and community forums, in which developers discuss technical topics, home in on the problem-solving aspect of your technology instead of evangelizing its merits. Chances are that once your message has sunk in, you’ll have rallied a sizable group of developers who would be happy to try it out and, in case of success, spread the word for you. Advertising by association in this manner pays handsome dividends.

Help Champions Win Endorsement

As a rule and for good reason, before adopting new technologies, companies customarily mandate approvals from IT, tech execs, and budget-holding stakeholders. Besides acting as a missionary for your technologies, help your prospective developer advocates with the selling job they must do within their organizations by lending your expertise, skills, and perspectives. A technology touted simply as being “useful” doesn’t cut it; stakeholders legitimately and justifiably worry about integration, security, scalability, performance, effects on other software components, and such.

Bottom line: practice empathy. Place yourself in the shoes of those who have skin in the game, learn what matters to them, and alleviate their concerns and reservations with clear explanations supported by concrete, demonstrable examples. After all, software development is complex with dependencies galore and your technology shouldn’t make it (or be perceived as making it) more complex.

Collaborate With Prospective Advocates

An effective way of winning developer champions is to actively collaborate with them, initially in several ecosystems, each of which with its own unique requirements.

Follow these steps:

  1. Do this background research yourself:

    Understand what the requirements entail for each of the organizations to which your prospective champions belong. One-size-fits-all in this context is a myth.

    Prioritize the requirements, highlighting the ones that matter the most and to which developers.

    Delve deep into the specifics, research thoroughly, and emphasize the salient points.

  2. Experiment at length with your collaborators. Review the results together, pick the ecosystem to work with, and test in detail.

    Tip: A surefire way of gaining insight and perspectives is to attend developer events that relate to the target ecosystems. Event speakers and workshop instructors often share their expertise, viewpoints, and experience by contributing articles to technical journals and the like. Reap the wisdom offered by those commentaries and analyses.

  3. Stay flexible. Treat decisions as being nothing more than educated guesses and remind yourself that you’re experimenting. Be prepared to change gears or adopt another ecosystem as circumstances warrant.

  4. Leverage comments. The interactions and feedback from your developer collaborators are invaluable, promising to steer you toward the correct ecosystem to engage in and bring to light your best allies and true champions.

Throughout the process, listen well. In fact, listen a lot more frequently than talk. As contradictory as that behavior might sound with you being on stage as a technology proponent, questions are an effective tool that often elicits input, which forms a key basis for your ecosystem pick. In addition, speak the audience’s lingo, take notes, respond promptly, follow through, and solicit opinions. Assuredly, your collaborators would appreciate and value your responsiveness, vigilance, respect, and support, let alone cherish having you as a sounding board and partner.

Proud to be Named to the Forbes Cloud 100

$
0
0

Forbes Cloud 100

Last night I attended a very special event honoring companies named to the annual Forbes Cloud 100. It was an incredible night spent with the founders and leaders of many companies I’ve long admired.

I’m grateful for every Cloudinarian and the work they do to support our customers, partners, and culture. We should all feel proud to be on this list and to be on an incredibly unique journey in the industry.

As the summer winds down and we plan to leave for our annual, week-long Company Gathering in Israel, there’s a lot of reflection on the year we’ve just had, both as an organization and as a SaaS media management platform designed to help our customers engage more effectively with their own customers.

Recapping all of our milestones and lessons learned so far this year would make for a long post, so I’ll stick with the key highlights.

  • We hit and quickly surpassed the 500K user mark and added 1,000 customers including major enterprise customers from around the world including StubHub, Nintendo and Trivago.
  • Still relatively new kids on the Digital Asset Management platform block, our unique approach is revolutionizing DAM and delivering what modern companies need today, and we’re thrilled with the positive response as evidenced by the rapid adoption by customers and partners.
  • We were pleased to expand our strategic partnerships with industry leaders like AWS, Adobe, Magento and Salesforce.
  • We hosted our third annual ImageCon conference in San Francisco and launched our first annual State of Visual Media report.
  • We established a Customer Advisory Board, a growing Media Developer Experts (MDE) program, and kicked off a multi-city training tour.
  • We expanded our UK office less than a year after opening it, added one in Poland, expanded our Israel office, again, moved our US headquarters to a much bigger space in Santa Clara, and added more than 75 employees to the team.

We’re still profitable, 100% bootstrapped and remain one of the healthiest companies in the market while continuing to grow fast. No doubt, it has been an incredible year so far, and one that might seem pretty hard to beat. But in many ways we’re just getting started.

Digital media is changing the rules of engagement for every market, from retail/e-Commerce to adtech, and from media and entertainment to finance. We’ve gone from always on to always visual in short order, and I believe we’re going to continue to see explosive growth across all areas of what we call the Visual Economy.

So what’s next?

New image formats and standards will continue to evolve and push for improved quality and support for a broader set of use cases. Our own Jon Sneyers is helping to lead an effort with the JPEG Committee and Google to create an update to JPEG, a universal next-gen image format called JPEG XL.

Companies will harness the power of video like never before, and see huge upticks in engagement and sales. We know that online shoppers are more inclined to purchase a product after watching a video about it, and that emails with videos skyrocket click-through rates by 200 to 300 percent. We continue to innovate here and are innovating constantly in this area.

Advancements in machine learning and data analytics will continue to drive new customer experiences, improve engagement, deliver personalized experiences, and allow companies and brands to better understand what’s connecting with consumers and what’s not -- all to make better connections and smarter business-critical decisions in real time. We’re excited about our own improvements in machine learning and AI such as automated background removal, content-aware video cropping, custom object detection and much more.

Efforts to ensure optimal security and privacy will continue to drive important discussions with regard to keeping our images, videos and platforms as protected as possible. In parallel we must also continue to rise to the challenges and opportunities relating to accessibility to ensure that everyone, and not just a subset of users, has access to the Internet as it was intended; an open platform for all and a great equalizer. We have much work to do in this area as humans and technologists and we’re committed to doing our part.

Last but not least, as we near 2020 (queue up all the 20/20 vision puns), we know that the broader digital ecosystem and customer experience landscape are evolving quickly. These radical shifts and innovations will require new thinking and new collaborations. For me, and for us as an organization, understanding our customers and their digital engagement challenges across the broader media ecosystem, so we can continue to make it easier for them to deliver the kinds of online experiences they need to be successful, is one of the things that excites me the most.

Drop me a line with any thoughts or comments. I’d love to hear what’s on your mind.

And if what we’re up to sounds of interest to you, take a look at our open positions and join us!

Viewing all 601 articles
Browse latest View live