Quantcast
Channel: Cloudinary Blog
Viewing all 601 articles
Browse latest View live

Cloudinary Helps Feature Upvote Bring Product Feedback Alive

$
0
0

Feature Upvote Cover image

At Feature Upvote, we specialize in enabling product managers to consolidate and prioritize customer feedback through simple online boards with a built-in voting capability. Companies across the world use our boards either publicly or privately to source ideas from their internal teams or B2B clients.

Early on, however, we ran into a problem: Our customers wanted their commenters to be able to attach images. That was a perfectly understandable, reasonable request because, after all, a picture is worth a thousand words. Words are all too often not enough and a screenshot or mockup could clearly and succinctly complement a message

So, we quickly got to work to build a media-hosting tool through Amazon Web Services (AWS)—only to run into two major issues: ease of use and optimization. After more brainstorming, we decided that building such a tool in-house from scratch was an unrealistic fool’s errand. Surely there was a company with a product or service that would meet our needs?

That was when we found Cloudinary.

Why Building an Image-upload Widget Yourself Is a Bad Idea

We're a SaaS business and our CEO is a developer by trade—not short on software talent at all. However, numerous roadblocks stood in our way of building an image-upload widget. To name only two—

  • One of Feature Upvote’s selling points is that it works smoothly on all modern devices. But how do we make it easy and fast to upload images, regardless of device? That’s tough to do. Trust us, we tried.
  • Serving unoptimized images wastes bandwidth and causes slow performance, frustrating customers to no end. Serving images in the optimize size and format is hard.

Cloudinary solved both problems for us.

How Cloudinary Offers the Full Feature Set We Needed

Cloudinary offers all the features we were looking for, namely, upload, storage, and optimal delivery of images.

The image-upload widget was what really sold us on Cloudinary. Getting started with the widget was easy: All we had to do was add a JavaScript snippet to our site. The widget works brilliantly on all the devices on which we tested it.

In short, we found Cloudinary extremely easy to use and our experience has been flawless.

How It Took Us Only One Afternoon to Integrate et With Cloudinary

Integrating Cloudinary into Feature Upvote was straightforward. What helped a lot was that Cloudinary features a Java library andour back end is in Java.

Not the least, we found it a cakewalk to find the best approach for serving images. That was because, with Cloudinary, we could scale and transform images merely by adding parameters to their URLs. Absolutely terrific..

How Cloudinary Makes Us More Productive

First up, Cloudinary helped us achieve in a day or two what might have taken weeks, months, or even years of intense development. Consequently, we saved many thousands of dollars and ended up with a more robust, efficient system than what we could have clobbered together ourselves.

Since the initial setup, we've discovered unexpected productivity savings:

  • From the Cloudinary dashboard, we can easily pinpoint images that are taking up far too much bandwidth. We can then investigate and take corrective action, if necessary.
  • Cloudinary's auto-tagging capability has helped us organize our media library big time. With Cloudinary's smart APIs, we’ve tagged each and every image with an ID unique to each customer.
  • Those housekeeping tasks go a long way in enabling us to keep track of image ownership by customer. Also, cleaning our media library as customers move on takes only one simple step: Ask the Cloudinary API to delete all the images with a particular tag.

Perfect.


New AI-Based Image Auto-Crop Algorithm Sticks to the Subject

$
0
0

AI-Based Image Auto-Crop

If you're the developer for an online store, a news site, a social media app, or any other website that delivers new media content on a regular basis, you are probably painfully familiar with both the challenge and importance of delivering well-cropped images.

In a nutshell, your customers expect top-quality, quick-loading photos that clearly show them what they need to see no matter what device they happen to be using at the moment. Making them happy requires delivering the same image in many different aspect ratios, and potentially cropping closer or wider on your main subject, depending on size. Hardly sounds reasonable, but if you don't meet their expectations, your customers will just go somewhere else...

(Why do I feel like I'm describing my teenage daughters? Well, to be honest, the demanding nature and short attention span of today's online customers have a lot in common with teens…)

But unlike teens, you can't afford to fall short of your users' demands. If you've got hundreds or thousands of images to deliver every day, you can't manually crop every image to the right size for every device and placement. Simple client-side scaling of your high quality images would mean completely unacceptable performance and quality. So it's clear that you must adjust the size and aspect ratio of your images programmatically, and then deliver the various image resolutions using responsive delivery code, probably via <picture> and <srcset> tags.

Then the question arises -- if you programmatically crop the same photo to significantly different aspect ratios, how can you be sure your code won't crop off the most important parts of your products, news subjects, or that adorable cat your users just have to share with the world?

If you are already familiar with Cloudinary's powerful media management and delivery capabilities, you might be saying - what's the problem? Just use Cloudinary's image auto-cropping gravity parameter (aka g_auto) and it will do the hard work for you!

And in fact, thousands of Cloudinary developers already use g_auto in their image URLs to automatically crop millions of images daily. That parameter applies a sophisticated algorithm that analyzes the pixels in an image and prioritizes the most salient areas of each image on-the-fly. The analysis gives priority to skin tones, edge detection, color contrasts, any detected faces, and more, in order to determine the most important areas to keep when it crops.

But what if Cloudinary's already powerful image auto-crop functionality could be even smarter?

Introducing Subject Detection Image Auto Cropping

Cloudinary's new and improved deep-learning-based g_autotransformation parameter goes beyond the saliency analysis described above, adding the capability to actually detect the subjects in an image that would be most likely to capture a person's attention.

To accomplish this, our new image auto-cropping deep learning mechanism has been (and continues to be) fed with tens of thousands of images and corresponding human input that together teach our machines to predict the important regions in images, no matter their subject and layout. This involves advanced computations performed by GPU-based hardware clusters that process millions of crop requests on the fly. The result is completely unique auto-cropping functionality that provides very impressive outputs.

Remember those products, news images, and user-generated content (aka cats) we talked about above?

Look what would happen to these mobile-camera photographs if we were to crop them to a square using the standard center cropping that other programs often apply, and how the new and improved g_auto with subject-detection cropping comes to the rescue in each of these crops:

Product - original original Product image with center cropping center crop Product image with subject detection cropping g_auto crop
News image - original original News image with center cropping center crop News image with subject detection cropping g_auto crop
Cat image - original original Cat image with center cropping center crop Cat image with subject detection cropping g_auto crop

How do you apply this cool cropping method on your delivered images? After uploading your original image to your Cloudinary account, just specify auto as the gravity (area to keep) in your on-the-fly delivery URL, along with a crop mode such as fill, lfill, or crop, and of-course an aspect ratio or width/height combination that's different than the original.

For example, here's how you'd deliver that nicely cropped cat above as a 500px square (1.0 aspect ratio or ar_1 in the delivery URL):

Ruby:
cl_image_tag("docs/cat_yellow_leaves2.jpg", :gravity=>"auto", :aspect_ratio=>"1", :width=>500, :crop=>"fill")
PHP:
cl_image_tag("docs/cat_yellow_leaves2.jpg", array("gravity"=>"auto", "aspect_ratio"=>"1", "width"=>500, "crop"=>"fill"))
Python:
CloudinaryImage("docs/cat_yellow_leaves2.jpg").image(gravity="auto", aspect_ratio="1", width=500, crop="fill")
Node.js:
cloudinary.image("docs/cat_yellow_leaves2.jpg", {gravity: "auto", aspect_ratio: "1", width: 500, crop: "fill"})
Java:
cloudinary.url().transformation(new Transformation().gravity("auto").aspectRatio("1").width(500).crop("fill")).imageTag("docs/cat_yellow_leaves2.jpg");
JS:
cloudinary.imageTag('docs/cat_yellow_leaves2.jpg', {gravity: "auto", aspectRatio: "1", width: 500, crop: "fill"}).toHtml();
jQuery:
$.cloudinary.image("docs/cat_yellow_leaves2.jpg", {gravity: "auto", aspect_ratio: "1", width: 500, crop: "fill"})
React:
<Image publicId="docs/cat_yellow_leaves2.jpg" >
  <Transformation gravity="auto" aspectRatio="1" width="500" crop="fill" />
</Image>
Angular:
<cl-image public-id="docs/cat_yellow_leaves2.jpg" >
  <cl-transformation gravity="auto" aspect-ratio="1" width="500" crop="fill">
  </cl-transformation>
</cl-image>
.Net:
cloudinary.Api.UrlImgUp.Transform(new Transformation().Gravity("auto").AspectRatio("1").Width(500).Crop("fill")).BuildImageTag("docs/cat_yellow_leaves2.jpg")
Android:
MediaManager.get().url().transformation(new Transformation().gravity("auto").aspectRatio("1").width(500).crop("fill")).generate("docs/cat_yellow_leaves2.jpg");
iOS:
imageView.cldSetImage(cloudinary.createUrl().setTransformation(CLDTransformation().setGravity("auto").setAspectRatio("1").setWidth(500).setCrop("fill")).generate("docs/cat_yellow_leaves2.jpg")!, cloudinary: cloudinary)

Classic Or Subject?

This latest addition to Cloudinary's growing set of machine learning capabilities analyzes the image as a whole, rather than the pixel by pixel analysis that's applied in our classic auto-cropping feature.

In the majority of cases, the classic saliency algorithms and our new subject-detection method will provide the same or very similar results. But when processing the vast number of auto-crops that Cloudinary handles every day, there are some cases where we felt we could provide even better results. For example, the new subject-detection algorithm can be more reliable in cases where the true main subject of the photo would otherwise have to compete with elements like sunlight, faces, or other large areas of color contrast that are not actually central to the 'story' of the image.

For example, the classic auto-cropping algorithm gives increased priority to the bright contrasts of the leaves against the sky, and thus in this case, doesn't keep the girl when the aspect ratio is changed significantly. But the artificial intelligence algorithm emulates what our intuition tells us, and the automatic crop is right on target.

Original Original Original Classic auto-crop Original New auto-crop

Just a quick note here, that in order to get the best of all worlds, the default g_auto parameter now applies a combination of the subject and classic algorithms (more heavily leaning towards the subject results). But you can always proactively request either the classic or subject mechanism with any crop mode using auto:classic or auto:subject as the gravity (g_) value.

Auto-Cropping and Responsive Art Direction

The value of great image auto-cropping really comes into play when you start thinking about delivering the same image in different devices.

Organizations who need to play it safe tend to just scale down their original image and deliver the same thing regardless of the device viewport aspect ratio. But that means you really sacrifice on the detail, when on smaller screens or when the aspect ratios are significantly different from the original.

When you rotate your phone between portrait and landscape, you are switching between ~19:9 vs. 9:19, or an aspect ratio of 2.1 vs. 0.47, while your computer screen viewers are probably using a 4:3 or 16:9 screen. Do you really want to deliver the identical image in all these views?

In general, images that fill the device viewport get the most engagement. But you can only go that route if you can be sure that even if 50% or more of the image may be cropped out, you'll still keep the important parts of your image in tact.

For example, with the new g_auto, you can confidently deliver images that fill a phone's view port, even when users rotate their phones, so when viewer's rotate their phones, you can offer your viewers the more engaging option Bs rather than the tiny option As.

Original
Option A
Original
Option B
Original
Option A
Original
Option B

When the Subject, is Subject to Change…

Programmatically cropped images are an essential part of any web or mobile site. But when the subjects, and the location of those subjects within your images, are unpredictable, automatic cropping isn't enough. The cropping mechanism you use has to be smart enough to 'know' what the end users are going to want to see. With Cloudinary's subject detection auto cropping, you can confidently deliver great photos that bring your users' attention directly to the subject at hand, from responsive view to responsive view.

Oh, by the way, if your subject is not so likely to change, for example, suppose you are selling microwaves, umbrellas, vehicles, or food, you may want to take advantage of our new object-aware image cropping add-on. This add-on applies another deep learning tool that gives the highest preservation ("don't crop") priority to specific objects or categories you specify. If the specified object(s) aren't found, then (by default) the subject-detection auto-cropping algorithm described here is still applied.

The end goal? With these smart AI algorithms, you can confidently use the same cropping transformation with virtually every image you deliver, no matter the size and layout of your images, the user's device, or your graphic design.

The subject detection auto-cropping we've demonstrated in this post is available with all of Cloudinary's plans; even the free plan!

Learn more about g_auto:subject and all the automatic cropping options in our docs.

Managing Visual Media With the Cloudinary-Netlify Integration

$
0
0

CMS integration

Static sites and the JAMstack are quickly becoming a standard for developing safe and performant websites with an optimal workflow for developers. Netlify CMS (not to be confused with the company that created it, Netlify) is an open source content management solution that works especially with static site generators such as Gatsby, Hugo, etc... enabling content storage in your Git repository along with your code for easier versioning, multichannel publishing, and direct content updates in Git.

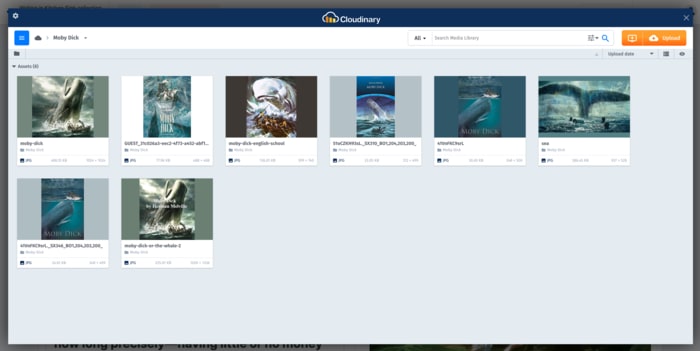
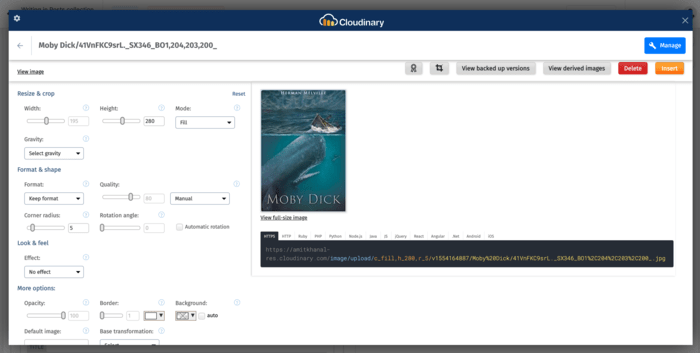
Cloudinary is integrated with Netlify CMS, meaning that you can seamlessly manage and publish media from Cloudinary within Netlify CMS. That is, you can load Cloudinary’s Media Library widget in Netlify CMS and then perform all the tasks you would normally do within the Cloudinary Media Library, for example, upload, search, tag, transform, or insert images.

Setting Up the CMS Integration

Integrating Cloudinary into Netlify CMS takes only a few configurations:

  1. Sign up for a free Cloudinary account if you don’t already have one.
  2. Add Netlify CMS to an existing site or if you don’t already have a site that uses Netlify CMS, you can create a new site from a template. Alternatively, follow the instructions to configure Cloudinary within Netlify CMS.

That’s it!

Afterwards, the Netlify CMS built in Media Library button and all image fields will use the Cloudinary Media Library to insert images. Furthermore, you can transform the image (see the illustration below for an example) from within the Media Library. Cloudinary applies such transformations as chained transformations on top of the global or field-level transformations. For details, see the configuration options.

Note
You can do a lot more with the Media Library widget, for example, upload, tag, move, or delete images. In other words, the Cloudinary-Netlify CMS integration makes available all the capabilities of Cloudinary’s Media Library within Netlify CMS.

media library media library widget

Here are some additional highlights:

  • The Cloudinary-Netlify CMS integration is available for all account tiers.
  • You can add transformations globally or per field. Global transformations apply to all images. Field-level transformations override global ones.
  • You can also define chain transformations for the global or field level. Below is an example of media library configuration in Netlify CMS that has 3 transformations chained together under ‘default_transformations’.
media_library:
  name: cloudinary
  config:
    default_transformations:
              -   - fetch_format: auto
                    quality: auto
                  - width: 300
                    crop: fill
                  - overlay: {font_family: "Verdana", font_size: 25, font_weight: "bold", text_decoration: "underline", letter_spacing: 8, text: "Hello"}
                    effect: grayscale
    cloud_name: *********
    api_key: *********

Note
Currently, only animated GIFs and images work with the Cloudinary-Netlify CMS integration. Videos will work, too, sometime in the future. Stay tuned.

Summing It Up

The Cloudinary-Netlify CMS integration brings together the best of both worlds, giving you flexibility and control over your content and media assets. No more worries about managing all that media. You can now focus on content authoring and publication with rich and optimized media.

Your turn next! In the Comments section below, tell us what you think about this integration and how it works out for you. Also, we’d love to hear about the sites you’ve built with Netlify CMS that manage and deliver images through Cloudinary.

Debut of the Cloudinary Customer Advisory Board

$
0
0

Customer Advisory Board

Focus on customers has always been Cloudinary’s mantra. Because we owe them our success, we are constantly reaching out to our customers, not just for feedback on our offerings, but also for their vision, wish list, and buy-in of what Cloudinary can do to meet their needs and make them succeed. About six months ago, it occurred to us that it would be beneficial if we could meet regularly with those who are behind innovation at our key customers—executives, product gurus, developers, content managers—to swap strategies, product roadmaps, best practices, and such. In particular, we’d like to solicit actionable feedback as a foundation for our plans of product enhancements.

A subsequent powwow with our product chief, Nadav Soferman, started the process of the formation of a Customer Advisory Board (CAB) with representatives from Cloudinary and from our key customers. The board’s first all-day meeting will occur on Friday, May 3 at Palace Hotel in San Francisco, California, the day after Cloudinary’s annual digital-media conference, ImageCon 2019, to be held at the same venue on May 1-2.

Membership

Altogether, the Cloudinary CAB boasts a customer membership of 25 representatives from 15 companies, among them Jane.com, Just Eat, Hike, HelloFresh, Kenshoo, Nintendo, and StubHub. They hail from 11 countries: Canada, Germany, India, Israel, Japan, U.K., and others. Representatives from Cloudinary include our three founders: Itai Lahan, CEO; Tal Lev-Ami, CTO; and Nadav Soferman, CPO; also Amit Sharon, VP of Customer Success.

Agenda

Attendance at the two-day ImageCon—whose agenda includes workshops, tech talks, and keynote speeches—prior to the CAB meeting promises to spark new ideas and concepts, transforming everyone’s digital experience.

The agenda for the May 3 meeting features the following:

  • Presentation by Cloudinary’s CPO on product strategy, roadmap, and analytics
  • Presentation of use cases by three customers
  • Brainstorming sessions in three groups with a focus on verticals, use cases, and product and market trends
  • Summary of future directions and priorities

Key Benefits

The Cloudinary CAB is a collaborative forum that emphasizes sharing of experiences, observations, concerns, problems. Both Cloudinary and its key customers stand to reap many benefits. Here are a few of them:

  • An opportunity to help strategize Cloudinary’s product direction and roadmap
  • Networking avenues with peers and other professionals in the visual-media sector
  • Establishment of rapport, camaraderie, and communication channels with Cloudinary’s product-team leaders and management
  • Illuminating insight into the trends of the visual-media market

Frequency of Meetups

Cloudinary’s CAB program is ongoing. We plan to meet annually, face to face, as exemplified by the upcoming May 3 meeting. Periodic virtual meetings will follow during the rest of the year.

The birth of the Cloudinary CAB, a milestone in the company’s history, is shaping up to be the cornerstone on which rests the success of Cloudinary and its partners and customers for many years to come. Need I say that we can’t wait?

An Eye-Opening Talk: Building Apps for the Next Billion Users in Africa

$
0
0

William Imoh

William (iChuloo) Imoh, who hails from Lagos, Nigeria, recently embarked on a U.S. speaking tour, February 20-March 12, during which he powwowed with technical and product teams and communities at such renowned enterprises as Netlify, Pluralsight, Lucidchart, Twilio, and more in Salt Lake City, Dallas, Las Vegas, and San Francisco. On March 5, he gave an enlightening talk, entitled International Developers and Development: Building for the Next Billion Users at Cloudinary in Santa Clara, California. Below is a synopsis. For details, see the related slides.

Market Potential and Challenges for Software Development in Africa

Presently, 1.3 billion people live in Africa, approximately 35 percent of whom are on the Internet, a mere 11 percent of the world’s population. The reasons are many, among which are low network speeds, with 3G still the norm; minimal product support; inadequate development tools; and high retail prices.

The market potential for software in Africa is tremendous, however. Your success in reaping that potential rests on resolving the challenges faced by the development of apps tailored for the African population.

Tips and Tools

How to best build apps for Africa and attract the users there? William suggests that you—

Adopt PRPL as the development architecture: push the critical resources for the initial URL route; render that route; precache the remaining routes; and lazy-load and create those routes on demand. Optimize the delivery of digital media, specifically images, and videos. Simplify deployment and offer helpful support. Establish, encourage, and advocate community and user groups.

William highly recommends, among other tools, GatsbyJS, Next.js, Hugo, Nuxt.js, and VuePress, all based on JAMstack (JAM as in JavaScript API Markup), as being ideal for app development. That’s because JAMstack embodies security, efficiency, cost-effectiveness, smarts, and intuitiveness, all paramount ingredients for killer apps.

William is a proponent of progressive web apps (PWAs), which, in his words, “cache everything.” Not only do PWAs accommodate offline and low-bandwidth networks, but they also boast a native-looking, mobile app-like UI, complete with push notifications. Note that most Africans like to run apps while on the go.

Optimization of Media

Above all, William contends, optimize the images and videos that accompany your apps. That way, you reduce the load time and data requirements, minimize user drop-offs, cut hosting costs, and alleviate frustration and anxiety on the part of your audience.

Cloudinary is your top choice for optimization, bar none. As a SaaS product, Cloudinary does all of the following:

Lazy-loads files. Tweaks media files for size reduction with no visible quality loss and for responsiveness, making for fast loading and accessibility of sophisticated content. Features on-the-fly manipulation capabilities, a free tier for developers, and a smart debugger. Stores digital media securely and delivers them seamlessly through content delivery networks (CDNs).

To try out Cloudinary, start by registering for a free account.

A Focus on Communities

“Do sponsor the developer and user communities in Africa, such as forLoop, GDG, and Devcenter. They are yuuuge!” William urges. Why? Because—

Those community members are loyal app builders who will win loyal users for your products. The members are often independent advocates who could promote your products or brands. You stand to forge mutually beneficial relationships with potential users and gain valuable insights on market entry, pricing, and user experience.

A simple win-win to do would be to donate prizes or act as judges at hackathons. Those are good deals for all.

Announcing Cloudinary’s Media Developer Experts Program

$
0
0

Media Developer Experts

Cloudinary was founded by developers and developer-centric thinking is in our DNA. Our work with developers helps them better understand all things rich-media management and delivery is crucial to us. Now, in an effort to recognize, support, and reward the innovative leaders in that technical community, we’re excited to introduce a new Media Developer Experts (MDE) program! MDEs will leverage the Cloudinary platform to foster a community of media-management professionals; receive training and certifications to become experts within their field or audience; advance the state of media management, adoption, and best practices; and make the web more accessible.

Ideal candidates for the MDE program are seasoned software or design advocates who relish in sharing their expertise through publications or at public forums, fostering developer and user communities, evangelizing the adoption of rich-media technologies, and building their brands.

Apply to be an MDE here.

MDEs are rewarded with a free Cloudinary Plus account in addition to exclusive training and certification from Cloudinary, early-access privileges to our new product features, and invitations to special events and conferences with industry luminaries, along with many other unique perks.

Have a look at the details of the MDE program.

Introducing our inaugural roster of MDEs!

Ire Aderinokun

Ire Aderinokun

Ire is a self-taught UI/UX Designer and front-end developer based in Lagos, Nigeria. With degrees in Experimental Psychology and Law, she’s adept at technical writing and explaining complex concepts to audiences of all knowledge levels. Since starting her blog, bitsofcode, in 2015, Ire has written weekly articles on HTML, CSS, and JavaScript in addition to contributing over 100 papers and video tutorials to the developer community. A stalwart advocate for open source and sharing of software expertise, Ire participates in open-source projects and continually speaks at technical events.

Jennifer Aprahamian

Jennifer Aprahamian

Jen is a product-obsessed software developer who loves building something out of nothing, jumping all over the stack, and listening to users. She’s happiest when creating something meaningful. Fun fact: Jen writes crime novels when not writing code.

Nick Babich

Nick Babich

Nick is a developer, tech enthusiast, UX lover, and blogger who’s worked in software development for a decade. He counts advertising, psychology, and cinema among his myriad interests. Nick enjoys sharing his insights on user experience through articles on Medium, UXPlanet.com (for which he serves as editor-in-chief), and many other online publications.

Tim Benniks

Tim Benniks

Tim is a tech lead who specializes in web development, focusing on the balance between the idealism of development and the pragmatism of delivering on time and on budget. Most of all, he enjoys building innovative, accessible, and responsive user interfaces that perform like a charm.

LaQuita Gollman

LaQuita Gollman

LaQuita is a Seattle-based web developer who’s passionate about making the web—and the industry that builds it—a more diverse and accessible place. She revels in front-end and Vanilla JS-based development, also specializing in NodeJS, Express, and MongoDB on the back end.

Neil Humphrey

Neil Humphrey

Neil is a UX engineer and lifelong learner with over five years of experience in software programming. Dedicated to designing and developing highly-optimized user experiences, he’s also the founder of OmahaCode.com, a learning platform for aspiring front-end developers and designers.

Mohammed Israil

Mohammed Israil

Mohammed is an undergraduate Computer Science Engineering student from Gandhi Engineering College in Odisha, India. He’s also an ethical hacker, a cyber-security researcher, and a leader of several developer communities, such as the OWASP Foundation. Mohammed has worked with and been acknowledged by 100+ companies, most of which from Silicon Valley.

Grant Kemp

Grant Kemp

Grant is a Google Analytics, Google Tag Manager, and Data Studio specialist with over 15 years of experience in the digital sphere. He started out as a developer, working across multiple verticals, including e-commerce, publishing, startups, and travel. He has deployed data solutions within a bevy of well-known companies, including Dreams, Missguided, Victoria Beckham, Arsenal Football Club, Photobox, and Virgin. Grant enjoys speaking at conferences and meetups, having delivered talks at BrightonSEO, Magento Live, and other events in the U.K. In his spare time, he builds with Lego alongside his kids.

Christian Nwamba

Christian Nwamba

Christian, also called Codebeast, is a software engineer who relishes in building tools with JavaScript. He was a developer advocate at Cloudinary for two years before joining Microsoft as a senior cloud developer advocate in early 2019. In addition, Christian has consulted as a software developer, technical writer, and community champion, also playing a major role in building and expanding ecosystems in collaboration with developer communities, such as forLoop Africa and Angular Nigeria.

Ekwuno Obinna

Ekwuno Obinna

A front-end web developer based in Nigeria, Ekwuno delights in creation, with software development being one of his many outlets. He’s also passionate about building and contributing to the tech communities in Africa and globally. In addition, Ekwuno is devoted to tackling cool projects with JavaScript and the MERN Stack.

Harry Roberts

Harry Roberts

Harry is an award-winning software consultant, front-end architect, writer, and speaker from the U.K. He has consulted internationally with many clients, including the United Nations, the BBC, England’s National Health Service, Google, and the Financial Times. Harry specializes in CSS architecture and front-end performance for large and long-lived sites and applications. He’s constantly writing, coding, speaking, and running workshops worldwide on pragmatic, product-led approaches to building and scaling large front ends for long-running projects and products.

Chris Sevilleja

Chris Sevilleja

Chris is a web developer who’s zealous about performance on the client side. With almost a decade of development experience, he’s the founder of the popular web-dev tutorial site Scotch.io, which he started as a blog a few years ago and which now reaches millions of developers every month with superb tutorials and cutting-edge articles. When not coding, Chris engages in heavy lifting.

Dima Vishnevetsky

Dima Vishnevetsky

A senior front-end developer and educator based in Israel, Dima is much revered for his superb communication skills. He frequently hosts workshops on such topics as usability on mobile devices and UX for developers. Dima is also well-known for his engagement and mentorship in hackathons and has long been a community leader for Vue.JS in Israel.

How Cloud-native DAM Optimizes Customer Experiences

$
0
0

Cloud-native DAM

In today’s digital age, brands rely heavily on rich media to tell stories, foster engagement, and make emotional connections that drive results. Marketers use videos and images, tuned to customers’ interests, to create dynamic visual experiences. Digital campaigns about trips to Florida, for instance, have separate plot lines, depending on audiences’ passions for golf, deep sea fishing, or kid-friendly versus romantic getaways. Marketers expect to detect preferences, produce personalized experiences highlighting different desires, and turn digital prospects into vacationing customers. The ultimate success of a marketing campaign relies on the consistent delivery of these customer experiences, at scale.

However, personalizing dynamic visual experiences takes time, effort, and a variety of digital assets. Certainly, teamwork across engineering, marketing, and creative teams is an important part of the equation. Photographers, videographers, photo editors, and video producers all have important roles to play, visualizing emotional connections with rich media. Web developers and marketers alike then have the digital assets in hand to deliver optimized online experiences create campaigns and tell engaging stories.

Streamlining Creative Activities and Marketing Operations

But time-to-market and costs are important considerations. Tried and true manual operations cannot keep up with the variety of customer experiences, the velocity of business activities, and the volume of digital assets required. Suppose stories about trips to Florida also include romantic golfing vacations for couples on weekend escapes, particularly those who have left their children with grandparents. Better to develop this and other plot lines automatically, from assets and scripts already vetted for wide-scale use.

New situations require new experiences and emotional messaging, rendered in full fidelity across multiple devices and display environments. Needed is a content infrastructure based on a single source of truth -- a shared repository for managing digital assets -- together with the embedded services for streamlining creative activities and marketing operations. With these services in place, campaign directors can rapidly identify the most popular visual themes, and use these insights to script new stories.

Next-gen DAM and Better Digital Campaigns

There are two parts to producing better digital campaigns – developing the plot lines and ensuring the right digital assets are readily at hand. Creative and marketing teams must collaborate efficiently. They are going to rely on a digital asset management (DAM) platform to deliver these dynamic visual experiences, accessing the multiple rich media variants to produce personalized plot lines. Moreover, a cloud-native DAM, like Cloudinary, makes it easy to manage assets while scripting stories and creating campaigns.

Here’s the situation. First, creative professionals continue to produce photos and videos. Some photo shoots may begin as specific assignments where the results are then stored for later reuse. Other shoots may be creative activities on their own. What is important are the rich media lifecycles, beginning with creation and capture events, then upload and manipulation tasks, and finally distribution and delivery processes. There are multiple editorial and production workflows between external branding agencies and in-house producers, depending on the organizational culture and business relationships. A cloud-native DAM provides the single source of truth across all of the steps of this rich media lifecycle.

Then, when scripting the personalized plot lines, marketers easily access and select from extensive collections of photos and videos, vetted and approved for distribution. They can focus on the messages behind the campaigns and access the digital assets that best visualize the experiences. They can easily browse through very large rich media collections, automatically tagged by multiple categories, often categorized by emotional moments.

This shared repository supports digital campaigning at scale. In addition to familiar capabilities for storing, securing, tagging, and accessing assets, the cloud-native DAM platform includes AI and machine learning capabilities to provide auto-tagging as well as on-the-fly object recognition. A smart repository minimizes the need for manual processes. Marketers can rapidly produce multiple personalized plot lines at lower costs and with fast time-to-market.

Cloud-native DAM

Finally, it is important to consider the underlying deployment environment. When it comes to omni-channel content delivery, a cloud-native DAM platform makes a difference. Traditionally, there are multiple points in a creative workflow where assets are downloaded from a DAM, shared with a different team, transformed, and then uploaded as other versions. Instead, a cloud-native DAM platform provides an on-the-fly URL that can be used at every stage of plot line development - the original, every transformed version, and wherever customers expect to view it on web sites, mobile apps, and even high-resolution kiosks.

In short, a cloud-native DAM platform such as Cloudinary optimizes customer experiences for digital campaigning. A cloud-native DAM delivers digital assets dynamically to any channel, any device, anywhere, with the perfect quality and performance, ensuring the full fidelity of the customer experience being rendered exactly as designed. Assets are managed within the shared repository, enabling marketers to spend their time and effort doing what they do best -- personalizing plot lines.

How to Automate Compression of Video Files With One Line of Code

$
0
0

Compress Video Size Automatically

As technologies advance apace, the volume of online videos continues to increase fast. Instagram, WhatsApp, Facebook, YouTube, Musical.ly are just a few platforms among many that massively share and distribute videos around the clock.

When compared to other media files, such as those for audios and images, video files are larger, consuming a lion’s share of data bandwidth. Compressing video files enables faster downloads, uploads, and streaming online.

For people in remote areas and developing regions, where download and upload speeds usually range between 720 kbytes and 1.5 Mbytes per second, compressing video files is not optional—it’s mandatory! To do that and deliver videos of a smaller file size to users with Cloudinary, you as developers can choose either of these two ways:

  • Compression as part of the upload request
  • On-the-fly compression during delivery

Compression As Part of the Upload Request

This technique involves applying compression transformation to the videos during upload before storage. Cloudinary makes the process a walk in the park with just one line of code in Ruby, Python, or PHP:

Ruby

Cloudinary::Uploader.upload("cool_video.mp4", :resource_type => :video, :quality => 60)

Python

cloudinary.uploader.upload("cool_video.mp4", resource_type = "video", "quality" = "60")

PHP

\Cloudinary\Uploader::upload("my_video.mp4", [ "resource_type" => "video", "quality" => "60"]);

In the code above, you specify the quality parameter to manipulate the video’s quality and size before Cloudinary stores the video in the cloud.

Note
If you’re not sure what number to assign to the quality parameter, just type auto. Cloudinary then automatically adjusts the compression quality for your video by applying the optimal balance between the video’s file size and quality.

On-the-Fly Compression During Delivery

With this Cloudinary technique, you upload videos straight to the cloud and then apply the quality compression parameter when delivering them to users. You can also serve videos in the formats that pertain to the various web browsers and mobile devices.

You configure quality on a 0-100 scale. The higher the video quality, the larger the video size; the lower the video quality, the smaller the video size. To compress videos on the fly, adjust their quality parameter in a codeline. See the examples below.

Node.js

cloudinary.video("dog", {quality: 50})

Java

cloudinary.url().transformation(new Transformation().quality(50)).videoTag("dog");

Python

CloudinaryVideo("dog").video(quality=50)

On-the-fly video compression through the URL

https://res.cloudinary.com/demo/video/upload/q_50/dog.mp4

In q_50 in the above URL, q stands for quality; 50 is the number of your choice on a 0-100 scale. Front-end developers, you can drop those components in your app out of the box, like this: React.js

<Video publicId="dog" ><Transformation quality="50" /></Video>

Vue.js

<cld-video publicId="dog" ><cld-transformation quality="50" /></cld-video>

dog represents the name of the uploaded video, which is usually the public ID (publicId) on the Cloudinary storage.

Conclusion

Automating the compression of video files with Cloudinary makes those media much more accessible. Furthermore, Cloudinary’s drop-in tools and services are effective, simple, and intuitive, saving you ample time to focus on your project.

For details, check out the following Cloudinary documentation:


Introducing Cloudinary’s State of Visual Media Report

$
0
0

State of Visual Media Report
One of the best things about working for Cloudinary is the amazing brands that trust us to manage tens of billions of images and videos. These companies span many industries, including retail, e-commerce, media, entertainment, travel and more. These brands understand that first impressions matter and understand that strong visual experiences engage users, create loyalty and drive revenue. So what can we learn from these brands and their loyal users?

With privacy top of mind, we wondered what we might learn from analyzing the large volume of data. What user behaviors would we discover, what regional differences might exist? What insights or early hints from different industries could we extrapolate? These questions guided us as we analyzed millions of anonymous end-user experiences and asset interactions across our platform.

From the results of our analysis from the last quarter in 2018, we are so pleased to deliver our first State of Visual Media Report. Our goal is to help you gain business and technical insights on the power of visual storytelling. You can read the full interactive report.

This is just the beginning of what we hope will help us all tell better visual stories. From this report, here are 3 of my favorite insights:

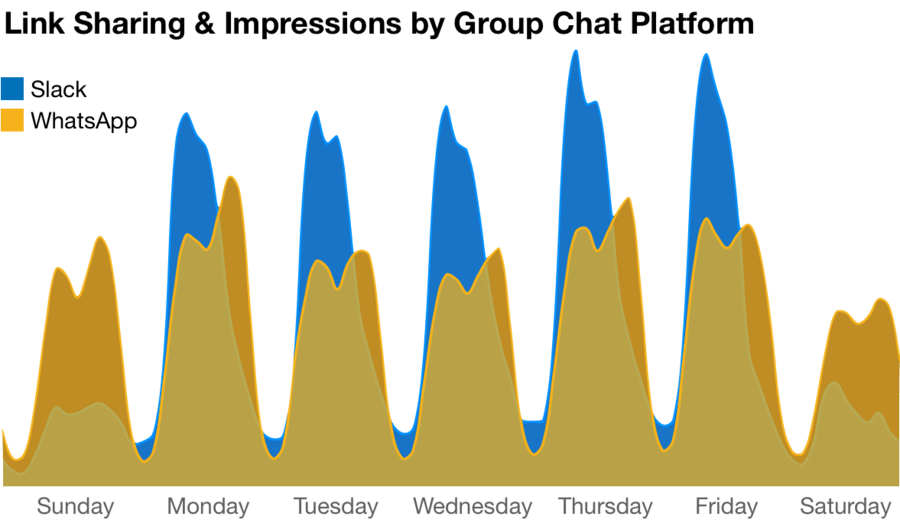
  1. Group-chat apps like Slack, WeChat and WhatsApp behave just like traditional browsers when friends share recommendations. Morning and night, we click and share links with our friends and co-workers:

    time of day traffic of whatsapp and slack

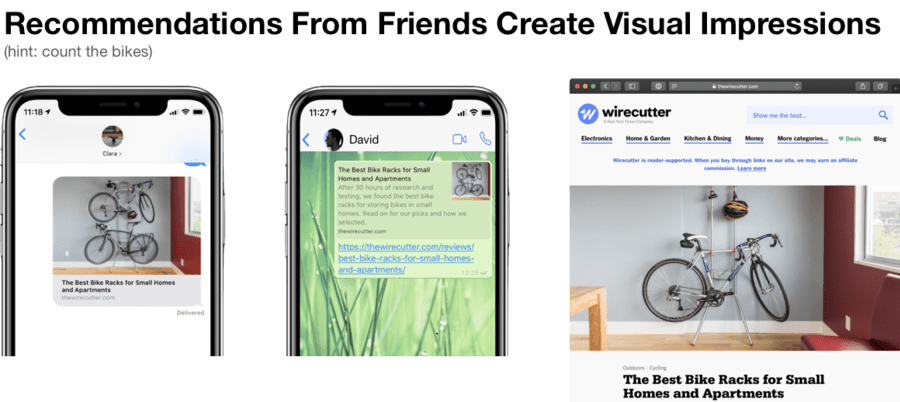
    These word of mouth referrals require attentive care for the visual hook and are potentially more valuable than traditional platforms like Instagram and Twitter.

    example of visual experience from link sharing
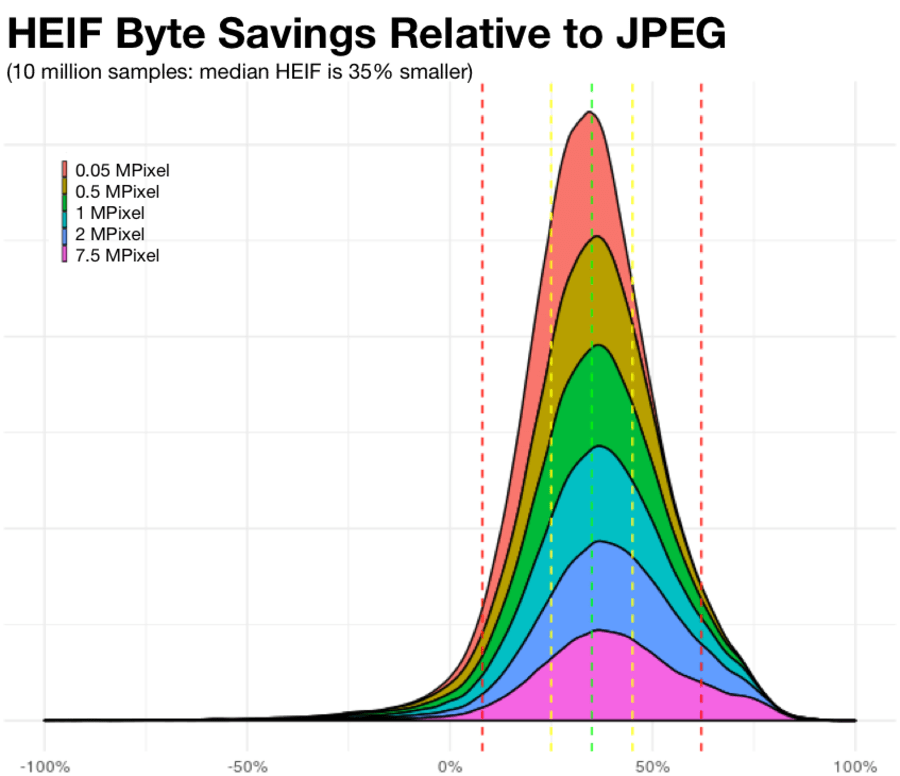
  2. Your loyal users will download your native Android or iOS application. You can reward these loyal users with superior visual experiences. New file formats like HEIF can be deployed in apps today, but they enable wide-gamut colors imagery and HDR experiences. In addition, HEIF is 30-40% smaller than traditional JPEGs!

    histogram of heif relative byte savings
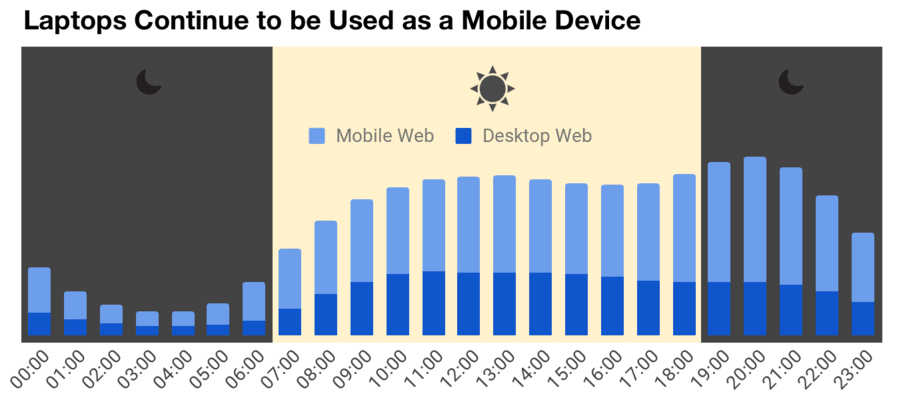
  3. We all understand the importance of “mobile” web experiences. Yet, “desktop” web usage remains steady at 35% of global traffic. This is because laptops are increasingly used like mobile devices - in Starbucks, tethered while in an Uber, or while sitting on the couch, watching Netflix. Now, more than ever, Responsive-Web-Design requires your brand to be mobile-first and desktop-friendly.

    laptops are used like mobile devices throughout the day

In upcoming posts we will explore these insights and others in more detail.

We hope the report and its insights help guide your visual content creation and delivery. Do let us know what you think in the Comments section below. This report is just the beginning, and we’re looking forward to the next edition!

StubHub Finds Ticket to Effective Digital Asset Management with Cloudinary

$
0
0

StubHub Finds Ticket to Effective Digital Asset Management with Cloudinary

Solution

As StubHub evolved from a lightweight website to one that was rich with images, videos and custom views from seat locations at event venues around the world, it sought a way to streamline image management. The company implemented Cloudinary, which enabled it to significantly reduce the time required to manually edit images, while ensuring that the key focal points of each image were viewable in more than 30 viewports across a multitude of devices. Cloudinary’s digital asset management capabilities also have helped StubHub better protect its content, creating a single repository that ensures developers and designers have access to only the most current images and understand the associated brand guidelines.

Results

  • Up to 60 percent reduction in page weight
  • Up to 6x faster image load times
  • Three to four times faster page load

Company

StubHub is the world’s largest ticket marketplace with tickets available for more than 10 million live sports, music, and theatre events in 40+ countries. The company enables experience-seekers to buy and sell tickets whenever and wherever they are through its desktop and mobile interface. Owned by eBay, StubHub reinvented the ticket marketplace in 2000 and continues to lead it through innovation. StubHub’s industry firsts include the introduction of the ticketing application, interactive seat mapping, 360-degree virtual views of seating, innovative price recommendation technology and an algorithm that determines the best value on tickets. Most recently, StubHub expanded into more than 40 additional markets with the acquisition of Ticketbis in May 2016.

The Challenge: Optimizing Digital Assets for Image-Rich Site

When Susan Stieglitz joined StubHub in 2015, the site was very lightweight and had few images associated with the events being promoted. But as head of imagery, she was tasked with finding ways to make StubHub’s portal more visually engaging, as the company expanded into more than 40 countries around the world.

That’s where the challenges began. First, she had to ensure that this imagery – which included photos, video, views from seats and virtual views – could be easily accessed and properly displayed across multiple devices, such as desktops, tablets and smartphones, and more than 30 different viewports. Stieglitz also had to address digital asset management, since StubHub worked with licensed content from partners and often had requests by third-party marketers to use the site’s images.

“All of our images required manual editing, severely limiting the potential for innovation in experience design. We prioritized editing for a desktop view, so the images may or may not look good in other viewports.” –Susan Stieglitz, Head of Imagery

In addition, StubHub had to contend with the sheer scale of managing more than 120,000 active events on the site at any given time, and between 800 and 1,200 new ones being published every day. StubHub’s catalog included more than 54,000 entities with multiple images that needed to be selected, edited and updated continually.

“Delivering quality images at scale is a daunting task, particularly since our catalog has a single image for each event, that we need to ensure displays well across all viewports,” said Stieglitz. For example, an image of Billy Idol cropped to look good on a desktop might end up showing only his armpit when viewing it from an iPhone, or Pink’s face may be cut in half when moving from a laptop to a tablet.

“All of our images required manual editing, severely limiting the potential for innovation in experience design,” she added. In 2017 alone, Stieglitz’s team manually edited more than 17,000 images in Photoshop to fit in the event cards in the desktop design, which was then used in native and other viewports. “We prioritized editing for a desktop view, so the images may or may not look good in other viewports.”

When getting images from partners, like the National Basketball Association, National Football League or others, StubHub also wasn’t sure which specific image to request, since they needed one that would look good across various shapes, including checkout, review and buy, grouping pages, desktop banners, event cards, native apps and the mobile web.

And finally, Stieglitz noted, it wasn’t all simply about the way images displayed. As they did a deeper dive, the StubHub team wanted to improve the overall user experience by making the images as small in size as possible without any perceptible loss of quality, so the site would load faster.

The Cloudinary Solution: Customizing Versions for Every Viewport and Improving

Access to Media Cloudinary enables StubHub to use one high-resolution source image, then optimize it in endless end-user configurations with simple parameter changes. Cloudinary dynamically selects the most efficient format, based on the end user’s device and browser. The solution also optimizes images so StubHub pages load three to four times faster, which is particularly important as StubHub has moved into international markets where devices may be slower or broadband access less prevalent. Facial recognition capabilities in Cloudinary also ensure that dominant face(s) stay within all viewports, while those images that do not include faces can benefit from edge detection and entropy detection. “These features ensure that we deliver the important part of the photo, no matter the viewport,” Stieglitz added.

“These features ensure that we deliver the important part of the photo, no matter the viewport.” –Susan Stieglitz, Head of Imagery

Other Cloudinary features that StubHub has found useful include:

  • Transformations – Allows teams to apply artwork styles, incorporate logos, remove backgrounds, and add tints, color enhancements or borders
  • URL customization – Improves SEO ranking with meaningful image filenames within the URL
  • Analytics – to learn where end users are clicking

StubHub also uses Cloudinary’s platform for digital asset management. Through Cloudinary, StubHub can maintain better control over partners assets, host brand identity guidelines and logos, provide buildable templates for asset creation and establish permission-based folders with access determined by group roles and individual user types. Cloudinary’s digital asset management capabilities enable StubHub to have a single location where it can keep all updates in sync and add metadata to images to identify protected assets.

“Cloudinary has created a no-fail, self-service system for brand, partners and event teams to use our content correctly,” Stieglitz noted. “This is critical. Our images previously were not safe, because they were available through an open developer portal accessible by anyone with an API key.”

The Results

Using Cloudinary, StubHub was able to reduce an image of Tim McGraw from 1.2 MB to 8kb, significantly improving page load performance. Similarly, StubHub reduced an image of Shakira from 25kb to 10kb, speeding download from 336ms to 51ms.

On average, StubHub achieved page weight reductions of up to 60 percent, and improved image load times by up to 6x.

Upscaling Raster Image to Vector Graphic Conversions

$
0
0

Generate raster image to vector graphic

SVG format has been around forever, but until recently usage has been relatively low. However, following improved browser support, developers are rediscovering SVG, and taking advantage of its merits including:

  • Extremely lightweight, especially for large image dimensions.
  • Pixel-perfect scalability making it ideal for responsive designs.
  • Code-only editing. SVG is code.
  • Searchable by search engines and accessibility screen readers.

For many web designers, SVG is a go-to method for creating and delivering logos, icons, fonts, graphics, infographics and other simple images in their websites. But generally, SVG creation requires a certain skill level and experience with SVG creation tools.

Cloudinary has long supported transforming and serving SVG assets but now Cloudinary has gone a step further by providing a simple vectorize effect . that enables web developers and designers to take advantage of SVG even when the images they have to work with are simple raster graphics, PNGs or even photographic data, and without requiring deep knowledge or special tools for generating vector graphics.

The newe_vectorizetransformation option accepts a raster image and returns an SVG on-the-fly and ready for delivery.. It achieves this 'magic' by tracing and detecting paths and areas in the source image and converting them to SVG vector form. It provides a variety of options that enable you to generate SVGs with more or less detail, depending on your goals.

Let’s take a closer look at some usage options that these new capabilities open up.
Vectorize Logos and Icons

Suppose you have access to logos, icons, or other graphics in raster form, (probably PNG) , but would like to scale them or deliver them in a more compact form. For this use-case, we want the SVG version to match the original as closely as possible.

Let's assume we only have access to a 256px version of the following drawing:

Original racoon PNG - 256px

This is a relatively small PNG at 28 KB.

But what if we want to display the image at a larger size? Unfortunately, the blurriness and file size of raster graphics both continually increase with resolution. So for example, if we wanted to display this image at 4x the original size, the file size would grow to a much less friendly 337 KB, while the quality would drop significantly, and it would also be highly pixelated.

Ruby:
cl_image_tag("docs/racoon.png", :width=>4.0, :crop=>"scale")
PHP:
cl_image_tag("docs/racoon.png", array("width"=>4.0, "crop"=>"scale"))
Python:
CloudinaryImage("docs/racoon.png").image(width=4.0, crop="scale")
Node.js:
cloudinary.image("docs/racoon.png", {width: "4.0", crop: "scale"})
Java:
cloudinary.url().transformation(new Transformation().width(4.0).crop("scale")).imageTag("docs/racoon.png");
JS:
cloudinary.imageTag('docs/racoon.png', {width: "4.0", crop: "scale"}).toHtml();
jQuery:
$.cloudinary.image("docs/racoon.png", {width: "4.0", crop: "scale"})
React:
<Image publicId="docs/racoon.png" >
  <Transformation width="4.0" crop="scale" />
</Image>
Angular:
<cl-image public-id="docs/racoon.png" >
  <cl-transformation width="4.0" crop="scale">
  </cl-transformation>
</cl-image>
.Net:
cloudinary.Api.UrlImgUp.Transform(new Transformation().Width(4.0).Crop("scale")).BuildImageTag("docs/racoon.png")
Android:
MediaManager.get().url().transformation(new Transformation().width(4.0).crop("scale")).generate("docs/racoon.png");
iOS:
imageView.cldSetImage(cloudinary.createUrl().setTransformation(CLDTransformation().setWidth(4.0).setCrop("scale")).generate("docs/racoon.png")!, cloudinary: cloudinary)
Upscaled PNG x4

But what if we turn it into an SVG?

With the new Cloudinary vectorize effect, we can do raster image to vector conversion on-the-fly.

As mentioned earlier, the vectorize feature works by tracing and detecting paths and areas in the source image and then converting them to SVG vector form. To do this, it must perform some approximations, so the result is usually not a completely “lossless” copy of the source, but depending on the source information, it can come very close.

There are several options that can be specified for the vectorize effect that you can use to control the resulting output, depending on your goals.

For this case, we'll request an SVG at the maximum detail (1.0) with 3 colors (like the original). We don't want corners to be too rough, but also not too soft, so we'll use an intermediate value of 40 for the corners option. This yields an extremely compact, 8 KB file that will provide pixel-perfect scaling to any size.

Ruby:
cl_image_tag("docs/racoon.png", :effect=>"vectorize:detail:1.0:corners:40:colors:3")
PHP:
cl_image_tag("docs/racoon.png", array("effect"=>"vectorize:detail:1.0:corners:40:colors:3"))
Python:
CloudinaryImage("docs/racoon.png").image(effect="vectorize:detail:1.0:corners:40:colors:3")
Node.js:
cloudinary.image("docs/racoon.png", {effect: "vectorize:detail:1.0:corners:40:colors:3"})
Java:
cloudinary.url().transformation(new Transformation().effect("vectorize:detail:1.0:corners:40:colors:3")).imageTag("docs/racoon.png");
JS:
cloudinary.imageTag('docs/racoon.png', {effect: "vectorize:detail:1.0:corners:40:colors:3"}).toHtml();
jQuery:
$.cloudinary.image("docs/racoon.png", {effect: "vectorize:detail:1.0:corners:40:colors:3"})
React:
<Image publicId="docs/racoon.png" >
  <Transformation effect="vectorize:detail:1.0:corners:40:colors:3" />
</Image>
Angular:
<cl-image public-id="docs/racoon.png" >
  <cl-transformation effect="vectorize:detail:1.0:corners:40:colors:3">
  </cl-transformation>
</cl-image>
.Net:
cloudinary.Api.UrlImgUp.Transform(new Transformation().Effect("vectorize:detail:1.0:corners:40:colors:3")).BuildImageTag("docs/racoon.png")
Android:
MediaManager.get().url().transformation(new Transformation().effect("vectorize:detail:1.0:corners:40:colors:3")).generate("docs/racoon.png");
iOS:
imageView.cldSetImage(cloudinary.createUrl().setTransformation(CLDTransformation().setEffect("vectorize:detail:1.0:corners:40:colors:3")).generate("docs/racoon.png")!, cloudinary: cloudinary)

deliver PNG as vectorized SVG

This was a relatively simple case. It only has a few colors, so it really brings out the value of having a vector version.

Do keep in mind that when you are going for very accurate detail in the resulting SVG, color gradients or a large number of colors in the original don't work as well. Optimal results are achieved with a limited number of solid colors.

Generating Cool, Compact Image Placeholders

When delivering high quality photos, it's good web design practice to first deliver Low Quality Image Placeholders (LQIPs) that are very compact in size, and load extremely quickly. Cloudinary supports a large variety of compressions that can potentially be used for generating placeholders. You can read some more about those here.

But there are several merits to using SVG placeholders:

  • They are quite compact.
  • They offer pleasant results that also convey the contents of the final image.
  • SVGs can be embedded directly within HTML and don't need to wait for JavaScript to load.

Let’s dive in with an example:

The 2 Megapixel version of this lion image by Capri23auto is 752 KB, but assuming we take advantage of Cloudinary’s f_auto and q_auto optimizations, we will be dealing with about 400 KB for the full resolution image, which is nearly 50% of the original, but still pretty large.

Optimized full resolution lion JPG is 397 KB

So it would be nice to have an SVG LQIP in place while lazy loading the full-sized image.

We want the placeholder to represent the subject matter of the original but also be very compact. Confining ourselves to 5 colors and a detail level of 10% produces a nice image, but still too large for a placeholder.

Ruby:
cl_image_tag("docs/lion.svg", :quality=>"auto", :fetch_format=>:auto)
PHP:
cl_image_tag("docs/lion.svg", array("quality"=>"auto", "fetch_format"=>"auto"))
Python:
CloudinaryImage("docs/lion.svg").image(quality="auto", fetch_format="auto")
Node.js:
cloudinary.image("docs/lion.svg", {quality: "auto", fetch_format: "auto"})
Java:
cloudinary.url().transformation(new Transformation().quality("auto").fetchFormat("auto")).imageTag("docs/lion.svg");
JS:
cloudinary.imageTag('docs/lion.svg', {quality: "auto", fetchFormat: "auto"}).toHtml();
jQuery:
$.cloudinary.image("docs/lion.svg", {quality: "auto", fetch_format: "auto"})
React:
<Image publicId="docs/lion.svg" >
  <Transformation quality="auto" fetchFormat="auto" />
</Image>
Angular:
<cl-image public-id="docs/lion.svg" >
  <cl-transformation quality="auto" fetch-format="auto">
  </cl-transformation>
</cl-image>
.Net:
cloudinary.Api.UrlImgUp.Transform(new Transformation().Quality("auto").FetchFormat("auto")).BuildImageTag("docs/lion.svg")
Android:
MediaManager.get().url().transformation(new Transformation().quality("auto").fetchFormat("auto")).generate("docs/lion.svg");
iOS:
imageView.cldSetImage(cloudinary.createUrl().setTransformation(CLDTransformation().setQuality("auto").setFetchFormat("auto")).generate("docs/lion.svg")!, cloudinary: cloudinary)

Deliver large JPG as LQIP vectorized SVG

Leaving just 2 colors, and going to a 5% detail level produces a result that is still easily identifiable, but much smaller (about 6 kb). Or you can make a few more adjustments, which still gives you an image resembling the original, but now you are counting your file size in bytes!

6 KB LQIP 6 KB LQIP ~1 KB LQIP ~1 KB LQIP

Vectorizing as an artistic effect

As can already be seen in the previous example, the product of vectorization allows us to capture the main shapes and objects composing a photo or drawing and produces a nice effect.. This might be something we want to offer to our users simply to apply as effects on their own uploaded images or for other purposes. In these cases, we don't necessarily want to deliver as an SVG. As with any other Cloudinary transformation, you can deliver vectorized images in any format, simply by specifying the relevant extension.

For example, suppose one of your users had uploaded this simple selfie image. You could provide a button that lets them convert their photo to a vectorized image:

Original Original Default vectorize effect Default vectorize effect

The default e_vectorize parameter will reduce it to a detail level of 300 pixels and 10 colors, which is quite sufficient for this image.

Let’s examine another image that may require more colors, but less detail. For this image, we might deliver using e_vectorize:colors:20:detail:0.1

Original Original Many colors, less detail Many colors, less detail

Customizing your Vector effect

As previously mentioned, the vectorize effect can be controlled in several ways allowing different outcomes. The syntax is as follows:

vectorize:[detail]:[colors]:[despeckle]:[paths]:[corners]

  • Detail can be supplied either as a relative value (0 - 1.0), or an absolute number of pixels. Relative detail may be more intuitive, but if you want to apply the same transformation to multiple images that may have different source resolutions, the absolute pixel value will provide more consistent results across images.

  • Colors (not surprisingly) indicate how many colors will be used for the resulting image (up to 30), but obviously the number of colors you choose (if fewer than the original) will also impact the ultimate level of detail.

  • The remaining options allow you to further fine tune the result.
    For full details, see the vectorize effect in the Image Transformation Reference.

Below you can see a variety of potential outputs using these options. The top-left image is the original photo. Following it, you can see the vector graphics, output as JPG, with varying levels of detail, color, despeckling and more.

Original   Many colors, high detail   Many colors, high detail   Many colors, high detail   Many colors, high detail   Many colors, high detail  

While the potential combinations are endless, if you are using Cloudinary to deliver images, your goal is probably automation, so you'll be looking for a set of options that will produce great results for the types of images you expect, without having to adjust the transformation code for each one.

(Unless of-course you are passing these on as cool effects to your users, and then by all means, feel free to let them adjust these options to their heart's content.)

Summary

The new vectorize effect allows you to easily generate vector graphics from raster images. Whether you want to upscale or reduce the size of your logos and icons, create effective placeholders, just offer another fun effect for your users, or any other usage you might think of, Cloudinary brings these capabilities to you with a simple URL, or using any of our SDKs. There's no need for a creative team, or fancy software editors and deep knowledge of how to use them. Just sign up for your free Cloudinary account, and give it a try.

Compression of Image Files With Only One Line of Code

$
0
0

Compression of Image Files

I recently came across a tweet by organizer and developer advocate iChuloo by way of @JAMStackLagos on how to reduce the size of an image with only one line of code on Cloudinary.

That tweet rang a bell. I then recalled that I’d used that exact codeline in at least two React projects in the past.

This article digs deeper, showing you how to compress image files, again with one line of code, in PHP, Java, or Python on environments or frameworks like React, Node, Vue, and Angular.

Image Compression

As a rule, compression of image files are either for storage or for delivery.

Image Storage

The compression of image files for cloud storage when requesting their upload to Cloudinary. Subsequently, Cloudinary applies to the files the transformations you specified before storing them. The examples below show the codeline in Ruby, Python, PHP, and Java. You can also code in a similar manner in other modern languages.

Ruby

Cloudinary::Uploader.upload("cat.jpg", :quality => 60)

Python

cloudinary.uploader.upload("cat.jpg", "quality" = "60")

PHP

\Cloudinary\Uploader::upload("cat.jpg", [ "quality" => "60"]);

Java

cloudinary.url().transformation(new Transformation().quality(60)).imageTag("cat.jpg");

In the code above, quality is a compression parameter that specifies the image quality and size for storage. If you’re not sure what number to assign to quality, just type auto. Cloudinary then automatically adjusts the compression quality for your image by applying the optimal balance between the image’s file size and quality.

Image Delivery

In this context, you upload images straight to the cloud and then apply the quality compression parameter when delivering them to users. You can also serve images in the formats that pertain to the various web browsers and mobile devices.

You configure quality on a 0-100 scale. The higher the image quality, the larger the image size; the lower the image quality, the smaller the image size. To compress images on the fly, adjust their quality parameter. See the examples below.

Node.js

cloudinary.image("cat", {quality: 50})

Java

cloudinary.url().transformation(new Transformation().quality(50)).imageTag("cat");

Python

CloudinaryImage("dog").image(quality=cat)

Alternatively, simply add a q parameter to your image’s URL, for example:

https://res.cloudinary.com/demo/image/upload/q_50/cat.jpg

Here, q stands for quality; 50 is your choice on a 0-100 scale.


Front-end developers can drop the components in their app out of the box, like this:

React.js

<Image publicId="cat.jpg" ><Transformation quality="50" /></Image>

Vue.js

<cld-image publicId="cat.jpg" ><cld-transformation quality="50" /></cld-image>

Angular

<cl-image public-id="cat.jpg" ><cl-transformation quality="50"></cl-transformation></cl-image>

JQuery

$.cloudinary.image("cat.jpg", {quality: 50})

JavaScript

cloudinary.imageTag('cat.jpg', {quality: 50}).toHtml();

Here, cat is the name of the uploaded image, which is usually the public ID (publicId) on the Cloudinary storage platform.

Conclusion

Uploading without images optimization or compression wastes bandwidth. Plus, delivering them on your app invariably takes longer. Why not automate the compression process with Cloudinary’s effective and simple drop-in tools so that your visuals load fast?

Register for free and for more details, check out the following Cloudinary documentation:

The Rise of Developers and Their Paramount Role in Software Adoption

$
0
0

Rise-of-Developers

Since the early 1990s, I’ve been watching with interest and intrigue the rapid evolution of the software industry and its developers, which ushered in the Internet age in the meantime. I’d like to share with you my observations on that subject. Because of the breadth and complexity of the related topics, I’ll chronicle them in a series of posts, starting with this one.

The Legacy Days

Up until the mid-1990s, software developers routinely created products and custom applications from scratch, hard-coding them in an imperative programming language, be it Assembly, C, C++, FORTRAN, Pascal, Java, or the like. The process typically started with IT deciding on the scope, requirements, and technology choice for the project, followed by developers taking the assignment, writing up a functional specification, and implementing it. Developers were largely coders then, with predefined responsibilities and relatively limited authority.

With the emergence of the Internet for public consumption in 1995 and rapid advances in software-engineering methodologies, computing infrastructure, and best practices for implementation since then, things have changed dramatically.

The Now-Now Thing

In the past decade or so, numerous robust developer tools, such as integrated development environments (IDEs), have become available, leading to intuitive, fast development of software. Many of those tools are free or open source, benefiting from vast support from the developer community and from large software vendors. In addition, the abundance of templates that are within reach have rendered building component-based software a cakewalk. Present-day developers can often start a software project from scratch and hand in a working prototype, demo ready, within hours.

Also, these days, developers have a tremendous amount of resources and power at their fingertips. For example, they can download from the Internet a library, customize it for their purpose, provision it, and deploy it instantly for a trial run. In case of success, they would then configure and integrate the software into their tooling and infrastructure environment and test it for scalability.

Simultaneously, software becomes much less complex and development cycles are getting shorter—a happy scenario for everyone.

Developers in the Driver’s Seat

Integration, however, often poses a challenge. A well-oiled integrated environment demands that multiple systems work together seamlessly. More and more, business managers base their purchase decision on whether the software being considered runs well with the other components in their environments, such as workflow and process automation, messaging and notifications, CRM, social media, and so on. In other words, can the software interoperate? And who can answer that question better than their own in-house developers?

That’s why seasoned developers are now the kingpin. They have the deep experience and battle scars from years of implementing complex software to determine whether things will work well for the benefit of the company.

Furthermore, the entire developer ecosystem has morphed drastically. Twenty years ago, software companies were already aware of the importance of developer evangelism, that is, the art of getting developers at potential customers on board to adopt new technologies. However, all too often, that initiative wasn’t high enough a priority to warrant the budget. Increasingly, large software vendors like Microsoft, Google, and Amazon are aware that, to make a sale, they must win a stamp of approval from their customers’ developers. And, to make money, they must rely on those folks to grease the wheel for them.

The Way SaaS Changes Everything

Before SaaS [software as a service] took hold of a sizable segment of the software market, vendors like Oracle and SAP sold integrated suites with hardly any stake hinging on successful deployment, raking in the bulk of the revenue up front. Not so with SaaS providers, which need customers to stay on—that is, not churn—for a long time so as to recoup their R&D investment. To begin with, SaaS products must be easy to try out and instantly deployed by customers’ developers, who act as a primary driving force behind signups.

Digital deployments nowadays are largely dominated by cloud computing, which is instrumental in enabling hassle-free technology adoption, aided by vast developer ecosystems. Scaling is paramount, too, as a business grows. As a result, developers are gaining more and more clout and it behooves SaaS providers to win their hearts and minds.

The next question is obvious: Just how do you engage with and win over developers for your software? I have tips and suggestions galore to offer, along with examples. Stay tuned for the other posts in this series.

Introducing the Cloudinary Integration With Salesforce Commerce Page Designer for B2C

$
0
0

Cloudinary's Page Designer Integration

Recent studies have shown that consumers are increasingly relying on online videos to shop around, learn about products, and make purchase decisions. Given that the online audience watches over 50% of videos on mobile devices, marketing through videos on e-commerce sites is a paramount strategy.

We are thrilled to introduce a new integration of Cloudinary’s capabilities into the Salesforce Commerce Cloud (SFCC) Page Designer for B2C, which launched in beta today at Connections. SFCC powers some of the largest e-commerce sites; its Page Designer enables marketers and designers to rapidly create and publish visually engaging content with no coding. Cloudinary’s superior platform for media management, optimization, and delivery is being adopted by thousands of customers, including some of the world’s biggest retail brands. With the Cloudinary-SFCC Page Designer integration, marketers can effortlessly add videos, beefing up visual storytelling in short order. In addition, by customizing the Cloudinary component (see the published code), developers can add management capabilities for rich media through Page Designer.

See all that in action in the demo below, which was part of SFCC’s early-access program. Not only are the videos optimized for fast loading on all devices and browsers, you stand to gain five significant benefits.

Ease of Use and Reuse of Evolving Videos

Even though e-commerce videos are typically produced only once, visual designs of websites and apps are dynamic and frequently being updated. Thanks to Cloudinary’s AI capability, the same video always works well in all layouts.

The example below shows how AI autocrops the same video to fit several layouts. In all cases, the most important part of the scene remains in focus.

“landscape”
“vertical”
“square”

Such versatility spells flexibility, freedom, and speed, with no back-and-forths between the publication and design teams.

Seamless Display on Mobile and Social Channels

Recall that over half of all videos are watched on mobile, a popular platform for social apps. Plus, notwithstanding that vertical videos are all the rage, most videos for website use are shot in landscape mode. Not to worry: Cloudinary AI automatically and intelligently crops videos to create vertical versions, ensuring a satisfactory delivery on mobile.

Superior Accessibility

Section 508 Accessibility Standards (or A11Y), a U.S. federal requirement, (is fast becoming a standard practice for websites and apps. Videos and images feature prominently in the checklist for rendering digital channels accessible. In addition, more and more consumers are watching videos muted with subtitles on.

To accommodate those requirements and trends, you can, with Cloudinary’s automated AI capability, transcribe and create subtitles for videos when uploading them to Cloudinary. To display subtitles, simply select a checkbox in the component’s user interface.

Accessibility

Smooth Maintenance of Brand Identity

Cloudinary automates the process of overlaying brands or logos to videos with no need for manual editing. See the video screenshot below for an example of a logo Cloudinary has added to the top left corner for a prominent display.

Brand Identity

Two major benefits:

  • Cloudinary “burns” logos into videos, making it harder for repurposing by unauthorized parties and hence protecting your digital assets.
  • You have complete control of the online experience to be delivered by using Cloudinary’s video player, but not with other platforms like YouTube.

At-Will Customization of Components

Again, by updating the published integration code, you can create or redesign video components to make even better use of Cloudinary’s exceptional capabilities for manipulating and optimizing rich media. How about developing an image that spotlights all of Cloudinary’s extensive image capabilities? Maybe add a coming-attraction kind of movie as a prelaunch feature for a video?

We are convinced that SFCC customers will relish the promising capabilities of Page Designer on Cloudinary. View our short demo and tell us about your experience with this integration. Not least, stay tuned for other advanced Cloudinary capabilities becoming available in the coming months.

Developers Succeed Through Learning

$
0
0

Developer Ecosystem

Part 1 of this series on developer relations elaborates on why, for your products or technologies to gain traction and succeed, you must win over the endorsement and support from the techies—software engineers, developers, and designers—at existing or prospective customers. Subsequently, everyone benefits and the world is a happy place. Before doing that, it helps to understand the ins and outs of the so-called developer ecosystem, that is, the mantra for developers, their learning paradigm, and their opportunities and challenges.

The Mantra for Developers

Developers’ success is directly related to their ability to learn, to dig deep, and to embrace innovation. They must be always on the lookout for richness: a richer user experience (UX), additional features, more advanced capabilities. Alas, such a pursuit sometimes generates complexities in workflow, system integration, dependencies, and the user interface, let alone the need for more human and infrastructure resources.

Concurrently, developers are naturally geared toward steering in the other direction: simplicity—streamlined architecture, elegant design, and the production of defect-free software—while leveraging effective tools to minimize consumption of resources. Striking a balance between richness and simplicity is essential for creating primary innovations that advance the software industry, which, in turn, handsomely rewards the creators. A case in point is the ultrapopular Linux OS Kernel and the Git distributed version-control system, both created by Linus Torvalds. For its part, Linux blossomed into “one of the most prominent examples of free and open-source software collaboration,” as stated in Wikipedia.

The Meaning of Knowledge

Developers, who ooze with potential to learn, place high value on people who can teach. And everyone in the developer community is naturally equipped to teach. Reality is, most developers learn and teach at the same time. They burn the midnight oil writing tutorials and technical articles or recording instructional videos and podcasts, which they publish online for free. Additionally, developers make considerable contributions to intellectual properties, creating ample free-for-use software, as evident from the numerous tools, frameworks, and extensions that are open source.

What do those developers gain, you ask? A lot. They engender admiration and accolades, which routinely translate into employment or freelance opportunities, sponsorships, and speaking engagements. Many a career advancement originates from a pro bono paper, project, and such. The more developers contribute, the more they learn, the more equity they acquire, and the more value they produce. In short, knowledge drives everything, including wealth.

Plus, software is never perfect when initially released. Invariably, developers learn from interacting with their community members, whose feedback, suggestions, contributions, and fixes are invaluable.

On the other hand, developers as a whole enjoy contributing to their community because networking, sharing, and recognition are gratifying. Given that software development is an artistic hobby, accredited profession, and competitive sport, developers are there for the team, in which novice and expert players abound. But then they are never cast in concrete: novice developers can advance quickly by learning best practices and by acquiring expertise from their more-skilled peers.

Developers’ Challenges Versus Opportunities

A developer’s life is a never-ending cycle, attributed to the fact that software never stagnates as new frameworks and architectures continuously emerge. Take a website, initially built on a proven software stack, only to be rebuilt through a new development cycle that ends up using another stack that’s more capable and productive—elegant on one hand and richer on the other. Then comes the rush to enrich and extend the architecture with plug-ins, tools, and packaged applications, which necessitates constant learning.

What does all that mean? Just as you conclude that giant enterprises like Microsoft and Google have mastered their domain and that no one can ever dethrone them, you’re in for a surprise. Innovations are always in the offing, Cloudinary in the rich-media sector being one such example. Those incumbent companies will likely stay on, but competitors will continue to emerge in and around the niches.

So, developers who are watching for opportunities usually end up unearthing new ideas and fly with them. Technologies not only foster innovation but also keep the ecosystem alive.

Summary

Ultimately, three things hold true for software development:

  • Software development is an eternal strife for excellence. As software developers continue to refine or build products with more power, improved capabilities, and reduced complexity, they also strive for enhancements in the products’ efficiency, effectiveness, and intuitiveness.
  • Excellence brings great rewards and job satisfaction. Brilliant products attract customers whose purchases bring wealth to the vendors. In this context, wealth means much more than financial rewards; it also refers to expertise and productivity.

    Furthermore, working for winners is a shot of adrenaline, inspiring one to charge forward energetically day after day and strive to perform better. With a sense of accomplishment being the mainstay of job satisfaction, companies that are populated by happy and motivated employees are often champions in their field.

  • Learning is the key cornerstone of developers’ success. A developer’s life is a relentless, never-ending, inevitably taxing, learning cycle; and the key to success is a passion for learning coupled with diligence and perseverance. After all, a better way always exists, waiting just around the corner, and everything under the sun can be improved.

Given all that, software vendors must not only build dynamite products, but also cater to the pertinent needs and wants of the developer audience that’s essential for successful adoption and dissemination of their product. Just bear in mind that you must do much more than caring for developers for the sake of your product being given a thumbs-up as a prerequisite to making a sale. Developers deserve first-rate attention and empathy—for their professional advancement, for their unrelenting pursuit of excellence, and for their uncanny dedication to innovation and resolution of tough problems.

And, by being there for developers, you score victories yourself.

In the next post, I’ll suggest ways of winning developers’ approval and championship with a focus on the tenets of advocating for them. Watch this space please.


Digital Asset Collaboration be DAM'd

$
0
0

Cloudinary Cross-Collaboration DAM Solution

If you are in a marketing or creative team at a large organization, you understand how complicated cross-team collaboration can be. Managing the entire workflow from creation until a developer delivers a new asset in your website or app (in its many variations for all devices, screen sizes, browsers, resolutions...) can be mind boggling.

You've got to coordinate with photographers, digital agencies, designers, managers, developers, campaign coordinators, marketers, reviewers, approvers, (and the list goes on)...

Another significant challenge in this dizzying process is the number of systems that are generally involved in the communication between these different groups. For example, you might have assets being stored and moved around on multiple personal computers or in a local network file system, one or more cloud storage systems, FTP systems for remote uploads, and sometimes, an internal DAM system. At the same time, you've got communication taking place via email, internal chat and meeting apps, as well as the DAM system itself, depending on which communication systems each stakeholder can access or uses regularly.

Digital asset collaboration in many organizations

And of-course in reality, the problem is exponentially worse when you multiply all of the above by hundreds of thousands of assets, which is typical for brands that use rich media in sophisticated ways to create engagement and conversions.

Cross-Organizational DAM Collaboration

The Cloudinary Digital Asset Management solution was designed over its API-based dynamic media management platform, enabling a highly flexible, highly scalable DAM solution that addresses digital media needs across large organizations in ways that legacy DAM systems were not built for.

We've recently added several cross-organization collaboration features to our DAM solution. These collaboration features help to streamline all those communications hassles mentioned above into a smooth process within a single system across all stakeholders, speeding the time-to-market, and easing the headaches involved in getting there. These features include:

This means one single-source-of truth: No more downloading and uploading of assets to different systems; No more attempts to compile and merge discussions about your assets from multiple communication sources; No more stakeholders out of the loop; No more dizzy spells (at least from this process…)

Permission-Based Folder Sharing

People were filing stuff in folders way before they got comfortable with computers, and it's still a natural way to organize and find things. In Cloudinary's Media Library, an asset's folder is an integral part of its identity. It's included in the delivery URL, assisting with SEO. And when it comes to sharing and permissions, folders also control who can do what with the assets it contains.

The first step in collaboration across a large organization is giving the relevant stakeholders access to what they need, but ONLY to what they need. When you have a single system that so many stakeholders are accessing for different purposes, products or campaigns, multi-level permission control is a central prerequisite for controlled collaboration.

For example, your company photographer needs to have upload and view permissions to relevant folders, but she shouldn't be able to make any other changes to the assets there. For various reviewers in the process, view and search permissions are sufficient. Your marketing and design teams should all be able to edit the assets for the products they work on, including renaming, adding tags or metadata. However, only one or a select few should control these permissions or have access to more risky options, such as the ability to delete assets or folders.

Cloudinary enables account administrators to define user groups and add Media Library users to them. Afterwards, folder owners can share their folders with relevant groups or individual Media Library users at the required levels.

Controlled collaboration through folder sharing

Check out our folder sharing video tutorial for an overview and see the folder sharing documentation for a detailed breakdown of these permissions, folder sharing best practices, and more.

Asset Collections

While assets are tightly tied to their parent folders, collections are a way to group assets dynamically. You can freely add and remove assets to one or multiple collections, enabling you to share a set of hand-picked related assets with specific users or groups, regardless of their storage (folder) location. This makes it easy to group and discuss all assets related to an upcoming campaign, a new web page, or a new product.

Collections are much like virtual folders in that you can use them for browsing and sharing, but much more flexible. The same asset can be included in multiple collections or moved from one to another, with no impact to the asset's ID or URL.

You can take advantage of Cloudinary's advanced search capabilities to find the assets you want to add to a collection. For example, you might search by tag, image resolution, video duration, predominant colors, and more to find potential assets that can fit a collection you are putting together.

Collections can also be shared at several different permission levels, and you can even generate a URL to give external agencies and stakeholders time-limited access to a copy of the assets from a collection.

Share Collection dialog box

The documentation has more information about the differences between folders and collections and about collection sharing and permissions.

Asset Commenting

So as you can see, Cloudinary offers great options for grouping and sharing assets with your stakeholders. Now it's time to dive in and start the feedback and approval process on individual work-in-progress assets.

That's where commenting comes in. Asset commenting in Cloudinary is intuitive. Just open the Asset Management page and start the discussion. Like in other communication platforms, the standard @user notation enables you to mention and notify the other stakeholders in your project to keep the conversation moving.

The big deal here is that all the stakeholders related to delivery of your asset can finally discuss together in one system, from the photographer who created it to the developer who ultimately needs to know that it's ready for inclusion in the code. This keeps everyone in the loop, leading to faster and more reliable decisions.

Asset commenting in desktop and mobile

Controlled Asset Publishing

When you're preparing the graphics for a major new campaign or the latest photos for a brand new design of your product, it may be essential to securely limit access of these media assets to specific people prior to the official release.

The fine-grained permissions available for folder and collection sharing help control who can view or modify assets within your Cloudinary account, but you also need to be sure that people outside the organization (or even within) won't be able to get ahold of the asset's URL to copy it or leak it publicly before it's ready.

That's why Cloudinary also enables you to set sensitive assets as restricted. Even if someone discovers the URL for a restricted asset, the URL won't work unless their device has a special authorization security token, which can be specific to that device, that asset, and also potentially time limited.

But the great thing is that even while the asset is set as restricted, your developers can already start working with the URL in their code (including testing it on a device with the necessary authentication token). You can even set restricted assets to automatically become public on a certain date (or between a certain date range), so that when the big day comes, your amazing new product or campaign shots will automatically be visible to the world with no modifications necessary in the developer code.

Access control settings Restricted asset

Learn more about applying access control to your Cloudinary assets.

Bringing it all together

Digital asset management is a team effort. When everyone involved is able to collaborate efficiently, there's no question that the whole is greater than the sum of the parts, but broken communication can just as easily become the weakest link.

Cloudinary's DAM and media management platform was designed from the ground-up to minimize the work required to optimize and deliver rich media assets at scale. The combination of folder and collection sharing permissions, secure access control, and convenient commenting on assets in a single system for all stakeholders, really does bring it (and everyone) all together.

Digital asset collaboration with Cloudinary

So in short, it really comes down to: Collaboration be damned or Collaboration be DAM'd.
The choice is yours.

Note
Many of Cloudinary's DAM capabilities, including the collaboration features described in this post require an account with multiple users (available on the Advanced plan and higher). Some of these features also require a special setup or are activated only upon request. Contact us for details.

A Unified Approach to Digital Asset Management, Across the Asset Lifecycle

$
0
0

Unified Approach to DAM

The explosion of rich media and the importance of that media to customer engagement is undeniable. Businesses that take advantage of this trend and try to solve some of the typical asset management pain points often end up using multiple point solutions. While these solutions might solve some problems in the short term, they ultimately lead to content and functional silos, inefficient workflows, and scale limitations.

If you look at digital asset management as a departmental fix or solution, it can turn into just another three-letter acronym adding to the digital frenzy.

Giving a DAM

There are more than a few jokes on why it is referred to as DAM, but that’s not how it’s supposed to be. The overwhelming nature of the entire digital ecosystem makes it critical to evaluate DAM, and every other solution, with the perspective of getting the most out of it. This requires:

  • Widespread adoption across the organization
  • Easy integration with other systems
  • Future-proofing with automation and scale

A True Single Source of Truth Across the Organization

Traditionally, DAM focused on certain functional needs, such as storing and re-purposing assets, without taking into consideration the entire asset lifecycle. And many were designed before today’s needs were even a reality. So, as many teams cobble together multiple systems for managing other aspects of the lifecycle, disconnects invariably occur and ad-hoc handoffs can lead to inconsistencies, confusion, and inefficiencies.

Assets typically flow through creative, marketing, and development teams before they are served to customers. So it is crucial to have a unified approach across all the teams and functions that interact with assets. With that in mind, DAM should be an organization-wide initiative, enabling these teams, to work faster, together across the lifecycle - from organizing and sharing assets to collaboration to dynamic manipulation [of work-in-progress assets] and publishing across every device and channel.

One Platform

DAM away, your way!

To drive successful adoption across the organization and meet the needs of various functions, Cloudinary offers flexible implementation options. Brands can choose to use Cloudinary through its interactive UI, custom widgets that can be embedded into other applications, or as a headless DAM.

To empower development and web teams that play a critical role in making sure that images, videos, and other rich media assets look good and load fast on every device and channel, Cloudinary goes well beyond just standard management. Developers can leverage the same platform via APIs to automatically deliver visual experiences that meet customer expectations, without slowing down the time to market or driving up the cost.

All the teams can work together on a single platform and orchestrate dynamic visual experiences that customers have come to expect.

Connect Your Entire Lifecycle

If you believe in stacks over suites, you need to ensure that all the best-of-breed solutions you put together to build a robust digital ecosystem can communicate with each other.

Putting images, videos, and other rich media assets at the core of visual storytelling, Cloudinary acts as the centerpiece, connecting your entire asset lifecycle, from creation all the way to consumption.

Cloudinary Connector

For example, just today we announced our new Cloudinary Creative Cloud Connector which will allow creative teams to move media assets freely between the DAM and Adobe platforms, and quickly and easily manipulate assets all while they remain within the single source of truth.

Extensible APIs and webhooks make it extremely simple to integrate with other upstream applications for project management and collaboration; and downstream applications such as your Web CMS, so you can access your library from within your system of choice, and distribute assets across the customer journey without friction.

Oh, by integrating with tools widely used by your team, you’ll see greater adoption!

Future-Proof Your Asset Management Needs

Automation

Automation is key to improving the efficiency of tedious, repetitive tasks that don’t scale well manually. Using AI for tagging assets based on their content is becoming a common practice. But the power of automation can extend beyond just tagging.

Cloudinary also enables automation of other tedious aspects, such as creating asset variants for every device and channel. Leveraging AI to automatically adapt images and videos -- resizing and cropping, selecting the best format and adjusting the compression quality -- makes the marketing team more autonomous and frees up critical resources to focus on their core responsibilities.

And, with the ever-changing technology landscape, moving faster on digital transformation initiatives requires effortless adoption of new technologies and evolving media trends. Cloudinary partners with image and video experts and associations along with industry experts such as AWS, Google, Akamai, and Fastly, to bring the most innovative technologies to users without any technical burden.

Scale

As your organization grows, your asset management pains grow in parallel. Being able to effortlessly scale rich media operations to support varying needs and global growth is critical.

Built on top of a dynamic media platform with a highly scalable architecture, the Cloudinary DAM enables you to get started in minutes and perform resource-intensive media operations, such as bulk migration, uploads, tagging, search, manipulations, and delivery without any technical limitations.

Cloudinary has been battle tested with tens of billions of media requests on a regular basis by media-intensive companies.

Summary

In a nutshell, a unified approach to digital asset management can enable your teams and empower your customers. Leverage a dynamic approach to digital asset management to unify disparate processes and functional groups, streamline asset workflows, and drive engagement.

Cloudinary is Money for Mediavine, Simplifying Video Management

$
0
0

Mediavine

Solution

Unsatisfied with the way ad networks were run, Mediavine saw an opportunity to break free from the burdens and constraints of legacy ad networks by creating its own ad management service. As the exclusive ad manager for more than 3,900 digital publishers, Mediavine relies on video for monetizing content. Having used Cloudinary for image management, Mediavine adopted Cloudinary’s video management solution to streamline developer workflow, optimize video performance and reduce bandwidth usage.

Results

  • Over 1 Petabyte of video served monthly
  • Bandwidth use cut by 50 percent
  • Publishers using video make 20 percent more than display ads alone

Company

Mediavine has been an internet publisher since 2004, owning and operating sites like The Hollywood Gossip, TV Fanatic, Movie Fanatic and Food Fanatic. In 2013, when Food Fanatic was launched and the company's relationship with bloggers began, Mediavine began its evolution from publisher to full service ad management. The company works with digital publishers, offering services that range from display ad optimization to video monetization to influencer marketing campaigns.

The Challenge: Managing Performance While Delivering High Quality Video

As a full-service ad management provider, Mediavine supports more than 3,900 publishers in the lifestyle space who are at the forefront of developing video content for their followers to watch. To help them monetize content, Mediavine manages advertising that appears before publishers’ content.

“Video is the fastest growing monetization channel for Mediavine. It’s mission critical for both our company and our publishers,” said Eric Hochberger, co-founder, CEO, and head of development at Mediavine. “We encourage our publishers to create unique content so we can offer exclusive ad experiences.”

But making sure all video – both the content uploaded by publishers and the pre-roll ads Mediavine delivers – worked as expected was a complex, time-consuming process behind the scenes. Mediavine initially used third-party video players, which required the company – not publishers – to upload and log each video to the third-party’s back-end system, then grab individual players for each video. This initial video player was integrated with a competing video ad server, which hindered Mediavine’s ability to build the business as it had hoped.

“Getting off that player was critical because, as a new ad management company, the ability to monetize videos was the most important business goal,” Hochberger noted.

The Cloudinary Solution: Removing Complexity from Upload to Delivery

Mediavine had been a long-time user of Cloudinary’s image management solutions, which enabled it to serve images at one-quarter of the size of the originals and easily support responsive design.

Mediavine’s The Hollywood Gossip site ranks #1 with Google based on page-load time. “Images are the bulk of the weight on the pages, and Cloudinary was instrumental in helping us reduce that load and achieve the #1 Google ranking,” Hochberger said.

As Mediavine was seeking solutions for its video challenges, it discovered that Cloudinary could help with that as well. “Cloudinary had already made it so much easier for us to manage images, so the second the company said they could do the same for video, I knew it was the obvious choice,” Hochberger noted.

“Cloudinary had already made it so much easier for us to manage images, so the second the company said they could do the same for video, I knew it was the obvious choice.” –Eric Hochberger, Co-founder, CEO, and Head of Development at Mediavine

Generating thumbnails was one of the frustrations Mediavine was having before the transition to Cloudinary. “Back then, that was one of the more challenging aspects, and with earlier partners, we’d end up having to take screenshots of the page to create a thumbnail,” he noted. “With Cloudinary, all we needed to do was present a thumbnail tag.”

Mediavine automated video uploads through the Cloudinary API, which has been integrated with the WordPress Mediavine plug-in used by their publishers. Publishers can simply click a button to add video to their posts, or grab an embed code from their Mediavine dashboard. Mediavine has created different streaming profiles and can automatically apply those to each video.

“Cloudinary is extremely powerful for how little time you need to put into developing with it. We can get on-the-fly image and video manipulation, all the way down to the content delivery network (CDN), streaming and serving this content by using one line of code,” Hochberger said. “This has sped up the entire development process.”

The Results: Speed, Savings and Improved Search Rankings

With Cloudinary, Hochberger estimates that Mediavine has saved hundreds of developer hours, particularly when considering the rollout of new codecs and the systems it has built. One example of this impact is the recent move to H.265 and VP9, Google’s video coding format. Using Cloudinary, Mediavine was able to introduce these two new codecs to regenerate more than 30,000 videos in only one day. “I’m not sure how we would have done that if we were transcoding videos on our own, much less in a single day. The power of Cloudinary and the amount of time it saved us was impressive,” he noted.

Mediavine developers aren’t the only ones benefiting from Cloudinary. Mediavine reports that publishers who run video in addition to display ads typically see earnings increase by 20 percent to 30 percent. In addition, optimized video content helps increase traffic to the publishers’ sites and their Google rankings.

“Adding video to my site has completely changed my website’s revenue potential and my page views,” said Courtney O’Dell, a Mediavine publisher of the website Sweet C’s. “In a crowded web niche, it can be hard to stand out in search results or make a splash in social media. But videos in posts have helped me rank higher in search terms and kept readers engaged and interested in my content. After adding videos with pre-roll ads to my site, I started making more money each month than the entire previous year. There is simply nothing better to attract and engage new readers and increase ad revenue than the addition of dynamic video content!”

Sweet C’s first incorporated video content in July 2016. Comparing July 2016-June 2017 to the same timespan in 2018, the site saw its video advertising revenue increase almost 1,200 percent. In the last months of 2018, video revenue continues to rise by an average of 20 percent per month. The site also saw traffic growth in these same time periods. From 2016 to 2018, the site has experienced a 95 percent increase in traffic overall, jumping from 4.5 million sessions in 2016 to 8.7 million in 2018.

Mediavine’s move to H.265 and VP9 also dropped the bandwidth usage of the videos by half. “Our publishers are always looking for higher quality video,” Hochberger added. “Cutting the bandwidth in half is great not only for our money savings, but for our users, since our videos are now half the size at the same quality.”

Announcing the OpenText TeamSite Cloudinary Connector from Klish Group

$
0
0

OpenText TeamSite to Cloudinary Connector

Tired of depending on other teams or software to create assets in multiple sizes for your responsive web site?

Does importing asset files into TeamSite slow down your web content publishing?

Klish Group is pleased to introduce the OpenTextTM TeamSite – Cloudinary connector. Customers of the OpenTextTM TeamSite web content management platform can now browse and select images in the same way they always have. But now, unlike current integrations to OpenText MediaBin or Media Manager, web content authors are not required to import files into TeamSite. Instead, authors can just browse and select the image they want to use and Cloudinary will automatically deliver it in the optimal format and quality to the customer requesting it.

Common Pain Points for Responsive Web sites managed in TeamSite:

  • Authors browse multiple times to select optimal images for each target viewport (Desktop, Tablet, Mobile are common)
  • Resizing and adjusting images requires Adobe Photoshop, third-party services or additional staffed resources
  • A copy of each viewport specific image is stored on both the content management and customer facing web servers
  • Customer Device and network connection detection for optimal delivery requires purchasing additional CDN services such as Akamai

Benefits of Integrating with Cloudinary:

  • Authors only need to browse and select the source image once, and Cloudinary handles the image resizing dynamically per each customer request.
  • Using Cloudinary’s artificial intelligence capabilities, images can be cropped and areas of interest are detected automatically without authors having to painstaking manipulate each image for each viewport.
    Bike Demo
  • Optimal customer experience as the least amount of bandwidth will be used to deliver the highest quality version, with no perceptually discernible degradation of quality, of the requested image based on the device, network connection speed and location.

Using Cloudinary within TeamSite:

  • Select Cloudinary assets from:
    • SitePublisher/Experience Studio component image datums
    • TinyMCE Rich Text fields
    • Forms Publisher/Data Capture Template fields
  • Dynamically pull in asset metadata (i.e. Alt Text) from Cloudinary to TeamSite on image selection

Hero Image

Media Library

Who is Klish Group?

Klish Group is a technology services and software company developing and delivering Content Management related solutions across a broad range of industries. Service offerings include strategy, platform architecture design, product installation, configuration, upgrade, migration, custom software development, application integration, user training and customer support. As an OpenText approved Services Partner, Klish Group has been recognized for their deep product expertise, ability to deliver complex integrations and many successful client implementations over the past sixteen years. For more information reach us at: info(at)klishgroup.com

Inject Your Own Image Processing by Using a Custom Function

$
0
0

Inject a custom function

Cloudinary offers a wide array of image manipulations and effects to apply to images as part of our image-processing pipeline, helping to ensure that your images fit the graphic design of your website or mobile application. Cloudinary is an open platform, and you can use our APIs, Widgets and UI to build the media management flow that matches your needs.

But despite the fact that our extensive and versatile range of transformations is continuously growing with new transformations added on a regular basis, the list is not complete by any means. There are just too many ways that an image could potentially be manipulated to be able to offer every possible transformation.

Cloudinary strives to provide a solution that is as complete as possible, catering to the needs of thousands of customers. That said, when catering for so many customers, having a plethora of needs, there can be instances where a customer needs a capability that is not yet supported. At Cloudinary we try to fill our customers needs, but may not always be able to implement new functionality in a timely manner, or there just may be no other demand for a customer's highly specialized requirements requiring some very specific code to implement.

To this end, Cloudinary now supports injecting custom functions into the image manipulation pipeline, allowing our customers to implement their own manipulations on their images. This new functionality takes our image processing capabilities to the next level, to be fully extensible and open - allowing you to add your own processing capabilities.

For example, if you wanted to limit a delivered image to the 3 most predominant colors in the image, you could add a custom function to make this happen.

quantized example

There are 3 ways to inject a function with the custom_function parameter (fn in URLs):

Use a WebAssembly Function

A WebAssembly function is a self-contained compiled WASM file that will run on Cloudinary's servers as part of the image transformation pipeline. The function is provided with a pointer to an RGBA interleaved pixel buffer together with a pointer to any metadata (context, tags and variables), and must return a pointer to an output buffer containing the image pixels (optionally including metadata as well).

The function cannot reference any outside URLs, so this case is most useful for adding new functionality (a new transformation) that needs to run quickly on our servers. This is the best way to use a special effect or add a new filter.

The WebAssembly function must be uploaded to your account as a raw authenticated asset, and then referenced in a custom function: use the custom_function parameter with the function_type set to "wasm" (fn_wasm in URLs), and the source parameter set to the public_id of your compiled WASM file.

For example, to deliver the 'rainbow' image after running the WebAssembly function located in a compiled WASM file uploaded to your account with the public_id of 'blur.wasm':

Ruby:
cl_image_tag("rainbow.jpg",
      :custom_function => {
        :function_type => "wasm", 
        :source => "blur.wasm"})
PHP:
cl_image_tag("rainbow.jpg", array(
      "custom_function" => array(
        "function_type" => "wasm", 
        "source" => "blur.wasm")))
Python:
CloudinaryImage("rainbow.jpg").image(
      custom_function = {
        "function_type" = "wasm", 
        "source" = "blur.wasm"})
Node.js:
cloudinary.image("rainbow.jpg", {
      custom_function:{
        function_type: "wasm", 
        source: "blur.wasm"}})
Java:
cloudinary.url().transformation(new Transformation()
      .customFunction(wasm("blur.wasm")))
      .imageTag("rainbow.jpg");
JS:
cloudinary.imageTag('rainbow.jpg', {
      customFunction: new cloudinary.CustomFunction()
        .functionType("wasm")
        .source("blur.wasm")}).toHtml();
jQuery:
$.cloudinary.image('rainbow.jpg', {
      customFunction: new cloudinary.CustomFunction()
        .functionType("wasm")
        .source("blur.wasm")})
React:
<Image publicId="rainbow.jpg">
      <Transformation customFunction={{
        functionType: "wasm",
        source: "blur.wasm"}} />
    </Image>
Angular:
<cl-image public-id="rainbow.jpg">
      <cl-transformation customFunction={
       functionType: "wasm",
        source: "blur.wasm"}>
      </cl-transformation>
    </cl-image>
.Net:
cloudinary.Api.UrlImgUp.Transform(new Transformation()
      .CustomFunction(CustomFunction.Wasm("blur.wasm")))
      .BuildImageTag("rainbow.jpg")
Android:
MediaManager.get().url().transformation(new Transformation()
      .customFunction(new CustomFunction()
        .functionType("wasm")
        .source("blur.wasm"))
      .generate("rainbow.jpg");
iOS:
imageView.cldSetImage(cloudinary.createUrl()
      .setTransformation(CLDTransformation()
        .setCustomFunction(CLDCustomFunction()
          .setFunctionType("wasm")
          .setSource("blur.wasm")))
      .generate("rainbow.jpg")!, cloudinary: cloudinary)

The code generates a URL similar to:

https://res.cloudinary.com/demo/image/upload/fn_wasm:blur.wasm/rainbow.jpg

Interactive Example

The following interactive example uses a custom function to add a 'quantize' effect to an image (just like the example in the introduction above), where the image is limited to a specific number of colors that is supplied as an additional variable parameter. This could be important for displaying images on devices that support a limited number of colors and for efficiently compressing certain kinds of images.

1  Select the number of colors:    

2  Pick a target photo, or upload your own:   
golf course target photo coffee target photo old man target photo custom target photo
3  Press the magic button!

Call a Remote Function

A remote function can pretty much do anything with the PNG image it is sent for processing, only limited by the programming language used and your imagination. Your remote function could access external databases for extracting information, add new layers and effects, or even incorporate remote calls to 3rd party APIs. This is a great way to incorporate any external functionality into the pipeline, in effect adding your own "add-on" to your toolbox of image transformations.

Remote functions are especially useful for new Cloudinary customers that may already be using 3rd party tools to accomplish some of their image transformations, whether it's something Cloudinary doesn't currently support, or just something that may give slightly different results with a Cloudinary transformation, for example, a 3rd party image enhancement service. You can host your own remote functions or just use a serverless computing vendor such as AWS Lambda or Google Cloud Functions to manage your custom function.

A remote custom function receives an input image in PNG format along with metadata (context, tags and variables), and must return an image in a format that Cloudinary supports (optionally including metadata as well). Use the custom_function parameter with the function_type set to "remote" (fn_remote in URLs), and the source parameter set to the URL of the custom function. As a security precaution, and to prevent unmoderated use of your remote function, the delivery URL also needs to be signed, which simply means adding the sign_url parameter set to "true" to the SDK method.

For example, to deliver the 'rainbow' image after running the remote function located at 'https://my.example.custom/function':

Ruby:
cl_image_tag("rainbow.jpg",
      :sign_url => true,
      :custom_function => {
        :function_type => "remote", 
        :source => "https://my.example.custom/function"})
PHP:
cl_image_tag("rainbow.jpg", array(
      "sign_url" => true,
      "custom_function" => array(
        "function_type" => "remote", 
        "source" => "https://my.example.custom/function")))
Python:
CloudinaryImage("rainbow.jpg").image(
      sign_url = True,
      custom_function = {
        "function_type" = "remote", 
        "source" = "https://my.example.custom/function"})
Node.js:
cloudinary.image("rainbow.jpg", {
      sign_url: true,
      custom_function:{
        function_type: "remote", 
        source: "https://my.example.custom/function"}})
Java:
cloudinary.url().transformation(new Transformation()
      .signed(true)
      .customFunction(remote("https://my.example.custom/function")))
      .imageTag("rainbow.jpg");
JS:
cloudinary.imageTag('rainbow.jpg', {
      signUrl: true,
      customFunction: new cloudinary.CustomFunction()
        .functionType("remote")
        .source("https://my.example.custom/function")}).toHtml();
jQuery:
$.cloudinary.image('rainbow.jpg', {
      signUrl: true,
      customFunction: new cloudinary.CustomFunction()
        .functionType("remote")
        .source("https://my.example.custom/function")})
React:
<Image publicId="rainbow.jpg" signUrl="true">
      <Transformation customFunction={{
        functionType: "remote",
        source: "https://my.example.custom/function"}} />
    </Image>
Angular:
<cl-image public-id="rainbow.jpg" sign-url="true">
      <cl-transformation customFunction={
       functionType: "remote",
       source: "https://my.example.custom/function"}>
      </cl-transformation>
    </cl-image>
.Net:
cloudinary.Api.UrlImgUp.Transform(new Transformation()
      .Signed(true)
      .CustomFunction(CustomFunction.Remote("https://my.example.custom/function")))
      .BuildImageTag("rainbow.jpg")
Android:
MediaManager.get().url().transformation(new Transformation()
      .signed(true)
      .customFunction(new CustomFunction()
        .functionType("remote")
        .source("https://my.example.custom/function"))
      .generate("rainbow.jpg");
iOS:
imageView.cldSetImage(cloudinary.createUrl()
      .setTransformation(CLDTransformation()
        .setCustomFunction(CLDCustomFunction()
          .setFunctionType("remote")
          .setSource("https://my.example.custom/function")))
      .generate("rainbow.jpg", signUrl: true)!, cloudinary: cloudinary)

The code generates a URL similar to:

https://res.cloudinary.com/demo/image/upload/s--21ba7cb4--/fn_remote:aHR0cHM6Ly9teS5leGFtcGxlLmN1c3RvbS9mdW5jdGlvbg==//rainbow.jpg

Preprocess an Image

The custom functions discussed so far are given an image for processing, either a pointer to an image bitmap for WASM functions, or a PNG image for remote functions. However, Cloudinary also allows you to insert a remote custom function earlier in the transformation chain, before any processing is done on the image at all. Whereas the remote function option described above is sent an image in PNG format, a preprocessing remote function is sent the original image file, as uploaded to Cloudinary. This may be necessary in two scenarios:

  1. The original image file is in a format that Cloudinary only supports for upload, but not for transformations without first converting to another format, for example the SVG format.
  2. Cloudinary only offers basic transformations for the given file format, for example the PDF format. If you want to extract or replace text within the file, rearrange or delete specific layers, or any other advanced editing option, you can integrate your preprocessing remote function with a 3rd party tool for this very purpose.

Use the custom_pre_function parameter (fn_pre in URLs) to call the custom function to preprocess, with the function_type set to "remote" (fn_pre:remote in URLs), and the source parameter set to the URL of the custom function.

For example, to deliver the 'logo' image after running the remote function located at 'https://my.preprocess.custom/function':

Ruby:
cl_image_tag("logo.jpg",
      :sign_url => true,
      :custom_pre_function => {
        :function_type => "remote", 
        :source => "https://my.example.custom/function"})
PHP:
cl_image_tag("logo.jpg", array(
      "sign_url" => true,
      "custom_pre_function" => array(
        "function_type" => "remote", 
        "source" => "https://my.example.custom/function")))
Python:
CloudinaryImage("logo.jpg").image(
      sign_url = True,
      custom_pre_function = {
        "function_type" = "remote", 
        "source" = "https://my.example.custom/function"})
Node.js:
cloudinary.image("logo.jpg", {
      sign_url: true,
      custom_pre_function:{
        function_type: "remote", 
        source: "https://my.example.custom/function"}})
Java:
cloudinary.url().transformation(new Transformation()
      .signed(true)
      .customPreFunction(remote("https://my.example.custom/function")))
      .imageTag("logo.jpg");
JS:
cloudinary.imageTag('logo.jpg', {
      signUrl: true,
      customPreFunction: new cloudinary.CustomFunction()
        .functionType("remote")
        .source("https://my.example.custom/function")}).toHtml();
jQuery:
$.cloudinary.image('logo.jpg', {
      signUrl: true,
      customPreFunction: new cloudinary.CustomFunction()
        .functionType("remote")
        .source("https://my.example.custom/function")})
React:
<Image publicId="logo.jpg" signUrl="true">
      <Transformation customPreFunction={{
        functionType: "remote",
        source: "https://my.example.custom/function"}} />
    </Image>
Angular:
<cl-image public-id="logo.jpg" sign-url="true">
      <cl-transformation customPreFunction={
       functionType: "remote",
       source: "https://my.example.custom/function"}>
      </cl-transformation>
    </cl-image>
.Net:
cloudinary.Api.UrlImgUp.Transform(new Transformation()
      .Signed(true)
      .CustomFunction(CustomPreFunction.Remote("https://my.example.custom/function")))
      .BuildImageTag("logo.jpg")
Android:
MediaManager.get().url().transformation(new Transformation()
      .signed(true)
      .customFunction(new CustomPreFunction()
        .functionType("remote")
        .source("https://my.example.custom/function"))
      .generate("logo.jpg");
iOS:
imageView.cldSetImage(cloudinary.createUrl()
      .setTransformation(CLDTransformation()
        .setCustomPreFunction(CLDCustomFunction()
          .setFunctionType("remote")
          .setSource("https://my.example.custom/function")))
      .generate("logo.jpg", signUrl: true)!, cloudinary: cloudinary)

The code generates a URL similar to:

https://res.cloudinary.com/demo/image/upload/s--511a3ca4--/fn_pre:remote:aHR0cHM6Ly9teS5leGFtcGxlLmN1c3RvbS9mdW5jdGlvbg==//logo.jpg

A Preprocessing Example

The following example uses variables together with a preprocessing remote function in order to render a text string within an SVG file. The variables set the colors for the text (fillc) and the font stroke (strokec), as well as the text itself (msgstr). Note that the uploaded SVG file has been prepared to include variables, each of them specified with triple hash marks before and after the variable name (e.g., ###fillc###). The custom preprocessing remote function searches for these variables and replaces them with the given values.

Exhibit 1 - The SVG file uploaded to Cloudinary including the variable definitions:

<svg viewBox="0 0 1000 300"
  xmlns="http://www.w3.org/2000/svg"
  xmlns:xlink="http://www.w3.org/1999/xlink">
  <defs>
    <path id="MyPath"
      d="M 100 200
      C 200 100 300   0 400 100
      C 500 200 600 300 700 200
      C 800 100 900 100 900 100" />
  </defs>
  <text x="10" y="100" font-size="40" fill="###fillc###" stroke="###strokec###">
    <textPath xlink:href="#MyPath">
       ###msgstr###
    </textPath>
  </text>
</svg>

Exhibit 2 - The SDK code for generating the image tag:

Ruby:
cl_image_tag("msg_tmp.svg",
      :sign_url => true,
      :variables => [
        ["$fillc", "!yellow!"],
        ["$strokec", "!black!"],
        ["$msgstr", "!The quick brown fox jumps over the lazy dog!"]],
      :custom_pre_function => {
        :function_type => "remote", 
        :source => "https://urmai0up1j.execute-api.us-east-1.amazonaws.com/test"})
PHP:
cl_image_tag("msg_tmp.svg", array(
      "sign_url" => true,
      "variables" => array(
        ("$fillc", "!yellow!"),
        ("$strokec", "!black!"),
        ("$msgstr", "!The quick brown fox jumps over the lazy dog!")),
      "custom_pre_function" => array(
        "function_type" => "remote", 
        "source" => "https://urmai0up1j.execute-api.us-east-1.amazonaws.com/test")))
Python:
CloudinaryImage("msg_tmp.svg").image(
      sign_url = True,
      variables = {
        "$fillc", "!yellow!",
        "$strokec", "!black!",
        "$msgstr", "!The quick brown fox jumps over the lazy dog!"},
      custom_pre_function = {
        "function_type" = "remote", 
        "source" = "https://urmai0up1j.execute-api.us-east-1.amazonaws.com/test"})
Node.js:
cloudinary.image("msg_tmp.svg", {
      sign_url: true,
      variables => [
        ["$fillc", "!yellow!"],
        ["$strokec", "!black!"],
        ["$msgstr", "!The quick brown fox jumps over the lazy dog!"]],
      custom_pre_function:{
        function_type: "remote", 
        source: "https://urmai0up1j.execute-api.us-east-1.amazonaws.com/test"}})
Java:
cloudinary.url().transformation(new Transformation()
      .signed(true)
      .variables(
        variable("$fillc", "!yellow!"),
        variable("$strokec", "!black!"),
        variable("$msgstr", "!The quick brown fox jumps over the lazy dog!")),
      .customPreFunction(
        remote("https://urmai0up1j.execute-api.us-east-1.amazonaws.com/test")))
      .imageTag("msg_tmp.svg");
JS:
cloudinary.imageTag('msg_tmp.svg', {
      signUrl: true,
      variables: [
        ["$fillc", "!yellow!"],
        ["$strokec", "!black!"],
        ["$msgstr", "!The quick brown fox jumps over the lazy dog!"]],
      customPreFunction: new cloudinary.CustomFunction()
        .functionType("remote")
        .source("https://urmai0up1j.execute-api.us-east-1.amazonaws.com/test")}).toHtml();
jQuery:
$.cloudinary.image('msg_tmp.svg', {
      signUrl: true,
      variables: [
        ["$fillc", "!yellow!"],
        ["$strokec", "!black!"],
        ["$msgstr", "!The quick brown fox jumps over the lazy dog!"]],
      customPreFunction: new cloudinary.CustomFunction()
        .functionType("remote")
        .source("https://urmai0up1j.execute-api.us-east-1.amazonaws.com/test")})

Exhibit 3 - The code generates a URL similar to:

http://res.cloudinary.com/demo/image/upload/s--kkSWOzr4--/$fillc_!yellow!,$strokec_!black!,$msgstr_!The quick brown fox jumps over the lazy dog!,fn_pre:remote:aHR0cHM6Ly91cm1haTB1cDFqLmV4ZWN1dGUtYXBpLnVzLWVhc3QtMS5hbWF6b25hd3MuY29tL3Rlc3Q=/msg_tmp.svg

Exhibit 4 - The resulting image:

Fully Extensible Image Processing

Cloudinary strives to enhance our core features as best we can, prioritizing features that will benefit many customers, and to be as responsive as possible to customer requests. As extensive as our open platform functionality may be, we may not currently support a specific functionality, and so custom functions give our customers the flexibility to incorporate their own functionality in the image-processing pipeline. It also makes it relatively simple to incorporate other 3rd party functionality. Make sure to read up on all the details about custom functions in the documentation, and note that custom functions are available with no extra charge for all Cloudinary's plans, including the free plan.

Viewing all 601 articles
Browse latest View live