So, your boss comes to you in a panic: he's just heard about Google's Core Web Vitals initiative and needs you to optimize the company website right now! "No problem," you say, hiding your fear that it's not something that can be done overnight. Just taking the first metric, Largest Contentful Paint (LCP), how can you possibly identify all the large elements - most likely images or video posters - of the many hundreds of pages that make up your site? There are already thousands of high-resolution (read massive) media files stored away, which marketing could use any time. How are you going to make sure they're all compressed to a size small enough to be delivered within the threshold? Not to mention all the new images and videos that will be created over time...
It's time for you to learn about Cloudinary's newest product offering: Media Optimizer.
It Only Takes a MOment
Media Optimizer (or MO as it's affectionately called within Cloudinary) automates the format selection and quality settings of all your rich media so that your websites and apps become visually engaging and load fast.
It really does take only a moment to set up MO. You don't have to migrate your media anywhere; you don't have to touch your originals; you might not even need to update your website at all and, even if you do, it'll take no more than a simple search-and-replace across your source files.
Here's Your MOtivation
Core Web Vitals are definitely a major motivating factor for optimizing the media on your website. You don't want your site to slide down Google's rankings simply because you're delivering unnecessarily oversized images. That's not the only consideration, though. Delivering the right file size to your end-users, no matter which device they are on, saves them bandwidth, reduces page-load times, and leads to higher consumer satisfaction and conversions. After all, the bottom line is the bottom line.
"E-businesses must keep in mind the difference between file storage and file delivery, always prioritizing efficient delivery of images." - Harry Roberts
If you haven't already seen it, check out Satarupa Chatterjee's blog post for more details on the importance of optimizing media delivery and the ways that Media Optimizer can address those requirements.
And Here's the MOde of Operation
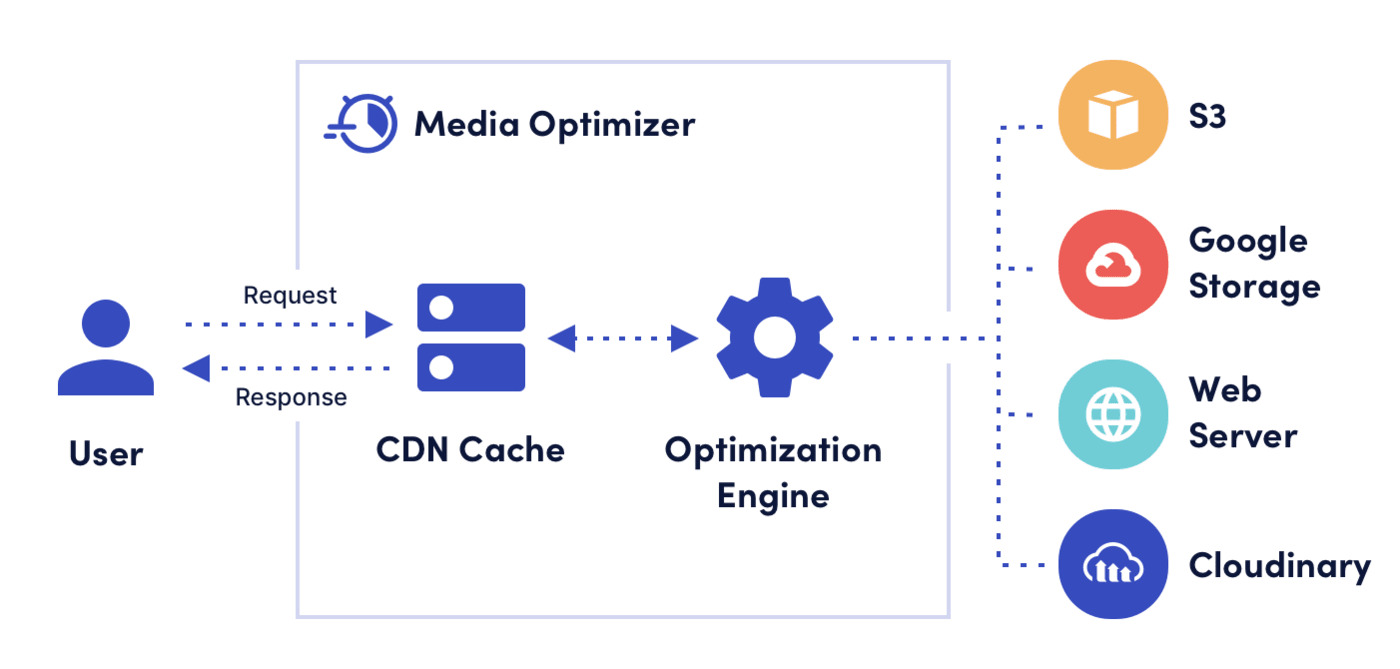
So, how does Media Optimizer work? It takes your media from wherever you store it and creates an optimized version of it, which it then delivers to your end-users through fast multi-CDN.

The first time an image or video is requested, it's not yet cached on any CDN, so Media Optimizer fetches the media from the source you configure - be that an S3 bucket, a Google Storage bucket, a web server, or even another Cloudinary account. Media Optimizer then performs on-the-fly transformations on the media files to optimize their dimensions, quality, format and encoding - whatever you've configured - before caching them on the best CDN for the requesting user, and delivering it to them.
Subsequent requests only need to go as far as the closest CDN cache, where your optimized media is ready and waiting.
Go Through the MOtions of Setup
Media Optimizer's Getting Started Guide describes how to set up Media Optimizer for your site. Here are the basic steps:
- Create an account: Sign up for a Cloudinary account if you don't already have one. If you do, you can create a dedicated sub-account for Media Optimizer.
- Request a Media Optimizer cloud: Contact Cloudinary Support to convert your account or sub-account to a Media Optimizer cloud.
- Create a media source - Log into your new Media Optimizer account, and specify where your media is stored and how to access it.
![Creating a media source Creating a media source]()
- Test your setup - Verify that you can request your media through your new Media Optimizer domain,
https://<cloud_name>.mo.cloudinary.net, where<cloud_name>is the name you gave to your Media Optimizer cloud on signup.If an image URL in your site is currently
https://www.mydomain.com/rest/of/the/path/myimage.jpg, and your cloud name ismycloud, you would update it to use this URL instead:https://mycloud.mo.cloudinary.net/rest/of/the/path/myimage.jpg.
If you want to continue using your own domain name to access your media, you need not change the URLs on your site. Just ask Cloudinary Support to configure the DNS routing and then specify your domain name in your delivery profile.
What's a delivery profile? Well, the basic MO setup automatically adopts the default delivery profile, which is why it's not mentioned in the steps above. In a nutshell, a delivery profile identifies a set of media assets by their delivery URLs, and defines how they are delivered based on the optimization transformations that you specify.

So, the default delivery profile identifies every request to https://<cloud_name>.mo.cloudinary.net and fetches files from the media source that you defined, applying the default automatic format and quality optimizations.
You can set up multiple delivery profiles with different path prefixes to treat certain types of media differently. For example, the delivery profile URL https://mycloud.mo.cloudinary.net/images could specify optimization transformations for images, whereas https://mycloud.mo.cloudinary.net/videos could specify a different set of optimization transformations for videos.
You can also configure multiple media sources for a delivery profile. Thus, even though the basic setup for Media Optimizer can't be simpler, MO is also very flexible and can cater to complex requirements.
And There's MOre...
Another component of Media Optimizer is the mapping function, whose default is in the default delivery profile. The mapping function contains JavaScript code that enables Media Optimizer to analyze URLs, determine the path to the media, and identify any existing optimization parameters to map to transformations. The parameters could be from your existing delivery platforms or even classic Cloudinary (also known as Programmable Media).
You can opt for one of Cloudinary's predefined mapping functions, or create your own. Cloudinary Support would be happy to help you out. Our goal is for you to have to make the least changes to the existing URLs on your site.
Make the MOst of Cloudinary's Capabilities
Besides an easy setup, what else sets Cloudinary's Media Optimizer apart from other optimization solutions out there?
Automatic quality: Cloudinary is a leading force in image and video processing. Whereas most other optimization platforms use an accross-the-board compression quality of 80 as the standard, Cloudinary's intelligent quality and encoding algorithms analyze each image or video to arrive at the best quality-compression level and optimal encoding settings based on the media content and requesting browser.
Automatic format: Similarly, Cloudinary determines the best file format to deliver media based on each user's browser, and reformats the source files on the fly so you need to supply only one format. And Cloudinary leads the way when it comes to file formats. For example, if a browser supports it, Cloudinary delivers an AVIF, which is one of the newest formats out there, offering more byte savings than other formats, such as JPEG and WebP.
Automatic cropping: When cropping images to a particular width and height, Cloudinary automatically decides which part to keep based on what Cloudinary's deep learning algorithms determine to be the most important part of the image.
MOnitoring Improvements
The Media Optimizer console's dashboard and reports help you monitor your media assets by providing insights on their performance.
For example, with the interactive media optimization chart, you can experiment with different format and quality settings to see how your 100 most requested images would behave in terms of bytes saved and image fidelity (perceived similarity to the original), and then compare those findings with how those images behave according to your current Media Optimizer configuration.
The chart also highlights media assets in your site that are unnecessarily large, such as hero images, which directly affect your LCP score.

Have a play! You might find that a hybrid configuration works best for your site, whereby you can have a delivery profile for certain media that do not need to be of optimal quality, and another delivery profile for media that must be of superb appeal.
ReMOte Updates
Media Optimizer also comes with its own API. Though you might never need to leverage it, the capability is in place if you ever want to automate configurations or produce your own reports. It also gives you control over your cache so that you can:
- Warm up your cache: If you have a transformation that might take a while to be applied to large media assets on the fly and you want them ready pre-generated before the first request, you can send the relevant delivery URLs to the warm_up endpoint. You'll be notified when the derived media is ready in the cache.
- Invalidate your cache: If you update a source file or change a named transformation, you must clear the cache to deliver the correct media. For that, use the invalidate_all_derived_resources endpoint.
You're AlMOst There...
You now have an understanding of Media Optimizer: how quick it is to set up, how it can help make your site load lightning fast with full control over quality and how you can measure your media's performance.
Our docs contain many comprehensive details, so be sure to have a look. Also remember: our fabulous Support Team is always on hand for questions.
Once you've implemented Media Optimizer for your boss, be sure to ask him for that proMOtion!
